Yashica TLR VS Rollei TLR
perhaps this is the comparison between the most famous (or expensive) TLR and the most economical TLR. Or a comparison between TLRs made in Germany and Japan.
BTW, both are my fav. like them much better than the other few brands.
the below article is a shared opinion by “The Frugal Photographer”
The first post-war Japanese TLRs in general were not up to Rollei standards in any way. Some were junk. The Yashima company’s TLR factory produced the Pigeonflex/Yashimaflex/Yashicaflex line, decent but unexceptional goods, from about 1951 until the company transformed itself in 1955 by purchasing the Nicca company, at which time it renamed itself Yashica. They subsequently produced some very high quality TLR cameras, from 1957 until about 1984.
Between about 1957 and the early 1980’s, I would cheerfully rate the Yashica TLRs as better than the Rollei products with which they were meant to compete — the Rolleicords, and the Tessar and Xenar equipped f3.5 Rolleiflexes. The better, later, much more expensive Rolleiflexes are on a different plane. I don’t count the Yashica A, which was an entry-level, basic camera that didn’t pretend to compete with Rollei products.
The Yashica film wind mechanisms are not always as silky-smooth, but often they are, and even the worst are plenty smooth enough. They are robust enough for me, although the Rollei film wind gearing is stronger. The Yashica viewfinder screens incorporate fresnels and are substantially brighter and easier to use, and their lenses are of equal quality for all practical purposes (but not identical — Xenars have more “snap” to my eyes and Yashinons seem more subtle. Not everyone would agree).
The shutters are functionally equivalent, although I consider the Yashica’s Copal better designed than the Rollei’s Compur. The Copal has three speed range controllers, the Compur two, which has the practical consequence that the Copal will switch to 1/500 without effort, and you can switch to 1/500 when the shutter is cocked. Switching a Compur to 1/500 is remarkably difficult, and if you do so while the shutter is cocked you can ruin it. The Copal should stay more accurate longer — in theory.
The brighter viewscreen makes the Yashicas easier for me to handle, and earns them the “better than” rating. I would feel differently if it was 1960 and I was a busy pro who might easily wear out the Yashica film wind, or needed the Rolleiflex’s fast film reloading. But this is the 21st century, and neither I nor anyone reading this is likely to put film through a TLR by the mile, and none of us are using a TLR to shoot weddings. I’m nearsighted, and for me, moving from the comparable Rollei products to a Yashica-Mat at more or less the same price is definitely an upgrade.
The 124-G is usually overpriced and a Rolleicord or older Rolleiflex in good condition may be a better financial deal, e.g. $125 for a Rolleicord or decent Rollei Automat vs $200+ for a 124-G. In that case, don’t even think about the Yashica. Squint and bear it. Use the money you save to buy film.
Late 124-G’s (post-1980 approximately) sometimes had rough film winding mechanisms that fail prematurely. I have been told of late 124-G’s with no-name “Yashica” lenses instead of the high-quality Yashinon. However I have never seen one of these, and earlier specimens do not have these failings. The rough film-wind problems with the last of the 124-Gs are not widely acknowledged. I have been unable to pinpoint the region in the serial number range which marks the onset of problem cameras. In fact, I have no idea what the Yashica TLR serial number range is.
Non-124-G Yashicas are undervalued. The best of them is undoubtedly the plain-vanilla Yashica-Mat, a Rolleiflex clone without the film-thickness sensor, unmetered and usually available in excellent condition for much less money than a comparable Rollei TLR. It was manufactured continuously from 1957 to 1968 with the last models having f2.8 viewing lenses. Do not confuse the tough, attractive Yashica-Mat with the very early, flimsier Yashica-Flex.
There are selenium-celled versions of the Yashica-Mat, the Mat LM with LV readouts, and the Mat EM with direct f-stop/shutter speed readouts. Their selenium cells may work fine, but are now too old to be guaranteed reliable, and these metered models are worth owning, but not worth spending extra money for.
The Yashica-Mat 124 (just plain 124, non-G), an attractive, high-quality, CdS-metering machine, is equally as good. It will meter accurately if operated with a hearing-aid battery of the correct size. It was “improved” to make the 124-G, but the improvements are essentially trivial. The meter contacts of the G are gold plated. The G film chamber has improved anti-flare baffles. Nice, but not necessary.
If what you have is a ‘Mat, LM, EM, C, D, 635, 12, 24, 124, or 124-G, then use it. Don’t worry about trading “up” to a Rolleicord or f3.5 Tessar or Xenar Rolleiflex. You have nothing practical to gain, and the spiritual frisson some enthusiasts get from fondling Rollei gear doesn’t impress me. Knob wind film advance is just fine, not as sexy or as fast as lever wind and it doesn’t automatically cock the shutter, but it’s perfectly useful (and it lets you double-expose, if you’re into that).
If you have a YashicaFlex, or a Yashica A or E, then you should definitely trade up. You can do a lot better. The A is the one with that little red film number window on the back; the wretched E is a clone of the equally wretched Rolleimagic. Sell it on eBay, skip lunch for a week, and you’ll have enough to buy a Yashica D, Yashica-Mat, or Rolleicord.
If you have a Yashica B, Yashica Rookie, Pigeonflex, or a Yashimaflex, keep it — they’re decent if unexceptional performers — or sell it to a collector. They’re quite rare.
There is danger in generalizing about a line of cameras from handling one or two specimens. Here are my credentials:
My sample size in the years since about 1965 is probably on the order of a dozen Rollei and about 35 Yashica TLR cameras, of which I still own two Rolleis and 22 Yashicas (I’m collecting variations). I once regularly used a Rolleiflex Automat with Xenar (and an oddly attractive serial number, 107,0001), Rolleicord Va and Vb with Xenar, and various Yashica cameras with Yashikor and Yashinon lenses. I own but don’t use Yashica models A, B, and C, happily use my D, never shoot the screwball E, sometimes use the 635, 12, 24, 124, and 124-G, but prefer my late Yashica-Mat with f2.8 viewing lens.
I have owned, and tried to use, bad examples of Rollei products as well as bad examples of Yashica products. In my experience, neither marque has any monopoly on reliability except for the Rollei’s stronger film wind mechanism.
It needs to be said that the Minolta Autocord and Ricoh Diacord cameras are also fully the equal of the Rolleicord and f3.5 Xenar/Tessar Rolleiflexes, if not better, though they are less plentiful and not always less expensive. Abandoning one for a comparable Rollei would not be a step up. My sample size with these is three Autocords and two Diacords. They focus using lever mechanisms instead of knobs, which I could easily learn to prefer. The Diacord’s side-mounted focus levers in particular make it a lovely, wonderful to handle camera that makes the Rolleis and Yashicas seem awkward.
Prop Blur: Yashicaflex
Prop Blur: Yashicaflex.
TLR names can be confusing… e.g. yashica and yashicaflex
In the above post, Prop blur talks about a yashicaflex – from purchasing, cleaning, shooting to results. Pretty awesome negative produced given the condition of this yashicaflex.
here is the photo of this yashicaflex

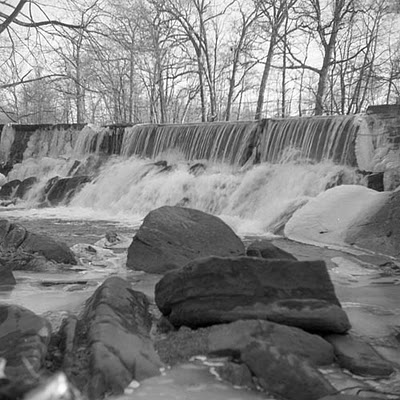
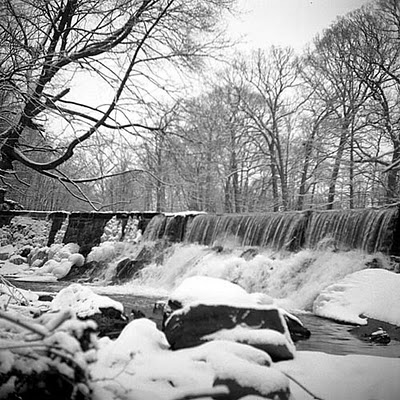
Personally I like these two images produced from this yashicaflex:
Classic cameras: Yashica 635
“My name is RaúlM. and I’m a cameraholic”.
This is a very cool self-introduction!
Raulm is a photographer and camera collector. The post above shows a fabulous Yashica 635. Yashica 635 TLR is a unique TLR. With the 35mm adaptor kit, it can shoots both 135 and 120 films, of coz, not the same time.
See PauIM’s post on how to load film on this piece of beauty.
Yashica 635
 |
| Yashica 635 in black leather case |
I have already told you in a older post, “A camera for the case”, about how and why I bought this camera.
Now I intend to make a light review of it.
This camera is able to use 120 roll film or 135 cartridge film.
That’s why it has a profusion of controls, dedicated to the advance of one or the other kind of film.
In order to use the 135 cartridge film there is a dedicated adapter kit.
 |
| The 35mm adapter kit |
If we are using 120 roll film we use the right side of the camera to control it’s advance.
 |
| Right side |
The knob on the top left controls the advance of the 120 roll film.
The film is loaded and advanced until the start mark is aligned with the arrows in the film path, back closed, turn clockwise the knob until it stops and you see the number 1 in that small window, top right.
To advance to the next exposure you have to press the button in the centre of the knob to release it and once again turn it CW until it stops. Repeat that all the way to the 12th exposure.
The scale around the knob is a ASA/DIN reminder.
The other knob is the focus control, being the above scale for depth of field control.
 |
| Left side |
On the left side we have another set of controls, most dedicated to the advance of the 135 cartridge film. Although the big knob, top right, where we can read “35mm only” and the one with the red arrow, on the bottom, are used to secure the 120 roll film also.
The drill is the same, on this side to control de advance of the 135 cartridge film.
The film is loaded using the adapter after the back is closed we have to press the 35mm stop/release button, that isolated silver button, and wind CCW the “35mm film only” knob.
We have to repeat this operation three times to advance the exposed film, during loading, after that we have to turn the exposure counter, the scale around the knob, in the arrow direction and align the 1 with the index dot.
After that all we have to do is, after every exposure, press the 35mm film stop/release and advance to the next frame.
The small knob with the engraved red R is pulled out and turned, to release the sprocket axle and allow the rewinding of the film, performed turning the bottom knob in the arrow direction.
 |
| Loaded with 120 film |
The 120 film loading is quite simple, as I explained above, like in most TLR cameras of this kind.
Using 35mm is a little more tricky but it isn’t rocket science.

To secure the 35mm cartridge, first we have to screw the spacer ring, left, then insert the cartridge with the spool stud adapter in the other end.
In the above picture I have already installed the film frame also.

In the above picture I’ve inserted the film leader in the 35mm take-up spool.

After make sure that the sprocket holes are engaged in the sprocket teeth it’s time to set the pressure plate and close the camera.
Advance three exposures, reset the counter and we have a film to burn.
I have to confess that, although I’ve taken several 120 films with it, I’ve not yet tried it with this kit.
 |
| Yashica 635 and cased 35mm adapter kit |
 |
| 35mm mask for sports finder on display |
In the previous post about this camera, I told you that when I bought it the 35mm mask for the sports finder was missing. I didn’t have the leather case either.
I found a kit missing the spacer ring and the spool stud adapter, at a flea market, paid four Euro for it, and completed my kit.
I can’t say this is the most simple or intuitive camera but it’s not a challenge also. It’s a bit awkward but I like very much all kind of waist level finder cameras.
This one has the advantage of a big brilliant viewfinder and the ability of using 35mm film, that taking advantage of the 80mm Yashinon lens must be very good for portraits. When I try it that way I’ll come back to it.
With 120 film it is a perfectly capable shooter as you can see in the following shots.
 |
| “TLR Man” by RaúlM. |
 |
| “Back in the tunnel” by RaúlM. |
