Classic cameras: Yashica 635
“My name is RaúlM. and I’m a cameraholic”.
This is a very cool self-introduction!
Raulm is a photographer and camera collector. The post above shows a fabulous Yashica 635. Yashica 635 TLR is a unique TLR. With the 35mm adaptor kit, it can shoots both 135 and 120 films, of coz, not the same time.
See PauIM’s post on how to load film on this piece of beauty.
Yashica 635
 |
| Yashica 635 in black leather case |
I have already told you in a older post, “A camera for the case”, about how and why I bought this camera.
Now I intend to make a light review of it.
This camera is able to use 120 roll film or 135 cartridge film.
That’s why it has a profusion of controls, dedicated to the advance of one or the other kind of film.
In order to use the 135 cartridge film there is a dedicated adapter kit.
 |
| The 35mm adapter kit |
If we are using 120 roll film we use the right side of the camera to control it’s advance.
 |
| Right side |
The knob on the top left controls the advance of the 120 roll film.
The film is loaded and advanced until the start mark is aligned with the arrows in the film path, back closed, turn clockwise the knob until it stops and you see the number 1 in that small window, top right.
To advance to the next exposure you have to press the button in the centre of the knob to release it and once again turn it CW until it stops. Repeat that all the way to the 12th exposure.
The scale around the knob is a ASA/DIN reminder.
The other knob is the focus control, being the above scale for depth of field control.
 |
| Left side |
On the left side we have another set of controls, most dedicated to the advance of the 135 cartridge film. Although the big knob, top right, where we can read “35mm only” and the one with the red arrow, on the bottom, are used to secure the 120 roll film also.
The drill is the same, on this side to control de advance of the 135 cartridge film.
The film is loaded using the adapter after the back is closed we have to press the 35mm stop/release button, that isolated silver button, and wind CCW the “35mm film only” knob.
We have to repeat this operation three times to advance the exposed film, during loading, after that we have to turn the exposure counter, the scale around the knob, in the arrow direction and align the 1 with the index dot.
After that all we have to do is, after every exposure, press the 35mm film stop/release and advance to the next frame.
The small knob with the engraved red R is pulled out and turned, to release the sprocket axle and allow the rewinding of the film, performed turning the bottom knob in the arrow direction.
 |
| Loaded with 120 film |
The 120 film loading is quite simple, as I explained above, like in most TLR cameras of this kind.
Using 35mm is a little more tricky but it isn’t rocket science.

To secure the 35mm cartridge, first we have to screw the spacer ring, left, then insert the cartridge with the spool stud adapter in the other end.
In the above picture I have already installed the film frame also.

In the above picture I’ve inserted the film leader in the 35mm take-up spool.

After make sure that the sprocket holes are engaged in the sprocket teeth it’s time to set the pressure plate and close the camera.
Advance three exposures, reset the counter and we have a film to burn.
I have to confess that, although I’ve taken several 120 films with it, I’ve not yet tried it with this kit.
 |
| Yashica 635 and cased 35mm adapter kit |
 |
| 35mm mask for sports finder on display |
In the previous post about this camera, I told you that when I bought it the 35mm mask for the sports finder was missing. I didn’t have the leather case either.
I found a kit missing the spacer ring and the spool stud adapter, at a flea market, paid four Euro for it, and completed my kit.
I can’t say this is the most simple or intuitive camera but it’s not a challenge also. It’s a bit awkward but I like very much all kind of waist level finder cameras.
This one has the advantage of a big brilliant viewfinder and the ability of using 35mm film, that taking advantage of the 80mm Yashinon lens must be very good for portraits. When I try it that way I’ll come back to it.
With 120 film it is a perfectly capable shooter as you can see in the following shots.
 |
| “TLR Man” by RaúlM. |
 |
| “Back in the tunnel” by RaúlM. |
Minolta Autocord CDS Restoration/ Repair
Below is a google translation of a japanese camera restoration website
Source: http://endoscopy.jp/moto/camera/camera_repair/minolta_cds/
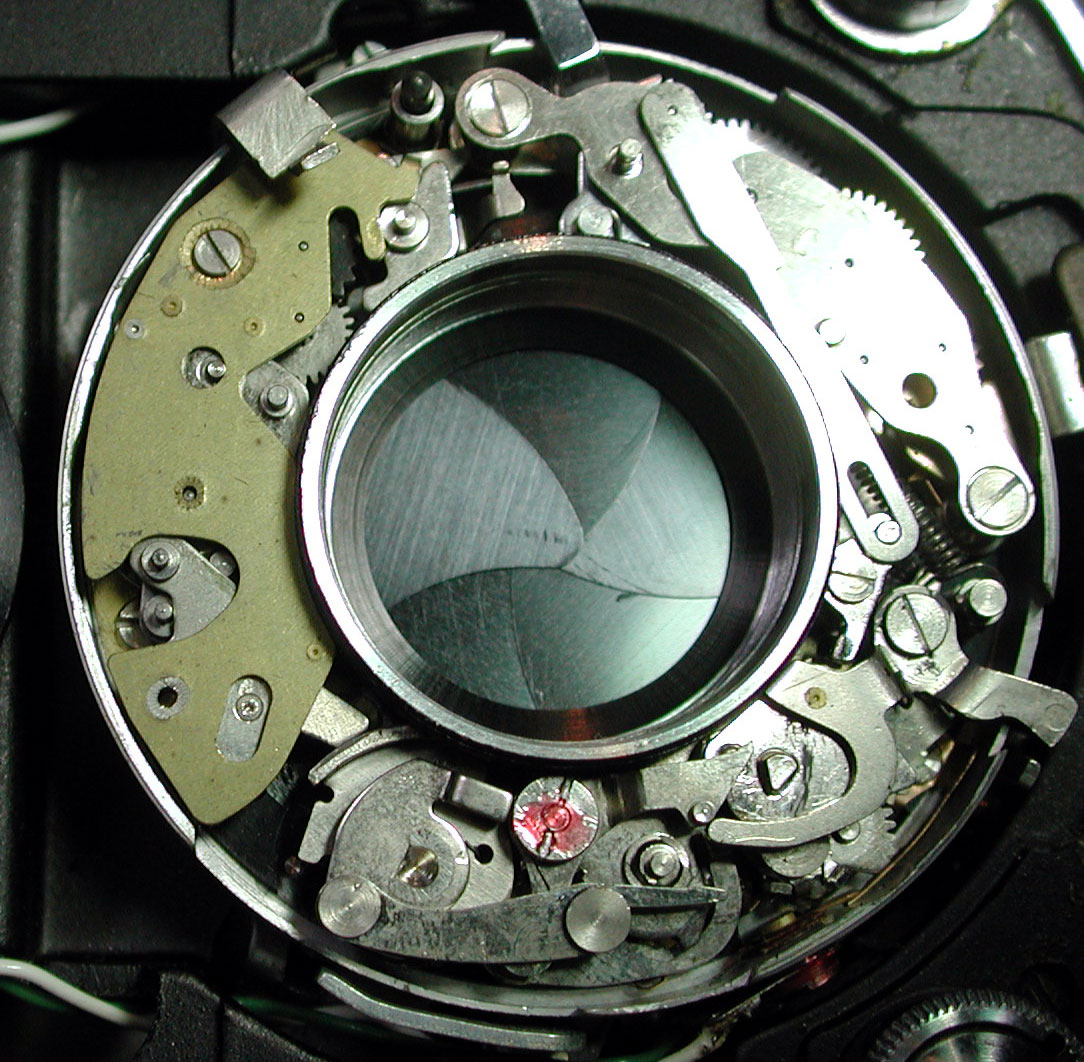
I think Autocord CDS Model I released in 1965. The shutter is Citizen MVL, 1-1/500.

First machine with a built-in exposure meter Cds. In order to decompose the aperture began to wee on. |
|

Structure is almost the same as the old code auto. |
|

Must be removed so that it will screw (knob switching of flash and the flash bulb) parts of the arrow. |
|

Citizen MVL shutter. Minolta A3 is the same as the shutter. Was a small amount of lubrication in particular there was no problem. Enlarged view of the shutter ishere . Aperture clung around oil. Close call in the state of the aperture pin would fly a little more. Back on safe ground and washed with benzene |
|

Remove the swing look funny because of the exposure meter. Aperture and shutter does not work at all in a very simple exposure meter. |
|

A simple exposure meter individual Cds, two pieces of resistance. Are waving at right angles to the optical axis on the mirror. Improved somewhat with the cleaning of the contacts. Cds is so deteriorated that much. At a later date, will be replaced with new. Enlargement is here |
