Weston Master II restoration/ repair
Weston Master IIMany of my old classic cameras lack a built-in light meter. When I shoot film in these cameras I use a meter that was in wide use back when these cameras were made. That meter is the old standby Weston Master II. This meter uses a seleium cell and has two ranges. The door on the back pops open for low light and is closed in bright light. All in all the meter works very well. The readings it gives are consistent with the meter on my Nikon FE2. Best of all, this meter only cost me $10. Using the meter is very simple. To start, you have to set the emulsion speed. Press the button at the bottom of the meter and then push the little tab that sticks out from underneath the main dial until the speed setting you want is visible in the little window. If you can’t see the window, turn the main dial until you see it.
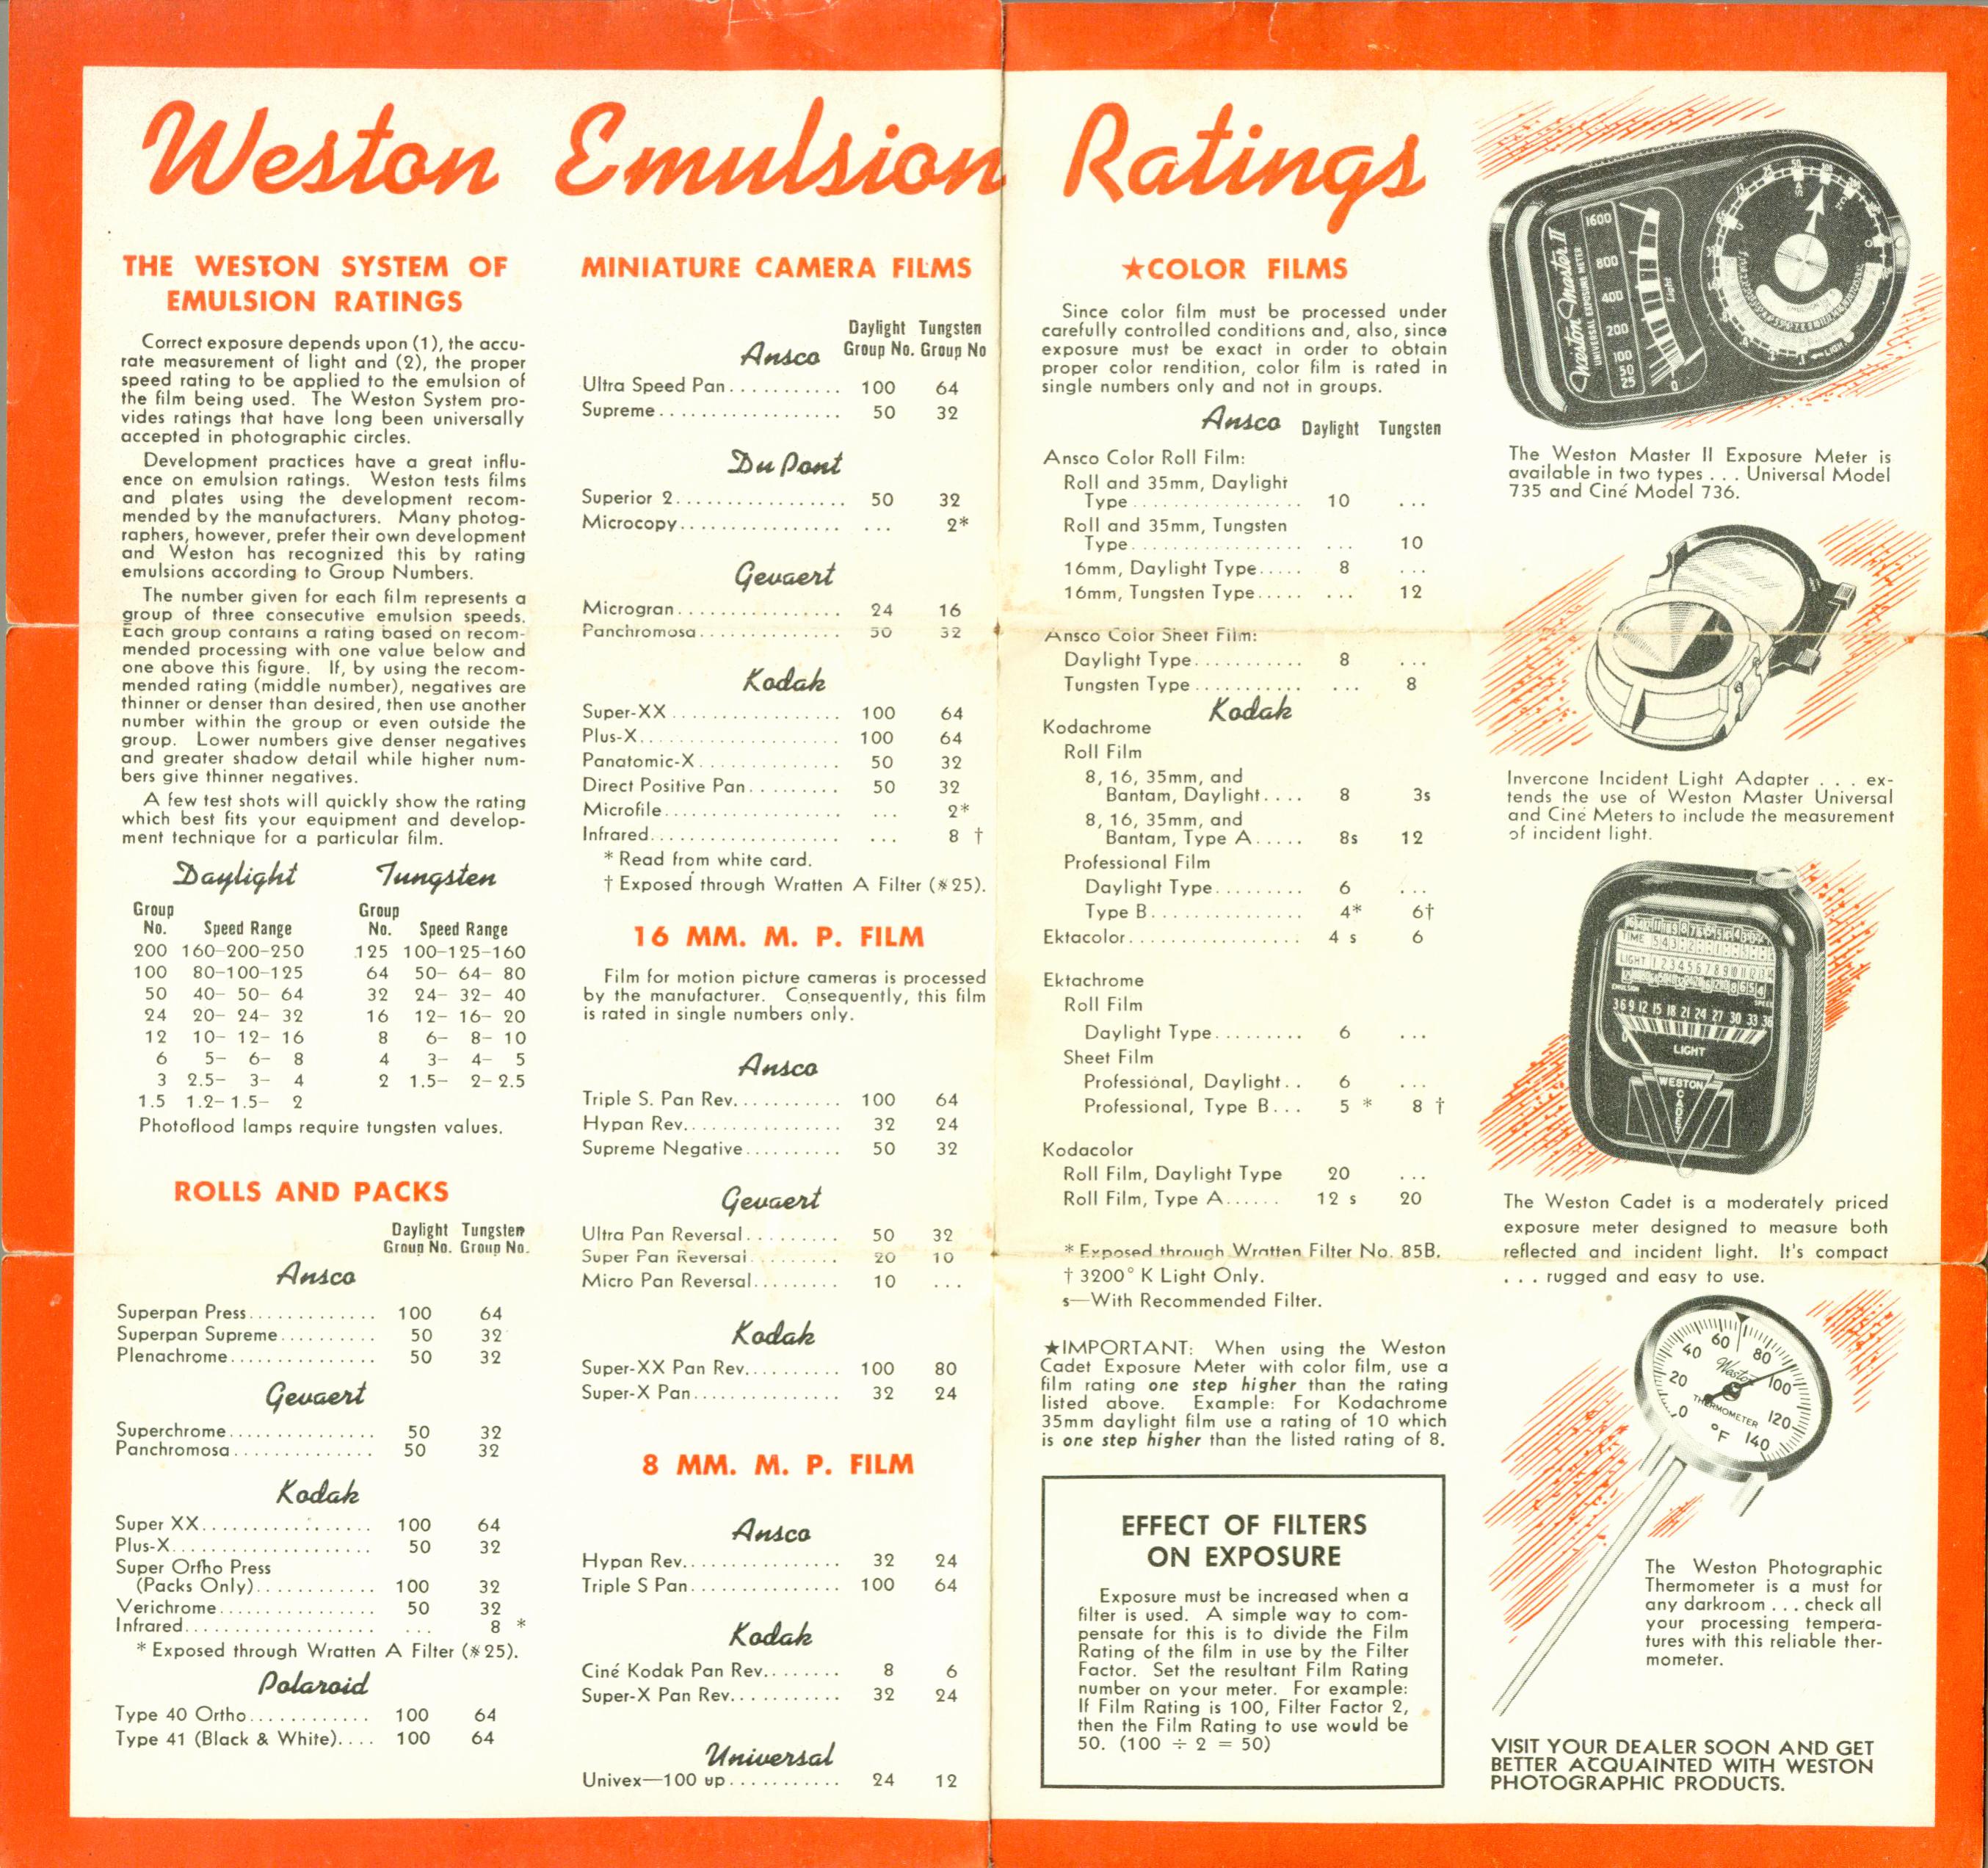
To get a light reading, hold the meter in front of you parallel to the ground and read the number the needle points to. Rotate the main dial until the arrow on the dial points at the number and then read the shutter and aperture settings from the dial. That’s it. As with any light meter, remember that the reflectivity of the surface you are reading will affect the readings. On any meter, light colored surfaces will tend to give a setting that produces underexposure. One thing you have to adjust to when using these old meters is the changes in film emulsion ratings over the years. Emulsion ratings were not standard at the time the meter was made and most meter manufacturers came up with their own system and then published charts for the popular films. I have uploaded a 300dpi scan of the chart Weston published for this meter. The changes in emulsion ratings presents a problem if you want to use one of these meters. You need to know what the settings are for modern ASA/ISO speed ratings. The following image is a scan of a chart I found in the back of a Minolta A camera manual. It shows equivalent values for Weston, ASA and DIN. Note, however, that the equivalent for ASA 100 is DIN 22 on this chart. Today, ASA 100 is DIN 21.
Unfortunately, I dropped the meter one day and the needle jammed. I either had to start using it as a paper weight and get another meter, or try to fix it. As it turned out, the fix to the meter was very simple. The impact had dislodged the coil from its bearings and slightly bent the springs on the needle. All I had to do was pop the coil back in place and then gently bend the spring so that the needle return position was back at zero. The Weston Master III is supposedly nearly the same as the model II. According to Romney’s text, the III has a piece of foil on the back that covers the screws instead of the screwed on plate. You have to poke holes in the foil back to get to the screws.
|
 I’ve found that a setting of 64 on my meter produces good results with TMax 100 film. A setting of 80 works also, but seems to produce slight underexposeure. The best thing to do is to just shoot a roll of test shots using different settings and then use the setting that gives the best negative.
 |
Start by removing the two screws that hold the name plate on the back. Lift of the plate.
The large screw in the center is an adjustment screw and doesn’t come out. |
 |
With the nameplate out of the way, you can see the two screws holding the back in place. Unfortunately, these screws have some type of “star” head on them. I didn’t have a tool to fit them, so I pushed against the edge with a small screwdriver until I got the screws started. Then, I used tweezers to remove the screws. Before reinstalling the screws I used a screw slot file to make a slot in the head.
With the screws removed, slide a knife blade along the bottom of the back cover and lift it up. Note that the chrome strip is attached to the back cover. You need to lift from the bottom then tilt the back up slightly. There are two studs at the top that hold the back cover in place. |
 |
With the back off, you can see the meter movement. The two brass screws hold the front cover in place. Remove these two screws. |
 |
There is a third screw at the top that needs to be removed
Also remove the door over the light cell. You can see here the two studs that fit into holes in the top cover. These studs can fall out, so watch for them. |
 |
With the screws removed, the front cover will lift off. There is a spring at the bottom underneath the cover that pushes against the release button on the bottom. This button has to be pressed to change the film speed setting. Be careful that the spring doesn’t fall down into the meter.
With the front cover off you can see the problem clearly. The coil should be centered on the magnet but is sitting off-center. I gently put the spindle back in the bearings and the needle begain to swing freely again. However, the needle wouldn’t return to it’s zero position. After a little head-scratching, I realized that the coiled springs in between the coil and magnet had been slightly distorted. Pushing these gently back a bit solved the problem. This is as far as I needed to go in fixing the meter. It looks as if you remove the two large screws on the front and the screw holding the copper connector and the entire meter will then lift out.
Source: http://pheugo.com/cameras/index.php?page=westonmtr
Manual free download: |
Weston Master Light Meter List
| Start Date
In US Unless otherwise stated |
Model No | Description |
| ??? | E703 | Lightometer – for general light intensity measurement rather than photography. |
| 614 | An “Illumination Meter” patented 1928 | |
| ? | Photo electric cine meter advertised in Jan 1932 in “American Photographer” | |
| 756 | Foot-candle meter used for Movie work including “Gone With The Wind” in 1939 | |
| 1932 | 617 | Universal – the original twin cell meter. |
| 1933 | 627 (Type 1) | Exposure meter for motion picture cameras. All 627s in the form of a jewellers loupe. Black metal cover, black plastic and chrome body. No dial |
| 627 (Type 1) | Cine Version | |
| 627 (Type 1) | Leicameter Version. | |
| 1934 | 617 Type 2 | Very much smaller, single cell version of the 617 |
| 627 Type 2 | Cine Type II exposure meter (could be 1933?) | |
| 627 Type 2 | Universal – smaller than 617 and with 1 cell | |
| 627 Type 2 | Universal Cine | |
| 627 Type 2 | Leicameter | |
| 1935 | 628 | Studio in oak carrying case with 617 style cell. Green marble models as well as black. |
| 650 | Universal. Small and big pointer models. Film speeds on early small pointer models only to 64 others to 250 Weston. May have been a model 632 round shape. | |
| 1937 | 819 | Cine – exactly like a 650 numbered out of series due to direct reading capability as on all future cine models. As with all future cine models, reads in half stops except 617 1/3 stops |
| 603 | An illumination meter often used for professional movie work | |
| 650 | Filmo Cine – (in round design may be 632) | |
| 1938 | 650 | Leicameter |
| 850 | Direct Reading Junior Cine | |
| 850 | Direct Reading Styled like 650 only smaller | |
| 628 Type 2 | Studio in oak carrying case with 650 style cell | |
| 1939/51(UK) | 715 / S74 | Master Universal – first of the master series. |
| 1939/41 | 715 | Leicameter |
| 715 | Bolex Meter Cine | |
| 720 | Master Cine | |
| 1945 | 735/S141 | Master II Universal. Made in grey as well as black all-metal case. Not made in UK as S141 till 1952 |
| 1946 | 736 | Master II Cine In grey and black |
| 1949 | 852 | Cadet Direct Reading. First with ASA speeds. Built in double invercones on back |
| 1953 | L III | Sekonic Master made under licence from Weston. Similar to Master II |
| ? | L-V | Sekonic Master made under licence from Weston. Similar to Master III |
| 1954 | 853 | Direct Reading |
| 1956 | 854 | Direct Reading – Green case large top dial and smaller under body (T shape) |
| 614 | Incident meter for movies in large case (From Popular Photography Directory) | |
| 737/S141.3 | Master III Universal – first with ASA speeds. Cast aluminium case. S141.3 in UK | |
| 1957 | S217.3 | Master III Cine Last Weston cine model UK Made only. |
| 1960 | 745 | Master IV Pointer lock aluminium and black case. Made UK Only. |
| ?? | L104 | Sekonic Master made under licence in Japan. Identical to Master IV except the name. Weston also sold a Sekonic made Weston IV branded version in some European countries |
| 1963 | 748 | Master V Universal. Pointer lock aluminium and grey case. Not made in the US. |
| 1966 | 348 | Ranger 9 Aluminium and black plastic case. US only not sold in UK |
| 1968 | 548 | Pixie with round case |
| 1972 | 540 | XM-1 Made in Japan by Sekonic |
| 550 | XM-2 Made in Japan by Sekonic, a cds model | |
| 560 | Master VI Made in Japan by Sekonic until 1974. | |
| 1973 | S461.6 | Europa (Euromaster in UK) Made only in UK only till 1980. Very similar to Master V Aluminium and grey plastic case. |
| Final USA Production | ||
| 1974 | Final Japan Production | |
| 1980 | Sangamo Weston (UK) stop production. manufacturing restarted by East Kilbride Instruments | |
| 1984 | East Kilbride Instruments liquidated, manufacturing restarted by Megatron in London. | |
| 1985 | Euromaster II made by Megatron in UK. | |
| 2010 Feb | Megatron stops trading. Weston meters are no longer manuactured. An era ends. | |
| NOTE:All Weston models were made in black plastic except where noted. S models were made in UK and possibly some in Hong Kong by Sangamo Weston. Other models made in US in Newark. | ||
via Chronology.
History of the TLR camera
 Reporter (Image) It’s called “Double Camera”. Really, two cameras are put in one. |
The Root of TLR camera
It is said that the root of TLR camera is such a two-store-house camera as shown in the left figure. |
 Cloud Camera (Image) This is so-called the prototype of TLR camera. |
Cloud Camera
Around 1880, a staff of the meteorological observatory near London came up with the idea to build the mirror inside the camera to take a picture of cloud. That was when the camera employed the mirror in it for the first time. |
 Twin-Lens Graphics (Image) Sophisticated body associated with Graflex! |
TLR camera in America
Around 1840, Daguerreotype had started to be manufactured in New York. Then, as the large-size TLR camera appeared in Europe, it was exported to America little by little, and around 1900, manufacturing was started there, too. |
