All about lens fungus
nce a month, we bring you a tipster from Lomography.com. Their ever-growing database of film knowledge offers tricks, tips and techniques that often outside the realm of mainstream photography.
Fungus can slowly take over and destroy your precious lenses and film. If you are still not aware of this problem that could be growing on your gear, get acquainted with this guide which explains, among other things, what fungus is, what it does to your equipment, and how you can prevent it.
What is this dreaded fungus?
If you buy new equipment and take good care of it, you may not encounter fungus. But if you own any vintage cameras or old lenses, this could be a problem and you may not even know it!
When you think of fungus, you may think of mushrooms, yeast, alcohol fermentation, traditional Chinese medicine or even fungal skin infections (ack!), but mould can be deadly for camera equipment and film.
Fungus is a tiny organism that can grow on film and lens surfaces, inside lenses, between the elements, and under lens coatings. It sets down its “roots” very quickly and multiplies even faster. It is very hard to remove fungus completely once it has taken hold, so it’s best to start prevention before it appears.
How exactly is it bad for my equipment and film?
As it grows on glass, it can permanently etch the surface, causing your photos to become “soft”, less contrasty, have more flare, or slightly darker. On film, once it sets in, the same thing happens. As it has “set roots” in, even if you wipe it away, there are still marks remaining. The effects of fungus may take years to become visible on photos though.
How does fungus get on my lenses and film?
High humidity is the main cause, so if you live in the tropics, or often go shooting in the rain, beware! Fungus is among the most abundant organisms in the world, and it mostly multiplies by teeny spores, which are everywhere. They can find their way into lenses because they are so small. Moisture (from rain, or the high humidity) then helps it grow at super speed.
How do I spot it and what does it look like?
Take out your lens, open it to the widest aperture (biggest hole), and hold it up to bright light. You can also use a torch light and shine it on the lens. Look through the lens. If you see something that looks like dust, but more spidery and in blobs or clumps, you’re in trouble.
Here are a few examples:

Image from photo.net
The image above shows it in early blob stage. It’s past the part where it could be mistaken for dust, as it’s clumping together and multiplying.

Image from clubsnap
This image above is how it looks when it has taken over the whole lens surface, which is bad news.

Image from pentaxforums
On rare occasions, it could look like bacteria. As shown in the example above, fungus usually starts from the edge of the lens and grows inwards.

The example above is how it could look like on film, which is in blobs as well. The fungus was spidery too, but that can’t be seen here.
How do I prevent its growth?
There is no definite way of keeping fungus out given its tiny and effective spores. I have had lenses kept in dry conditions yet they magically grew fungus. However, there are some good ways to lower its chances of taking hold. Fungus thrives in humid (and dark) places, so the best way would be to suck its life-giving moisture out. So take your lenses and film out of your drawers and boxes right now!
Some ways to keep humidity low:
- Silica gel
- Dry cabinet
- Dehumidifier

Image from madeinchina.com
Silica gel is not really a gel. It is most commonly sold in the form of tiny beads (above), and is useful for controlling humidity. If you buy stuff and see packets saying “do not eat”, it most likely contains silica gel beads. Please, do not eat it. To use it, buy a dry box (sealed or airtight case) first – then pour the beads in and keep your equipment or film in the box. The beads will change colour when they absorb moisture.
Keep an eye on them and when they show water saturation, you should either buy a new pack of beads or heat them up until they return to their original colour (meaning they are highly absorbant again). Some people have stir-fried the beads in a pan, baked them in an oven, or even microwaved it. Just don’t reuse that pan or baking tray for food! You could also try sunning them for reuse.

The dry cabinet is probably the best option as it gives you more control over the humidity. It comes with an analogue dial or tells you digitally (above) what level the humidity is, and you can also choose your humidity level. Camera equipment is best stored at 35-45% humidity.
About humidity: Don’t keep levels too low as cameras and lenses are lightly lubricated and low humidity could dry up that oil quickly, making your lenses zoom slower than normal, for example.
Otherwise, the dehumidifier also sucks out moisture, but this would have to be an enclosed room. Aircon is also an option, because cold air holds less moisture, but it consumes lots of electricity and is expensive.
Another way to fight fungus growth would be to use your equipment regularly. Keeping it for too long in a dry cabinet won’t help as cameras should get some fresh air from time to time. Cameras used daily are much less likely to get fungus (but more dust) than those which are kept even in less humid conditions.
How do I get rid of fungus?
Once it has grown on the lens or film, it will likely return even after being removed. Thus it is best to follow the prevention methods above. However, if your lenses have caught the fungi bug, you can either clean it yourself, or send it for professional cleaning.
Self-cleaning is more possible when the fungus is on the exterior of the lens. Use hydrogen peroxide, bleach or rubbing alcohol to wipe the glass surface gently, which will likely kill as well as remove the fungus. Lens cleaning paper, like this one below, is best as it is lintless and soft, making it less likely to scratch your lens.

Professional cleaning is the best, and sometimes only, option, when the fungus has grown inside the lens. These specialists will give it a thorough cleaning for a certain price. In Singapore, it costs about $80-100 to get a lens cleaned at a camera shop. If the fungus has etched the glass surface, the lens may need to be polished and require a new coating as well.
Alternative methods (which have both worked and failed for people)
Some have tried sunning their lenses by leaving it in the open, or putting their fungus-infected equipment under UV lamps. This has worked for some, and also boosted fungus growth for some, so please be wary if trying it.
For film, some have recommended putting it in the freezer and then wiping off the fungus gently when there is condensation. I have tried this and it worked but temporarily only as the fungus came back.
It won’t go away…
However, as mentioned earlier, please note that fungus can make a dreaded return, even if you store it in a dry cabinet after cleaning. Certain items are just more prone to fungus. I kept all my lenses in one dry cabinet in the past, and two showed signs of fungus (they were moved to a separate dry cabinet) while the rest were, and still are, fine. This has been the case for many other photographers as well. In the case that fungus starts growing on your lens again, please keep it separately from the rest of your equipment.
To sum it up!
Use your equipment as much as possible. After each use, let it air dry then store it in a low-humidity environment. The same goes for film – keep it in a dry cabinet if possible, or years down the road your memories could be etched with fungus.
Please leave any comments if you have any other suggestions on how to keep fungus at bay or how to remove it!
Source: http://photo.tutsplus.com/articles/hardware/all-about-the-dreaded-fungus-lomography-tipster/
Review on Camera Repair and Restoration Books
Revised Basic Training in Camera Repair (Photocopy)
by Edward H. Romney
 If I could only keep one repair manual, this is the one I’d keep. As King Solomon said, “With all your getting, get understanding.” This is the difference between Romney and Tomosy. Tomosy explains “a camera”, Romney explains “all cameras”, unknowing step by step versus theory. Still Tomosy’s books are more professionally done and much better illustrated. If these two men could get together they’d make one Hell of a book! The scope of “Basic Training” encompasses nearly the whole of Tomosy’s first four books. Romney calls his approach the “system method” because he goes into the component mechanisms that comprise all cameras.
So much for comparing, on to describing this book. In the introduction Romney begins teaching. He mentions troubleshooting hints at the outset, how to tell a well used camera from one that has been on a shelf, which cameras to look for and which to look out for, etc. In Section 1 (chapter 1?) the required tools are listed as well as makeshift tools that can be made. In Section 2 he jumps right into how to take a camera apart, getting your feet wet fast! Section 3 leaf shutters and the differences between designs, Compur, Seikosha, Prontor, etc. Section 4, focal plane shutters: Exakta-like pin and hole, cloth curtain, Copal Square, etc. Section 5 goes into adjusting shutters while Section 6 is adjusting focus systems. Section 7 & 8 describes wind mechanisms of 35mm and roll film. Section 9 does meters, both built-in and hand held. Section 10 looks at SLR’s as a whole. Section 11 describes lubrication. Section 12 talks about rangefinder and viewfinder cameras. Section 13 is devoted to TLR’s while Section 14 is on Large Format. Sections 15, 16 and 17 lightly touches on electronic cameras. (My experience agrees with Romney when he says service manuals are necessary when troubleshooting electronic cameras.) Section 18, synch and strobe. Section 19, lenses and diaphragms. Section 20 and 21 goes into bellows and wood frame cameras.
This book is short on pictures, its biggest failing. The quality of the pictures and diagrams is its second biggest. The inserted, folded plate pictures (supposedly meant to pin to the wall?) are clumsy to use and probably will get lost and separated from the book.
Getting back to comparing Romney and Tomosy books, buy Tomosy if you only plan on working on one or two cameras that happen to be covered in his books. Buy Romney if you want to understand how to work on many different cameras. Or be like me and buy all of them so you can gripe a bunch about both authors and their methods!
Fundamental Techniques (Camera Maintenance & Repair, Book 1)
by Thomas Tomosy, Michael McBroom
 If one is a complete novice at camera repair (or tinkering as I prefer to call it), this is the book to read. Not because it is the best but rather because it is the simplest. Most would be tinkerers quit after the first camera either because they only intend on fixing their beloved old camera the local shop will no longer touch or because their first effort ended up in a baggie. So simple here is good.
Section 1 (of 3) starts out with a description of the tools and materials required, then chapters 3 & 4 moves into common sense precautions and Do’s and Don’ts. In chapter five the study of theory begins as Tomosy gives excellent flowcharts of operating sequences of the various types of cameras: Rangefinder, SLR, etc. Chapters 6, 7 & 8 is spent on cleaning. If you are still awake after these three, chapters 9 & 10 describe some common problems and their solutions…finally. Chapter 11 & 12 present basic troubleshooting. One of my favorite chapters was number 13 where there is descriptions of simple test equipment one can make. Chapter 14 goes into the tinkerers biggest nightmare, finding parts.
Section 2, things finally start to get interesting as he uses representative cameras to show some basic design layouts. Mechanical SLR, Electronic SLR, P&S’s, mechanical rangefinders, etc. These are well worth studying then coming back to often in the first few weeks of screw turning. I cannot praise this section enough but can complain that it isn’t thorough or complete enough. Tomosy explains the sample cameras well and “nearly” has enough pictures..
Section 3 is similar to Section 2 only many more cameras and very little information on each, kind of an anorexic Section 2.
The Appendix’s give ok reference data. Nothing to brag about. Read them if the cleaning chapters didn’t do you in.
All in all, Book 1 is a good book but too short for such a huge subject.
Advanced Techniques (Camera Maintenance & Repair, Book 2)
by Thomas Tomosy
 One would have hoped that Book 2 would have gone deeper into camera design/manufacturing theory so a well grounded understanding of camera functions could have been gleaned, and the aspiring technician (tinkerer) made able to diagnose any camera. No such luck. Instead Book 2 is an expansion of Book 1. Even still in the same three section format. Imagine Book 2 as a stack of updated insert pages that would have been stuck into Book 1 had it been loose leaf.
I’m not saying Book 2 is bad, just that it doesn’t build on Book 1. It only expands it, like a Russian novel, more pages …. Not much new to learn, just more examples. Still the expanded list of cameras makes for a good reference. I would have been happy if both books were condensed into one at the price of a little more than either.
Restoring Classic & Collectible Cameras
by Thomas Tomosy
 It seems that with every Tomosy book I buy, it gets smaller and the price gets higher. This is his third book. Finally he breaks with the 3 section format and jumps right in with practical restoring information and techniques. In my opinion this is his best done (if smallest) book so far, although it is not able to stand alone, if one is a novice. The thing I liked the most was the diagrams with dimensions…practical info. He needed to add more though. Even with my own personal short experience, I have many more dimensioned drawings of curtains, curtain ribbons, etc than he gives. I’m certain he has volumes more locked away. Sharing a few more would have been nice. As always Tomosy is short on explaining the “why” of things but good at “do this, then do that”.
This book deals more with wood and bellows cameras than metal ones…say pre WWll.
After the short introduction , Chapter 1 goes into the leatherwork of straps and cases. Chapter 2 is a fairly thorough introduction to bellows repair and making. Chapter 3 shows rebuilding a wooden camera stand. Chapter 4 introduces various lens shutters. Chapter 5 covers medium format and small plate folding cameras while chapter 6 delves into wooden view cameras. Chapter 7 is large format focal plane shutters. Chapter 8 gives a bit more on medium format and one TLR. Chapter 9 gets into the classic 35mm metal bodied cameras like Contax, Exakta and Leica, etc. This is a super chapter. Chapter 10, miniature format ie. Minox C. Tomosy wraps it up with an abstract where he reiterates stuff from his first two books.
Restoring the Great Collectible Cameras: (1945-1970)
by Thomas Tomosy
 Tomosy’s 4th book consists of only five chapters:
Rangefinders with lens shutters
Rangefinders with focal plane shutters
SLR’s with focal plane shutters
SLR’s with lens shutters
Medium format.
Many classic cameras are covered, none of which were in his previous books. And… he covers these more thoroughly than in his previous books. There are approximately 40 cameras covered.
Tomosy couldn’t resist wasting several pages repeating basic repair stuff from his previous books. Are these meant as tempting commercials? I would have preferred he cover a few more cameras.
Collecting & Using Classic SLRs
by Ivor Matanle
 A delightful book by a delightful writer. Matanle writes as if he and the reader are sitting at the kitchen table drinking coffee and passing cameras back and forth. And the books pictures are as if Matanle is showing you a family album and saying, “Here is one of my daughter I took twenty years ago with the camera you are holding.” He shows you pictures not so much to impress you with a certain camera, or his personal photographic skill, but rather because…he likes the picture for what it means to him. Delightful. Not too many photo book writers would do that. Matanle reminds me of Carl Shipman (whose books are a delight to read too).
Matanle’s love of (and knowledge of) cameras and photography is apparent on every page. I’ve simply got to quote you what he says about the huge, clumsy handling Contarex…
“There is really no quality among SLR’s to match that of the Contarex. If you buy just one SLR to admire, stroke, hold in front of the fire on a winter’s evening and never load with film, it should be a Contarex Cyclops (in Britain) or Bullseye (in the land of the free). The perfection of the engineering is breathtaking. It also comes expensive, so you need to be fairly well endowed with available cash to be able to afford one as a substitute for a Siamese cat.”
Delightful.
The book is packed with tidbits about a cameras cost, history, reliability and shortcomings as well as its finer points. Matanle is very opinionated in his likes and dislikes, as a writer should be. I find myself not always agreeing with him fully about certain cameras (like the Pen F series) but always seeing his point. He covers a wide variety of cameras and gives many lists of lenses.
It is a very comprehensive book. Well worth the money! Those of you who have read some of my other book reviews know how much I like to complain. And yes, as much as I liked and enjoyed this book there is a complaint. Although the paper is very thick and of high quality, both my Matanle books (published by Thames & Hudson) are coming loose at the spine. They have only been read through once and thumbed through a few times since given to me last Father’s Day, only couple months ago. Both mine are paperback, hopefully the hardback versions are better.
Collecting & Using Classic Cameras
by Ivor Matanle
 How best to begin a review but in the author’s own words? Chapter 1 (subtitled: It’s harder. It takes longer. The results are no better. So why do you do it?) begins:
Just once in a while, one sees in a crowd a photographer who stands out from the mass of camera enthusiasts who rush to seize imagined decisive moments with their motor drives and zoom lenses. He uses a separate hand-held exposure meter and takes his time. His camera does not make a repetitive noise like a duchess sneezing, nor clatter like a distant scrapyard when the shutter is fired. A discreet click is the only evidence of his having recorded the world about him on film.
This book is not a repair tome as most of the other books on this webpage, although the author gives many tips on reliability and possible faults in several old cameras. And tells the reader which ones are more likely to be dependable users. Rather it is a book to introduce one to the existential pleasures of classic camera photography.
Matanle, an avid photographer, has peopled this delightful book, at the end of each chapter, with many pictures of his family and friends. A mood of compassionate familiarity is set by these examples. All taken with the very cameras described in that chapter. Within each chapter there is a plethora of professionally taken photos of the cameras, 320 Illustrations in total.
Most books on classic cameras are dull lists of specifications and time lines. Not so here, here you will find descriptions of the form and feel of the cameras, the author’s personal likes and dislikes. Their idiosyncrasies and histories come alive in the many marquee comparisons. Oh yeah, there is a four page list of cameras at the end of the book for those who must have one. Also small lists of lenses, etc. are scattered here and there, but they aren’t often enough to put one to sleep. Shutter speeds and aperture sizes are interwoven into each cameras story.
There are too many makes and models of cameras described to even think of completely listing here. But suffice it to say he describes a LOT of cameras. Entire chapters are spent on Leica, Contax, Rolleiflex, but even in these chapters he thinks to compare marquee’s. Though many classics, like Canon’s Canonet series, I would have liked shown and compared weren’t. Perhaps because the author lives in England where a whole different range of cameras were available. He did describe several I had never heard of. Or perhaps the limited space available, regardless it is a very fine book and well worth owning.
My only complaint with this book (published by Thames & Hudson) is the same one I made of Matanle’s SLR book. The spine is coming undone even with the single complete reading and a few thumbings from the two months I’ve owned it. Perhaps the hardback versions are sturdier? I have 25 year old paperback Carl Shipman photo books (HPBooks) that have been handled many more times that are holding up better.
Rollei TLR Filters
Are you looking for some Rollei filters? We have a basket of filters for sale!!


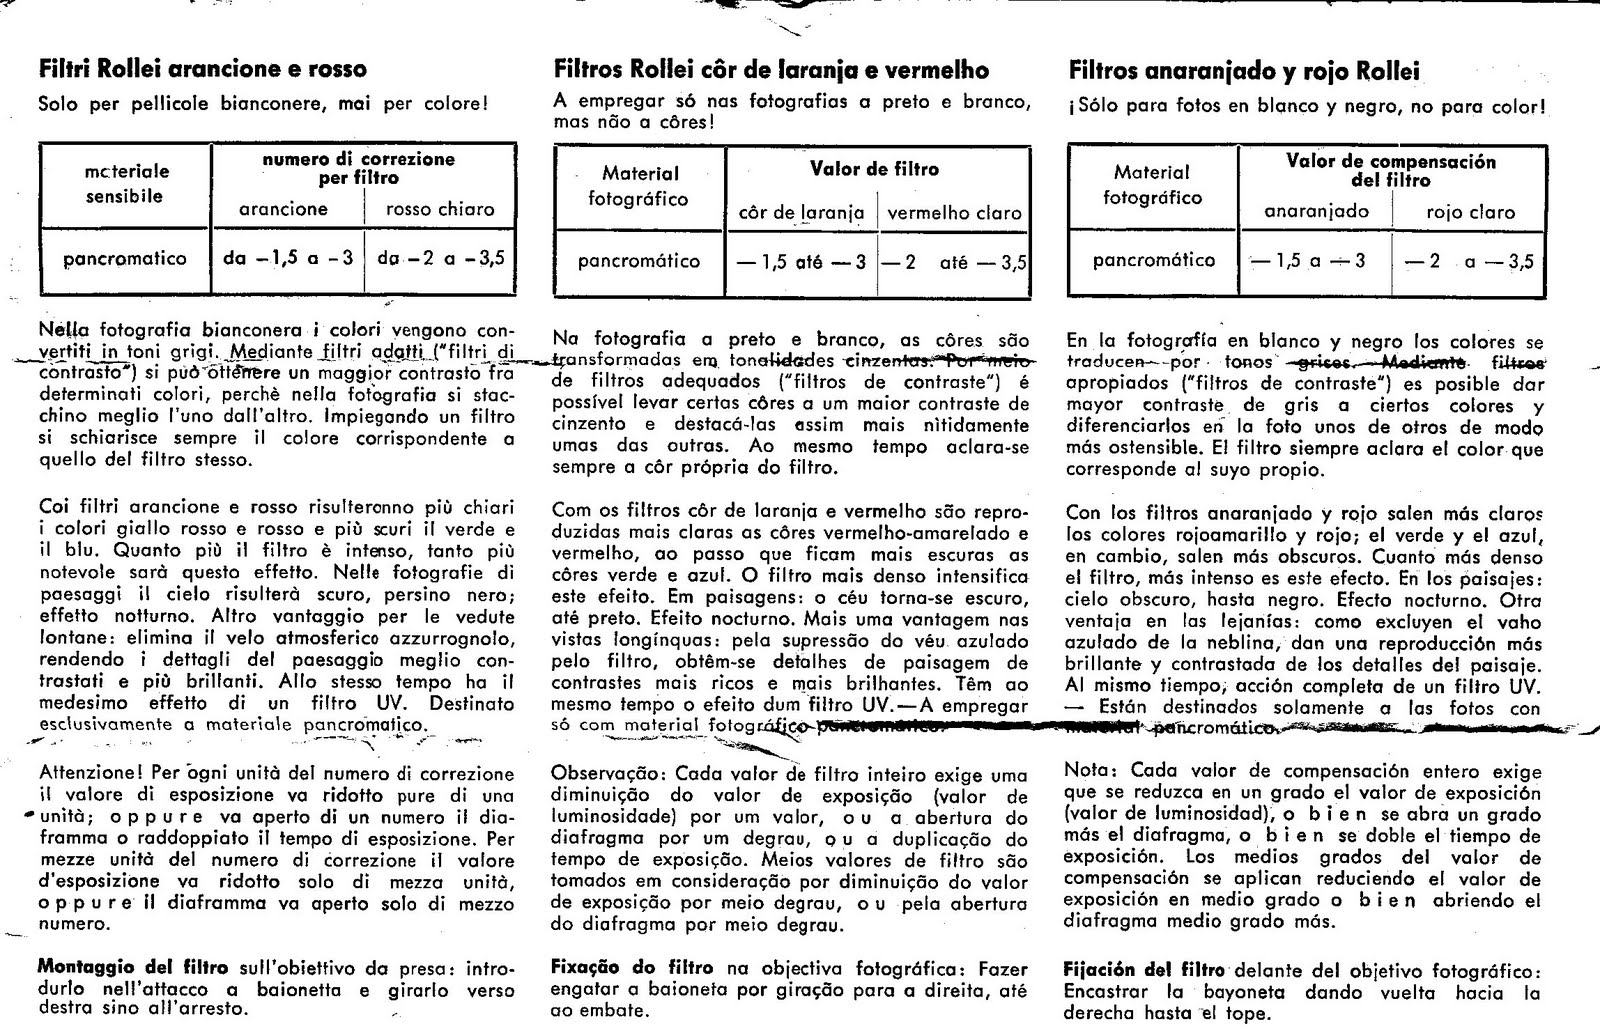
Italian, Portuguese and Spanish (click on thumbnail)
ROLLEI COLOR CONVERSION FILTERS
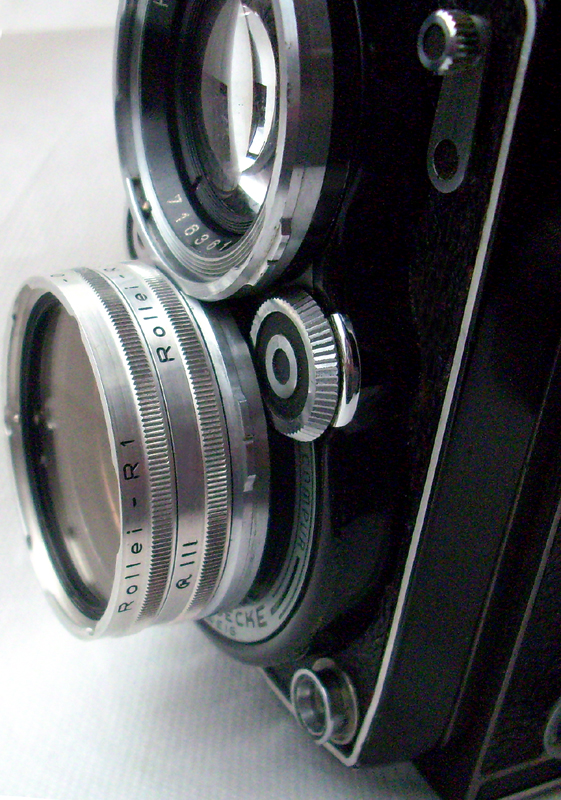

The table above explains the scale and system used for the colour filters effect and filters power and mentions each filter available for the regular three TLR cameras bayonet with the commercial code, the WA Rolleiflex B IV is not included (click on thumbnail)

Tables A and B work together for the Practical Accesories printed version, you can obtain some useful info anyway (click on thumbnail)
Filter factors for common filters
The table below gives approximate filter factors for a variety of common photographic filters.
| Filter purpose | Wratten number | Other designation | Filter factor |
|---|---|---|---|
| Ultraviolet | UV(0) | 1 | |
| Skylight | 1A or 1B | KR1.5 | 1 |
| Contrast filters | |||
| Yellow | 8 | Y, K2, Y48, 022 | 2 |
| Yellow-green | 11 | X0 http://www.hoyafilter.com/products/hoya/cf-09.html | 4 |
| Orange | 21 | G | 3 |
| Light Red | 25 | 090, R2 | 4 |
| Red | 29 | 25A, 091 | 8 |
| Green | 58 | X1 http://www.hoyafilter.com/products/hoya/cf-09.html | 6 |
| Infra-Red | 89B | R72 | 16 |
| Colour conversion (blue) | |||
| 3200 K to 5500 K | 80A | KB15 | 4 |
| 3400 K to 5500 K | 80B | KB12 | 3 |
| 3800 K to 5500 K | 80C | KB6 | 2 |
| Warming filters | |||
| 3400 K to 3200 K | 81A | A2 | 1.4 |
| 3500 K to 3200 K | 81B | 1.4 | |
| 3600 K to 3200 K | 81C | KR3 | 1.4 |
| 3700 K to 3200 K | 81D | 1.5 | |
| 3850 K to 3200 K | 81EF | KR6 | 1.5 |
| Cooling filters | |||
| 3000 K to 3200 K | 82A | B2, KB1.5 | 1.3 |
| 2900 K to 3200 K | 82B | 1.5 | |
| 2800 K to 3200 K | 82C | KB3 | 1.5 |
| Colour conversion (orange) | |||
| 5500 K to 3400 K | 85 / 85A | KR12 | 1.6 |
| 5500 K to 3200 K | 85B | KR15 | 1.6 |
| 5500 K to 3800 K | 85C | 1.3 | |
| Neutral density | |||
| 0.3 | 96 | NDx2 | 2 |
| 0.6 | 96 | NDx4 | 4 |
| 0.9 | 96 | NDx8 | 8 |
| 3.0 | 96 | NDx1000 | 1000 |
| Polarizers | |||
| Linear polarizer | PL or LP | 3 to 4 | |
| Circular polarizer | PL-Cir, C-PL, CP | 3 to 4 | |
