Mamiya TLRs
Mamiya started out with a fairly low-end conventional TLR in 1948, following up with a number of quite classy Rollei-type models, most using its own Sekor lenses, sometimes Olympus Zuiko ones. Then in 1957 it went for the professional market in a big way, with the giant “C” series of folding models with interchangeable lens sets (different series, chrome and black, all Sekor, copied in concept from the unsuccessful French Rex Reflex interchangeable-lens model of the early fifties), eventually ranging from 55mm to 250mm.
The three photos immediately below are from a photoshoot which Ivor Matanle organised with my cameras for his April 2006 article in Amateur Photographer. They show four of my early (pre-C-series) cameras, the three earlier C’s, and then the C200 and C330, the late models. Following these pictures is the key section listing each camera individually – click on the thumbnail pic in each case to see larger versions.
|
The DEFINITIVE website for Mamiya C-series cameras is Graham Patterson’s Mamiya System Summary. I’m not sure he’s still maintaing these pages, as he told me a while back he’d moved to California with his work, but the tables and other information provided are a vital resource if you’re researching these unique cameras. In May 2006, Ivor Matanle published an article on Mamiyaflexes in Amateur Photographer, in which he used my cameras for all the photos. This is reproduced HERE by kind permission of Gary Coward of AP. If you have a good example of any of the models missing here, PLEASE LET ME KNOW The early Mamiyaflexes (Pre-C Series) |


 Mamiyaflex JuniorThe first of the line 1948 – fairly basic. This one is the second of three main variants, all front-geared focussing. “Made in Occupied Japan” on winder.
|
 Mamiyaflex IContinuation of the front-geared line from 1951. The Mamiyaflex I and II are superficially very similar, but this one has no underline on nameplate.
|
 Mamiyaflex IIVery similar to Mamiyaflex I of previous year, but has sports finder, self-timer and cocking by film wind-on. Mamiya was starting to move up-market.
|
 Mamiyaflex Automatic AThe classier A/B series were quite advanced – from c 1949. First Japanese Tlr with auto-filmstop, two dials for setting speed/aperture. Well made feel.
|
 Mamiyaflex Automat BDating from 1953, this dates from close to the end of the period when Mamiya still preferred Olympus Zuiko lenses for their top-end model (the A) and used Sekors for the B. The “Sekor” is still presented with the Setagaya Koki company name – they were soon to become “Mamiya-Sekor”
|
C Series Mamiyaflexes (Bellows Models)The C series (early ones badged “Mamiyaflex”, later ones just “Mamiya”) were a major departure in TLR development, using bellows for close focusing (dowwn to 7″) and a wide range of interchangeable paired lenses. |
 Mamiyaflex CThe original C Professional was launched in 1956/7, and is very rare, with production rapidly swithched to the improved C2 (right). It is distinguished by having only one focus knob (usually on the right, although I believe some left-handed ones were made.Lens here is Sekor 80mm f2.8 (silver) |
 Mamiyaflex C2The C2 was launched in 1958, improved mainly by two focus knobs rather than one, by a removable hood and the Seikosha-S shutter on the standard lens. Rack extension/ bellows focus down to 7″ transformed the TLR market. SHutters were also improved.
|
 Mamiya C3The C3XX series differs from the C2xx chiefly by having a film-advance crank, rather than a knob. Auto exposure prevention. This is the first of the long-lived series, made c 1962Lens here Sekor 80mm f3.7 (black) |
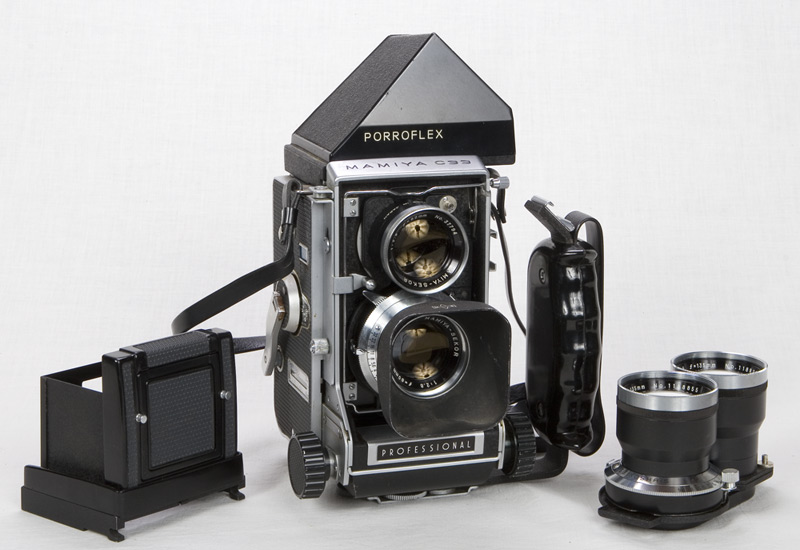
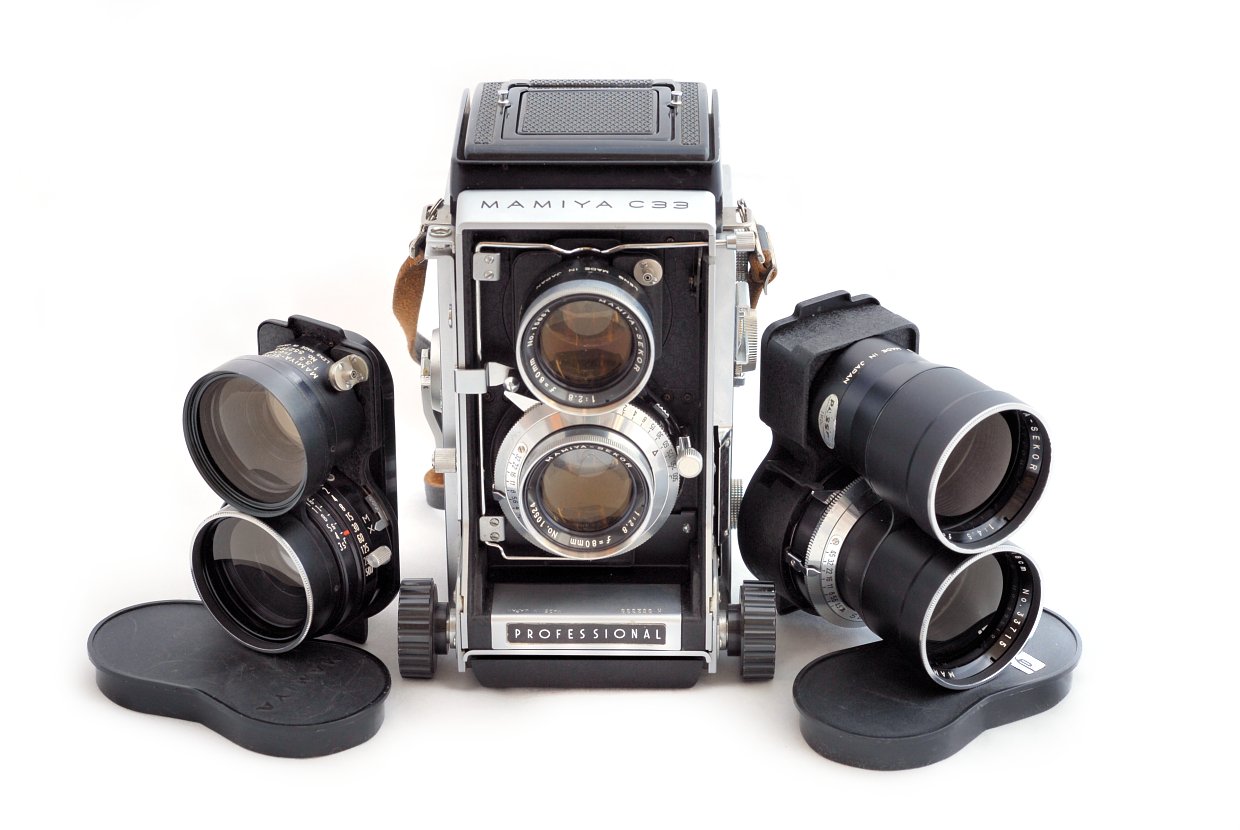
 Mamiya C33The C33 series succeeded the C3 c 1965. Film-advance crank now tensioned the shutter. Automatic parallax compensation.Lens here Sekor 135mm f4.5 (black) |
 Mamiya C22The first of this series was the C2, succeeding the Mamiyaflex C. The C22 (1966) is a lighter body with knob advance. 120/220 backs available.
|
 Mamiya C220Followed the C22 (1968). Small crank on wind knob. Single back takes 120/220 film. Later (1982) succeeded by a C220f with minor improvements.
|
 Mamiya C330sLast of the line (1983) after intermediate C330f. Lighter body, parallax indicator in viewfinder. Still widely used, top-quality camera. The linked page (click thumbnail) has a picture of a strange “Special Edition” of this camera.
|
Mamiya C33 Twin Lens Reflex
Mamiya C33 Professional is an interchangable lens TLR camera manufactured by Mamiya and produced between 1965-69.
Mamiya C series is a professional level of TLR medium format cameras. They have interchangeable lens system. This feature is on very few TLR cameras like Contaflex TLR and Koni-Omegaflex. Bellows focusing allows extreme close up photography, which is not easy with other TLRs. Auto cocking of the shutter feature is existent only on the C33 and the C330 series cameras.
Specifications Edit
Edit
 Added by Süleymandemir
 Added by Süleymandemir
- Film 120 roll, picture size 6x6cm
- Lens-Shutter assembly: interchangeable, accepts all Mamiya C-series TLR lenses
- Taking Lens: (in the pictures) Mamiya-Sekor 180 mm f/4.5, iris diaphragm, 4 elements in 3 groups, (an unique telephoto lens)
- Aperture: f/4.5-f/32, settings: on the lens-shutter assembly
- Focus range: 1.2-10m +inf
- Standart lens is 105mm f/3.5
- Focusing: Fresnel ground glass screen, bellows focusing
- Pointer in the viewfinder shows exposure increase which metered a hand posemeter, as bellows are extended and,
- Auto Parallax correction scale for the lens beeing used (for this purpose the parallax correction lever must be set as to the lens, left side of the camera)
- Focus knobs: two, bilateral, on the lowest front side of the camera
- Finder lens: (in the pictures) Mamiya-Sekor 180 mm, f/4.5
- Shutter: (in the pictures) [1] Seiko MX; Speeds: 1-1/500 +B, settings on the lens-shutter assembly
- Shutter release button: right lower front side of the camera, only works after film advance and operate once when Multiple exposure/film stop selector must be on Rollfilm (double exposure prevention), w/ cable release socket
- Shutter releasing is also possible by the lever on the Lens-Shutter assembly
- Caution: If there is no film in the camera the Shutter release button do not work, even with the shutter cocked
- Winding lever: also auto cocking of the shutter on the lens by an advance stroke, right side of the camera
- The shutter can be cocked by a lever on the lens/shutter assembly, but no film advance.
- Multiple exposure / film stop selector: in front of the winding lever,
- Viewfinder: (in the pictures) Porroflex finder Pat.Pend. M, eye level reflex mirror, image in correct orientation, manufactured by Nippon Kogaku(Nikon), Japan, Tokyo, an early version
- Interchangeable such as Waist level, Metered CDS Porrofinder, Prism finder and some others
- Standart finder is Waist level finder.
- Frame counter: left side, advance type, resets via opening the back cover
- Flash PC socket: on the lens-shutter assembly, beneath right side of the finder lens
- Flash sync: M, X, via a lever on the lens-shutter assembly
- Back cover: removable, w/ red window and built-in lid, to ascertain whether or not the camera contains film
- Cold-shoe
- Strap lugs
- Tripod socket: 1/4″
- Body: steel, very solid as rock; Weight: +2 kilograms
 |
| Mamiya C33 c.1965 image by Süleyman Demir (Image rights) |
|
|
||||
| Mamiya C33 c.1965 Images by Süleyman Demir (Image rights) | |||||


 Added by Süleymandemir
Notes and referencesEdit
- ↑ There is different objectives between 55mm and 250mm which can be divided roughly into two series as chrome and black. The chrome series heve three different Seikosha shutters as MX, S and SLV. The black series have Seiko shutter. The only exception is black 80mm f//3.7 which has Copal shutter. The Seikosha-MX’s max speed is 1/400, all the others 1/500. In general all variations fit on all cameras.
Smaole photos:


Video Review:
Mamiya Rb67 Pro-S
photoSIG » Mamiya Rb67 Pro-S; Want one? Here’s the rub..
By sisco1/Simon (236) ![]() on March 27, 2003 11:38:08 PM CST
on March 27, 2003 11:38:08 PM CST
Overview
Features
Operation
Pros and Cons
Conclusion
Overview
 This camera has been called the workhorse of the photographic industry for many years with good reason. It has often been linked as guilty by assumption, with studio work, product and commercial photography only; due to it’s robust size and weight. The idea that this camera is unweildly outside the studio invironment is only true for those perhaps not prepared to utilize this baby to it’s fullest potential. That and they might lack moral fibre and upper body strength! I bought this camera as new a few years back from a Studio Portrait photographer with 40 years in the business. The camera came with a f3.8 127mm Mamiya Sekor lens, 120 roll film holder, pop up view finder with a 2+ diopter – and a speed grip for hand holding with top mounted hotshoe. My 35mm outfit barely gets a look in anymore because I always hike this beast everywhere I go. The big neg in 6×7 is so impressive that I have become totally absorbed by the MF culture and approach. I had a vision for larger formats that my 35mm images were not able to provide in results. So when I took my RB into the mountains and rainsforests shooting waterfalls and coastal scenics, what I got back in E6 jumped off the light box in a way I had never seen before. I was sold!
Features
And now a quick run down of features of the Pro-S. Lens mounting is bayonet with safety lock ring. Viewfinder has horizontal index marks interlocked with the revolving back. Focussing hood is single action opening and closing, also interchangeable with finder magnification at 2.5x. Finders are also interchangeable. Focussing screen is an interchangeable fresnel lens. Revolving back adaptor exclusive to the Pro-S allows up to 90 degree rotary system. You have the benefit of R lock adaptors and G lock adaptors. Focussing is by way of a bellows with rack pinions whereby maximum extention is 46mm. Shutter and mirror cocking are single action (75 degree) cocking lever on cameras side. The shutter release button can also be locked to not allow firing of the shutter. Standard lenses are the 90mm 3.8 and the 127mm 3.8. The filter screw diameters are all 77mm so you can rationalise all your filters should you need to. Apertures have full automatic diaphragm (with dof preview lever). F3.8 to 32 with full and half click stop intervals, also with MLU. Shutter gives 1 to 1/400 with T for time settings, flash synch on all speeds due to the leaf shutter system -M-X full flash synchronisation.
 Image shows the Pro-S Roll film back. The red arrow indicates the red flag exposure system while the green arrow points to the multiple exposure lock. The lock in the image is in the safe position for standard photography. When the lever is pushed forward multiple exposures are possible. Pro-S Roll Film Holder – 120 roll film will provide 10 shots at 6x7cm format which will sit nicely with those most used to shooting 35mm. Film advance – One stroke lever film advance. Automatic double exposure prevention, film wind stop auto release and multiple exposure capabilities. Film counter – Auto resetting type with red index tags that disapears upon completion of film winding. Provided with dark slide prevention and memo clip. You can fire the shutter with no film in the camera by pulling the dark slide 0.5cm from the sheath. The RB67 Pro-S has a series of locking features which prevent you from making accidental exposures. Another charming feature is that the bellows system allows a macro function with nearly all lenses. This camera was ten years old when I bought it and it has behaved flawlessly since then, with nary a hickup. Shutter speeds may be a little on the slow side for some at 1/400th to 1 sec; but I have never needed anything above 1/125 for what I do anyway. If you are buying a new RB67 in the Pro-SD area then you are in for some fine lenses in the newer KL range which have undergone a redesign. Lenses available for the Pro-S are as follows. 37mm f4.5C Fisheye, 50mm f4.5C, 65mm f4.5C, 90mm f3.8C, 127mm f.3.8C, 140mm f4.5C Macro, 150mm f/4C Soft Focus, 180mm f/4.5C, 250mm f/4.5C, 360mm f/6.3C and the 500mm f/8C. In the past there were some manufacture tolerance issues with a couple of the old C and especially the non C lenses. Some people called them soft and others got a sharp optic. Those days are over and the new lenses, particularly the 50mm, which suffered the worst reputation over the years are now top quality and in line with the new design KL lenses. Some people still complain about lack of edge to edge sharpness regarding 50mm 4.5 lenses, but many have failed to understand or even realize that you must operate the floating ring which controls critical DOF.
Operation
 …Getting the most out of your 50mm… There are a couple of lens’ in the Mamiya RB family which require you to manually adjust the select focus ring on the lens itself to correct for critical depth of field. “As with a standard lens, adjust focussing by turning the focussing knob on the camera body. Merely turning the floating ring will not produce accurate focussing. Next, read the distance to subject, set the distance scale of the floating ring to the center index mark (red dot), and then take a picture. Floating ring may be set either before or after focussing. When turning the floating ring, a portion of the lens system is shifted to the front and rear; however, no variations can be observed on the ground glass focussing screen.” “When placing emphasis on spur of the moment snaps, set the infinity mark (red) of the floating ring to the center index mark (red)when the distance to subject is from infinity to 7ft (2 metres).If the distance to subject is less than the above a sufficiently sharp image can be attained merely by setting 3.3ft/1m (red) to the index. In the case of close up photography nearer than 3.3ft, set the floating ring to 3.3ft then stop down the lens as much as possible. Distance to subject implies the distance from film plane to subject.”
 … Going off half cocked…. The Rb67 Pro-S requires that after each frame has been shot that you cock the shutter to drop the mirror then wind on the film, on the back itself. You can do this in any order you wish. Some people have suggested that this is laborious and slow, but it has never cost me more than 1.5 seconds, think about that! If the dark slide has not been removed you will not be able to fire the shutter, this is only one of the many useful interlocks and failsafes built into the cameras design. MLU is possible both with or without a cable release by turning the MLU knob at the barrel of the lens. For long exposures there are two ways of ending the exposure. You can cock the shutter lever forward by 17 degree’s, not my favourite option, or you can turn the shutter speed ring back towards one second; wait for the click and your exposure is completed. A tip for those who fear any form of camera shake is to use the black hat method. To get around all the fuss of MLU I just place my hand infront of the lens, fire the shutter, wait for 10 seconds for any vibrations to settle down, then remove my hand and begin timing. When I want to complete the exposure I replace my left hand and then with my right turn the shutter ring back towards 1 sec. I have yet to get an unsharp image.
Pros and Cons
Don’t be told that this camera isn’t meant for outdoor work or landscapes, this camera is a standard in the Landscape and Scenic photographic culture. If weight is an issue for you and you can’t stomach anything heavier than a 35mm camera then the Rb may not be for you. The RZ is a little lighter but then you have other issues of a non mechanical nature to deal with, such as batteries. The beauty of the RB is that it is a purely mechanical camera and requires nothing other than man power to operate it; no matter what the conditions or circumstances. Thats the reliability of an RB. As stated earlier this camera may not be well suited to the sports or action photographer the size of this system requires a more thoughtful approach and with the maximum shutter speed topping out at 1/400th you might be limited in your subjects. Image shows the two positions of the revolving back as displayed by the position of the back itself and the red index markers on the screen. This view shows the screen minus the focussing hoods.
Conclusion
Notes for those looking to buy with the aim of Studio and Commercial work… RB67 Pro-S and 127mm f3.8C You can easily shoot portraits with this lens but if you want to go for a longer focal length then you can. There are some lenses that are softer than others so depending on your purposes, when buying, be aware and try them out first as this could be just what you want or not the thing at all. I would suggest two lenses to begin with, but if you can only afford one, then you can’t go wrong with the 127mm which ought to come stock with an Rb. You have a choice of view finders which range from the pop up viewer or the PD Prism. With the pop up finder you have a choice of plastic diopters which serve to magnify the image on the glass. If you are mainly doing commercial and portraiture you won’t need to worry about the PD Prism which comes in either a plain standard or you can get a metered prism which requires a battery. You may well want the L grip which I myself have, this can come in handy when you want to move around and shoot freestyle without the tripod limiting your movements. The L grip has a hotshoe on the top for the flashmount and this works very well. Image displays the Polaroid Back adaptor for the Pro-S. Next thing you might need for portraits and commercial work is a Polaroid back which will allow you to pack mount polaroid film for proofing purposes, pretty important for this line of work. I do allot of landscape, nature, scenic and night photography and I’m getting one for myself so I can expand into studio work and the like. The Pola back is a very valuable tool indeed. If you get the RB67 Pro-S it is recommended you get yourself an excellent dedicated flash meter. What you choose is up to you but I would highly recommend something like the Sekonic Flashmaster L-358. I use this meter regularly and you couldn’t want much more from a meter, particularly for studio work. Get a solid tripod, you’re going to need one with an RB. Finally you may want to pick up a twin cable release for mirror up photography with this camera, this will give you greater control over the sharpness of your work and allow you to get the most out of your photography. The Rb67 is a beast of a camera but it is also an incredibly reliable camera which after 12 years of service has only needed the seals in the back and the body done once. I drag this thing allover gods creation and with no need for batteries and total manual operation it has yet to let me down or fall short of my greater expectations. More than that, this camera is just plain fun to own and run. You’ll get ten shots from any roll of 120 film and with a couple of backs and perhaps a 220 RFH you could be using two different types of film in any location and shooting 30. The RB stands for revolving back – and on location this is a godsend which takes you from vertical imaging to horizontal in a second flat! If you want to get into Medium Format you might as well be a maneater and grab an RB. The modularity of the RB is significant and the new buyer will find more add ons than they can shake a stick at, but it’ll have to be a big stick!
 If you liked this review or want to discuss any of the above feel free to contact me at psi_fan@yahoo.com Kind Regards, Simon White
