


Mamiya C33 Twin Lens Reflex
Mamiya C33 Professional is an interchangable lens TLR camera manufactured by Mamiya and produced between 1965-69.
Mamiya C series is a professional level of TLR medium format cameras. They have interchangeable lens system. This feature is on very few TLR cameras like Contaflex TLR and Koni-Omegaflex. Bellows focusing allows extreme close up photography, which is not easy with other TLRs. Auto cocking of the shutter feature is existent only on the C33 and the C330 series cameras.
Specifications Edit
Edit
 Added by Süleymandemir
 Added by Süleymandemir
- Film 120 roll, picture size 6x6cm
- Lens-Shutter assembly: interchangeable, accepts all Mamiya C-series TLR lenses
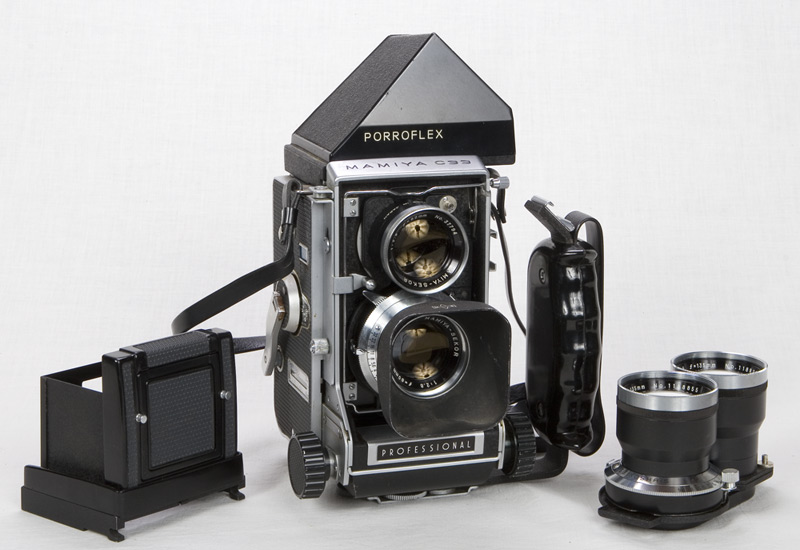
- Taking Lens: (in the pictures) Mamiya-Sekor 180 mm f/4.5, iris diaphragm, 4 elements in 3 groups, (an unique telephoto lens)
- Aperture: f/4.5-f/32, settings: on the lens-shutter assembly
- Focus range: 1.2-10m +inf
- Standart lens is 105mm f/3.5
- Focusing: Fresnel ground glass screen, bellows focusing
- Pointer in the viewfinder shows exposure increase which metered a hand posemeter, as bellows are extended and,
- Auto Parallax correction scale for the lens beeing used (for this purpose the parallax correction lever must be set as to the lens, left side of the camera)
- Focus knobs: two, bilateral, on the lowest front side of the camera
- Finder lens: (in the pictures) Mamiya-Sekor 180 mm, f/4.5
- Shutter: (in the pictures) [1] Seiko MX; Speeds: 1-1/500 +B, settings on the lens-shutter assembly
- Shutter release button: right lower front side of the camera, only works after film advance and operate once when Multiple exposure/film stop selector must be on Rollfilm (double exposure prevention), w/ cable release socket
- Shutter releasing is also possible by the lever on the Lens-Shutter assembly
- Caution: If there is no film in the camera the Shutter release button do not work, even with the shutter cocked
- Winding lever: also auto cocking of the shutter on the lens by an advance stroke, right side of the camera
- The shutter can be cocked by a lever on the lens/shutter assembly, but no film advance.
- Multiple exposure / film stop selector: in front of the winding lever,
- Viewfinder: (in the pictures) Porroflex finder Pat.Pend. M, eye level reflex mirror, image in correct orientation, manufactured by Nippon Kogaku(Nikon), Japan, Tokyo, an early version
- Interchangeable such as Waist level, Metered CDS Porrofinder, Prism finder and some others
- Standart finder is Waist level finder.
- Frame counter: left side, advance type, resets via opening the back cover
- Flash PC socket: on the lens-shutter assembly, beneath right side of the finder lens
- Flash sync: M, X, via a lever on the lens-shutter assembly
- Back cover: removable, w/ red window and built-in lid, to ascertain whether or not the camera contains film
- Cold-shoe
- Strap lugs
- Tripod socket: 1/4″
- Body: steel, very solid as rock; Weight: +2 kilograms
 |
| Mamiya C33 c.1965 image by Süleyman Demir (Image rights) |
|
|
||||
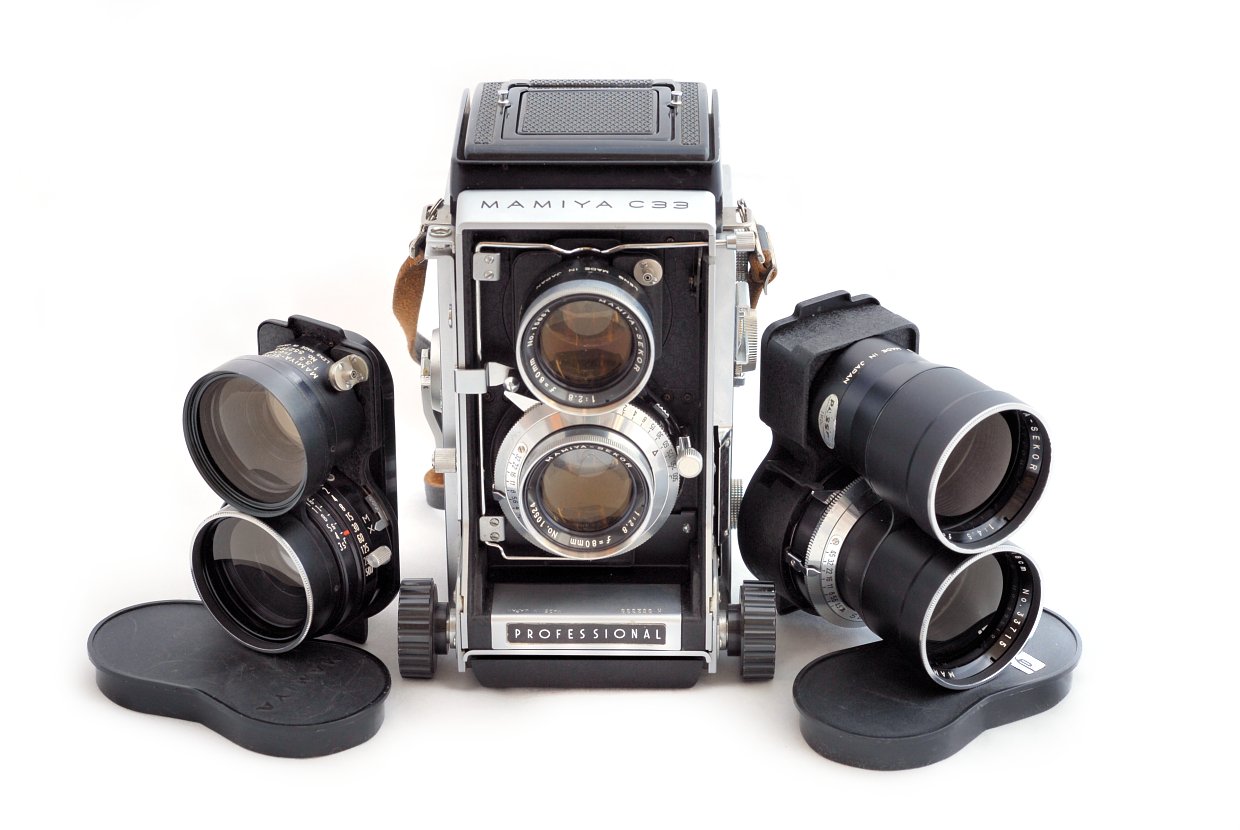
| Mamiya C33 c.1965 Images by Süleyman Demir (Image rights) | |||||


 Added by Süleymandemir
Notes and referencesEdit
- ↑ There is different objectives between 55mm and 250mm which can be divided roughly into two series as chrome and black. The chrome series heve three different Seikosha shutters as MX, S and SLV. The black series have Seiko shutter. The only exception is black 80mm f//3.7 which has Copal shutter. The Seikosha-MX’s max speed is 1/400, all the others 1/500. In general all variations fit on all cameras.
Smaole photos:


Video Review:
Seagull 4A-105 Review
[If you like this blog, please click the ad at the end of this post to help it grow. Thank you.]
A twin-lens reflex (TLR) camera offers you an entry price point into medium-format photography. Instead of the usual SLR design of cameras such as Hasselblad and Mamiya, a TLR has two lenses. The top one provides an image on a ground-glass viewing screen and the bottom is used to record the photograph directly onto film.
| The 4A-105 is the latest in a succession of models from the Chinese twin-lens reflex manufacturer Shanghai Seagull. Each model that has appeared has had slight modifications to improve the handling and this one includes the following:
Features at a glance Other features:
|
 |
The Seagull costs 189 including VAT and is available from importer Kauser in Hertfordshire. It looks very much like a Yashica 124G or old Rolleiflex and is designed to be used as a waist-level camera. A hood flips up on the top and allows you too look down onto a shielded screen to focus and compose your photograph. The hood is easy to return to its flat storage position. You just squeeze the sides and give a gentle push and it all collapses into place. Raising is just as easy – gripping the sides and lifting so it springs into place.
 |
When you look down into the hood you see a reversed image. This is one of the disadvantages of this type of camera and does, if it’s your first time using one, take time to grasp. If the subject moves to your left it will appear to move to the right in the viewfinder and your instincts won’t follow.
To use the camera you cradle it in the left hand and use your right to wind the film on and press the shutter release. The plunger is threaded so a cable-release can be attached. |
 |
The viewing screen has a ground glass surface to help make the image easier to focus. It goes slightly darker into the corners, but overall the image is bright thanks to the f/2.8 viewing lens. In the centre is a horizontal split line surrounded by a microprism style circle. These are used to provide accurate focusing. The split image is a familiar item on single-lens reflex cameras and splits the subject’s vertical lines in two when the subject is out of focus. As you move to the correct focusing distance the lines gradually become closer until they meet and correct focus is obtained. The microprism shimmers when the subject is out of focus and appears clear when it’s in focus. You can use each or a combination to help you gain perfect focus or, at least, that’s what you hope! (see comments later) |
| If you rely on peering down into the finder you won’t be able to focus accurately and to assist the Seagull has a pop up magnifier that you reach by pressing in a plate on the face of the hood. The magnifier is used with your eye pressed up to it and still allows you to view the whole image area, but concentrate on the inner focusing aids. A large knurled wheel on the left of the camera is used to focus and the lens mount moves backwards or forwards to adjust the lens’ distance from the film.
|
 |
I found the focusing hard to determine. Despite having both options, neither seemed to be very accurate and it took too long to be sure I was happy.
Also look at the bright white vertical line to the right of the magnifier (pic above). This is the hinge of the hood and it lets light in. Although this will do no harm to the film it did cause stray light to hit the focusing screen in bright weather and made it difficult to focus, especially when the sun was in front of me.
 |
If you push the plate on the top of the hood fully in it locks down at both sides and allows you to view directly through the hood when raised. This is called a sports finder and is designed for fast action pics where focusing is at a predetermined distance, so you can have everything set up and use the camera like a direct vision model. Crude but quick.
|
The latches that lock it down are not secure enough and it occasionally popped back up when I caught the hood, by accident. The advantage here though is it does always flip back up when you want it to. On some cameras I’ve used you really have to tug at the hood to make it spring out of the way.
 |
When loading a film you release the back using a dial on the base of the camera. This rotates to release a spring mounted catch and the back hinges open. Two plungers spring out to allow the film spool and take up spool to be positioned and locked in place. When the film’s loaded you shut the back and rotate the dial to the C position which pulls the catch inwards to secure the back. The gap at the bottom seems wider than the one at the top and it looks as though it’s ill-fitting. No light got in so this is just a cosmetic thing. I’d prefer to see it flush with less movement, I was initially conscious that the lock might release and the back would spring open while I was using the camera, but it proved solid enough. |
Four raised metal feet ensure the camera balances firmly when placed on a table, but these got in the way of the tripod platform I used and didn’t allow an even fixture.
| When a film has been loaded you use a large advance lever to wind on. The camera locks at frame 1(indicated in a small circular window above the wind on lever) Safety features ensure the lever will not advance until the shutter is fired and picture taken. The shutter will not fire until the film is advanced. There is no shutter lock so I would suggest you only wind on when ready to take a photograph to avoid accidental shots. The 4A-107, with its four element lens, does have a shutter lock. The lever is quick to advance film and has a good action. |
 |
There is no exposure meter built in to this camera instead you need a handheld meter or a good knowledge of exposure settings.
 |
When you know what the exposure is, you set it on the dials at either side of the lens. The left hand side has shutter speeds, the right hand side has apertures. These slide to adjust. The shutter speed is click stopped and the aperture is smooth, allowing infinite adjustment between settings. Both are positioned so you can adjust with the thumb of each hand as you cradle the camera. I’ve already picked up on several crude points of this camera and the worst is the shutter speed marker that doesn’t align correctly with the settings. It’s about half way in between so if you forget which way this appears you have to slide it to the extreme to see which setting it actually refers to. The aperture slider is a little coarse and appears to grate as it’s moved. |
On the picture above you can see a small lever with a red dot just below and to the right of the word REFLEX. This is the mechanical self-timer that allows a variable delay of between 8 and 14 seconds depending on where you move it to. It’s all guess work so you’ll need to get a feel for how far you need to pull it. Practice without a film in the camera.
We used this for some interior shots to prevent camera vibration when it was mounted on a tripod. Three shots later and it broke! The film advance still worked but the shutter release didn’t open the shutter or activate the timer, resulting in the third roll of film being blank and the camera inoperable.
Below the self timer is a standard flash sync terminal which is used to connect any electronic flash with a coaxial cable. There’s also a more convenient hot shoe on the side although this was slightly loose on our model so I wouldn’t trust it with a larger gun. The beauty with a camera like this, with its leaf shutter, is flash can be used at any speed – shame the top speed is only 1/300sec, but it’s still as good as the best SLR cameras and proves perfect for fill in flash in most conditions.
 |
The focusing wheel provides smooth adjustment and is easy to control. On the side is a depth-of-field scale indicating distances in meters with all the apertures. The red mark shows where you’ve focused and the alternate black and white marks show the depth-of-field at the various apertures. This is a well designed scale and very easy to use. |
Test pictures
 |
A straightforward shot of flowers. The subject was about 1.3metres away and overcast lighting ensured there was no complex metering involved.
There’s good detail in the plants and the background is subtly out of focus thanks to the selected f/3.5 wide aperture. This was taken on Fujichrome RDP100. |
 |
The lens shows no signs of vignetting into the edges which is something you may find on older TLRs, but the photos are not razor sharp. When magnifying the railings in the centre of the frame it was noticeable that details was starting to fall. Overall it the trannie would enlarge to about 12in without problem, but so would an image shot on a good 35mm SLR, |
 |
I deliberately ensure the bottom of the upper window was included in the frame to see how the lens responded to flare. There’s a fair degree of ghosting. This shot also shows the lens doesn’t suffer from distortion. |
 |
| To check my constant annoyance of the focusing accuracy I deliberately set the lens to f/3.5 and chose a subject with a variable distance background. I used the magnifier to focus on the wooden sculptures. The camera was mounted on a sturdy tripod and the delayed action used to prevent any movement. I didn’t focus accurately. And that’s a big problem. There’s no point in having all the benefits of a larger format camera if you end up with out of focus pictures. The camera definitely needs a better focusing screen! |
| Verdict Throughout the test I have been fairly harsh on this camera, particularly in construction. For background info I have owned or us  ed many medium-format cameras over the years. I admit I prefer the single-lens reflex type, but readies the TLR has a very useful place. One of the main benefits is the lack of a mirror clunking around causing vibration and noise. The shutter is almost silent on a TLR and there’s no vibration. The Seagull delivers in both these areas a great camera for candid photography and one that can be used in church for weddings without annoying the vicar. The other main benefit of a TLR is cost. Currently the Seagull is the only one you can buy new and I suspect that’s why it has a price of 189. When you could by the Yashicamat 124G, a better built camera with a built-in exposure meter, it sold for about 149. SLRs haven’t risen in price since then, so there’s no reason why this would have happened to TLRs either. If the Yashica was still available it would probably have cost no more than 160, in relative terms this makes the Seagull worth about 130 maximum. Overpriced but no alternative? Well yes, If you don’t mind buying a second-hand camera you can pick up a Yashicamat 124G for about 129 and in my view it’s a far better camera. You can also find Mamiya TLR cameras with interchangeable lenses for a similar price to the new Seagull and they have better build and much better close focus capability. You may even prefer an SLR and it’s possible to buy old Mamiya 645s or Bronica ETRs for not much more than the Seagull. ed many medium-format cameras over the years. I admit I prefer the single-lens reflex type, but readies the TLR has a very useful place. One of the main benefits is the lack of a mirror clunking around causing vibration and noise. The shutter is almost silent on a TLR and there’s no vibration. The Seagull delivers in both these areas a great camera for candid photography and one that can be used in church for weddings without annoying the vicar. The other main benefit of a TLR is cost. Currently the Seagull is the only one you can buy new and I suspect that’s why it has a price of 189. When you could by the Yashicamat 124G, a better built camera with a built-in exposure meter, it sold for about 149. SLRs haven’t risen in price since then, so there’s no reason why this would have happened to TLRs either. If the Yashica was still available it would probably have cost no more than 160, in relative terms this makes the Seagull worth about 130 maximum. Overpriced but no alternative? Well yes, If you don’t mind buying a second-hand camera you can pick up a Yashicamat 124G for about 129 and in my view it’s a far better camera. You can also find Mamiya TLR cameras with interchangeable lenses for a similar price to the new Seagull and they have better build and much better close focus capability. You may even prefer an SLR and it’s possible to buy old Mamiya 645s or Bronica ETRs for not much more than the Seagull.
Having said all this, if you prefer the comfort of a new camera and don’t mind paying slightly over the odds, the Seagull will not disappoint in optical performance, providing you can get on with the focusing and can put up with the crude aspects of the build, oh and avoid that self timer! Test by Peter Bargh Update! Comment from supplier Volume determines price. The factories does not sell the numbers they used to. Competition is another factor. In the days of the Yashicamat there were several TLRs in the marketplace. Today, there is the Rollei and nothing else. The Seagull is not the tin box it used to be and Minolta’s input has improved the quality of components and build. It still has some way to go to match that of the German & Japanese but gradually it is getting there. Ali Kamruddin, Kauser International Also regarding price: Global Cameras sell the camera for 160 which makes it a better buy. |
