How to frame in square format film?
The exact image size is 54 x 54 mm, with 12 images on one roll of 120 film. The 2 ¼ x 2 ¼-inch (6 x 6cm) square format established the popularity of the medium-format camera. Many good things can be said about the square format. The photographer has a wide choice in composing the subject and does not need to decide beforehand which way to turn the camera or the film magazine. Picture editors, artists, and graphic production specialists love square prints or square transparencies because this shape gives them full freedom to crop to their specifications. The 12 images from a 120 roll of film fit beautifully on a sheet of 8 x 10-inch paper, and because the camera is always held the same way, all shots will appear the right way up.
Square slides projected onto a square screen always fill the same area on the screen. Since the effectiveness of a visual presentation is destroyed by mixing horizontals and verticals on the screen, square slides make a much stronger and more effective visual presentation. (Pp. 1-2)
Wildi, Ernst. 2000. The Hasselblad manual. Boston: Focal Press.
Medium format cameras, toy cameras like the Holga and Diana, and smartphone apps like Instagr.am are making the square format more popular than ever. In the digital age, the square format like film photography, certainly isn’t dead.

A Little History
Square format cameras have been around a long time. The first one was introduced by Rollei in 1929. The reason that it used the square format is probably more to do with the twin lens design than anything else – to take a photo you look through a magnifier at a focusing screen on top of the camera. The inconvenience of turning the camera on its side meant that is could really only be used in the upright position. Rollei cameras were used by photographers like Richard Avedon, Irving Penn and Robert Doisneau. Diane Arbus used a Mamiya twin lens reflex camera. All these photographers used the square format.

Rolleiflex original camera with Carl Zeiss Jena Tessar f/3.8 75mm lens. Photo by Eugene Ilchenko.
Hasselblad made the 1600F – a square medium format camera – in 1948, and stuck with the square format in their rollfilm cameras up until the release of their H-System digital cameras in 2002. Hasselblad film cameras had a reputation for quality and were the camera system of choice for many professional studio photographers up until about decade ago. One reason for their popularity, apart from the quality, was the convenience of the square format. You could take a photo, such as a portrait, leave some empty space around it and then it could be cropped afterwards to fit the space for which it was intended.
Getting the Most Out of the Lens
There’s another practical reason that makes the square format attractive. Camera lenses cast a circle of light – called an image circle – over the sensor or negative. A rectangular sensor or negative doesn’t make full use of the image circle, there is always some wasted space. The square format, on the other hand, makes much better use of the image circle. Strangely, the circle would be best used by a circular sensor or film, but to my knowledge one has never been produced.

Going square
There are four main ways that to explore the square format:
1. Use a medium format film camera like a Rolleiflex, Mamiya or Hasselblad. You can either print the negatives in a darkroom or scan them with a high quality flatbed scanner allowing you can work on them in Photoshop. Many photographers that develop and/or print their own images work with black and white film, which is far easier than color to develop at home.
2. Use a toy film camera like a Holga or Diana. Again, you can print or scan the images. There are also some unusual older cameras around that use the square format – such as the Robot Star cameras that create a 24mmm by 24mm negative on 35mm film.
3. Use a cameraphone and convert the photos to square format using an app such as Hipstamatic or Instagr.am.
4. Take a photo with digital compact, SLR or medium format camera and crop it to the square format in Photoshop. Some digital cameras let you take square images in Live View mode.

If your camera only takes rectangular photos you can experiment with the square format by cropping your images in Photoshop. There’s a couple of approaches you could take here. One is to shoot specifically with the purpose of cropping to a square. The other is to go through your old images and see if any of them can be improved by cropping them to a square. I did this and it’s amazing how many of my photos are improved. I see this as part of the simplification process. When you crop from a 35mm frame to a square, you are discarding a third of the photo. The strongest two-thirds are left, and the image is sometimes stronger as a result.
The above photo is an example of that process. An advantage of using a 35mm digital camera is that you can crop your images to a square when you want, but you don’t lose the use of the full 35mm frame. So here, I can use either the rectangular or the square format of the photo, whichever is best for the purpose I have in mind.
Composition
In these days of near infinite choice when it comes to aspect ratio (after all, if you use a digital camera it’s easy to crop your images to any dimension you like) why would anyone use the square format?

One of the main attractions of the square format is composition. There is something different about a square – square photos have a certain beauty to the design that rectangular images lack. The viewers eye moves around the image in a circle, rather than from side to side (or up and down). There’s less wasted space around the subject. You can place the subject in the centre of the frame and it just looks right.
The square format seems to work best with subjects like portraiture, the nude, landscape, still life, architecture, details and abstracts. These are all artistic subjects – which is perhaps why the square format is popular with fine art photographers.
What it comes down to for most photographers, I’m sure, is that experimenting with the square format is fun. You get to create some good images and the lessons you learn about composition will help you out when you take photos in rectangular formats.
The 35mm problem
One of the problems posed by the 3:2 aspect ratio of 35mm digital SLRs is the length of the rectangle. Turn your camera on its side to take a vertical image and you’ll see what I mean, especially if the subject is a landscape. It can be quite hard to fill the frame without leaving empty space at the top or bottom. That’s one reason why photographers use medium format or large format cameras, and why the micro four-thirds format appeals to some photographers. The ‘shorter rectangle’ is easier to fill. The square format is what you get when you truncate the rectangle completely.

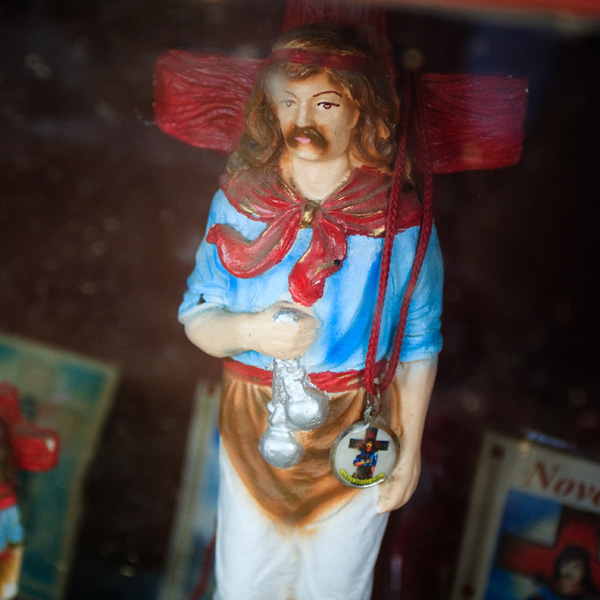
This is a good example of a photo that becomes stronger cropped to the square format. The compositional problem that I had to solve when I took this photo was what to do with all the empty space around the statue? My first thought was that it could be quite effective as a framing device. But now I think that there is just too much empty space around the statue, and that it benefits from cropping to a square. The statue is larger within the frame and the eye can take in the details of the statue rather than go on a somewhat wasted journey around the edges of the frame (there is nothing interesting to see there).
I’m sure there will be some people who prefer the original version to the cropped one. That’s part of the fun of photography. There are no set rules, there is usually more than one way of doing things, and we all have different opinions about the effectiveness of certain techniques or ideas.
Shapes

How many shapes can you see in these images? Whether it’s circles, squares, rectangles or triangles, the technique of composing using geometric shapes within the square format is very powerful. The square format lends itself better to this type of composition than any rectangular aspect ratio. Shapes become stronger in black and white photos as there is no distraction of colour. Shapes are also simple – note the simplicity of design in these images.
Design and balance
Unlike a rectangle, a square image has a natural sense of balance. A square is a very solid shape, especially compared to an upright rectangle – it can’t fall over.
You may be wondering whether you should still compose according to the rule of thirds within the square format. My advice is – don’t. You can throw the rule of thirds out of the window (probably the best place for it). The rule of thirds is a guideline only, and it’s really no more than a simplification of the principle of the golden mean (also known as the golden ratio), which only applies when used in a rectangle with an aspect ratio of 1.618:1 (close to the 3:2 aspect ratio of the 35mm frame).
In other words, it’s a rule designed to be applied within the 35mm frame. Don’t try and use it within other formats – you’ll only end up with a result that looks forced or formulaic. Instead, concentrate on the balance within the image. How do all the elements work together, and with the negative space surrounding them? As the photo above, and some of the others I’ve used here show, central compositions work well in the square format.
One of the strengths of the square format is that it’s quite easy to use the space within the frame well. It’s open to experimentation – you can place the subject in various positions within the frame to find the most effective. Especially if you’re cropping from a 35mm photo within Lightroom or Photoshop – you’ll have some leeway to place the subject within different parts of the frame, and see what works best.
Conclusion
Before digital photography, if you were interested in black and white photography you had to be quite serious about it to invest in a proper darkroom and the facilities required to make good quality prints. Digital photography has brought black and white photography to the masses by making it available to just about everybody who owns a digital camera.
It’s a similar story with the square format. It’s so easy to crop your images in Photoshop that you don’t need a medium format or square format camera to experiment with the square format. Anyone can try it – all that remains is to enjoy it and create some beautiful images for the rest of us to enjoy.
How to Accurately Use a Light Meter in Photography?
Introduction
Accurate exposure is fundamental to creating a high-quality photograph. With an light meter, you can venture into a wide variety of lighting conditions and be confident that you will consistently get good results. You can use an light meter otherwise known as an exposure meter to make selective light readings, to handle unusual and difficult lighting, or to make special creative effects.
Light meters, are light measuring devices that are good at doing what the human eye can’t–quantifying light. With an exposure meter you can relate the brightness of light reflected from a subject toward the camera, or the brightness of the light illuminating the subject, to the sensitivity your cameras sensor. The meter expresses this relationship in terms of lens aperture and shutter speed and ISO setting. Most of today’s digital cameras have exposure meters built into them. In a single-lens-reflex (SLR) camera, the built-in meter’s photocell measures the intensity of the light passing through the lens. In a non-SLR camera, the photocell is on the front of the camera body or lens. Some in-camera meters set exposure controls for you automatically, but more expensive models have overrides that enable you to change the camera’s aperture and shutter speed. Some photographers still prefer to use a separate handheld meter because of the added control and flexibility. Whether you use a camera with a built-in meter or a separate handheld meter, the following information will help you to use your meter to its potential to give you well-exposed pictures.
We have spoken in previous lessons about the exposure triangle and the impact ofshutter speed, aperture and ISO settings have on exposure.
Exposure Latitude
Correct exposure is necessary for getting the best possible picture quality from your camera. However, because of the lack of exposure latitude inherent in digital cameras, exposure can only be off slightly particularly towards overexposure and you could lose valuable data from the image file.
How Light meters work
The kind of meter you have determines not only how it measures light, but how you should use it. There are two basic kinds of meters: reflected-light (they measure the light reflecting from a subject scene) and incident-light (they measure the light falling onto a subject or scene). Each type has its advantages and its disadvantages. Some meters have accessories that enable you to use them to read either reflected light or incident light. Reflected-light meters that read a wide angle of view are also called averaging meters. They account for most of the reflected-light meters in use, including those built into cameras. Another type of reflected-light meter, the spot meter, is designed to take readings from only a small part of the scene.
Meter-Reading Area
Virtually all in-camera meters are the reflected type–they measure the average brightness of the light within the lens’ field of view. As you look through the lens of a SLR digital camera, you can see what the meter sees. Change the lens and you change the area being metered. Most handheld meters are also reflected-light meters. Many photographers prefer reflected-light meters because they can use them to take light readings from the camera position. To take a light reading with a handheld reflected-light exposure meter, you usually stand at the camera position and aim the meter at your subject. To use an incident-light meter, on the other hand, you usually position the meter as near the subject as possible, in the same light that is illuminating the subject, and aim the meter back at the camera. A spot meter has a unique and helpful feature–an extremely narrow angle of coverage. Instead of measuring the brightness of an entire scene, a spot meter measures the brightness of a small area or “spot” within the scene, usually only a few degrees or less. Handheld spot meters have a built-in viewing lens so you can see precisely what part of a scene you’re metering. This feature can be very helpful.
Most through-the-lens SLR camera meters are the averaging type, reading the entire picture area. Many read the entire area but are biased for the central part of the viewfinder. The center has the greatest influence over the exposure reading, although the remaining picture area still has some effect on exposure. Other cameras can be switched to modes similar in principle to spot meters; they read only a small segment of the scene. With the advent of advanced electronics, it is possible to make several spot readings that are automatically integrated for optimum exposure.
Another type of system offers multi-pattern metering. Also called matrix or segmented metering, these systems work by dividing the viewing area into a set pattern or grid of several segments. The meter reads each segment and makes a comparative analysis of things like subject size and the brightness of each zone. The camera compares this data with programmed information it contains to calculate exposure. This type of metering system can adjust automatically for backlighting, snow and other unusual scenes to give better exposure. Check your camera manual for specific instructions and information about the area of coverage fore your camera’s meter.
How Light meters see.
Both reflected-light and incident-light meters are calibrated to “see” the world as a medium gray. The assumption is that most subjects, most of the time, are of average tone and reflectance. So long as there is an even distribution of light and dark subjects in the scene, correct exposure is usually as easy as pointing the meter or camera at the scene and using the reading you get. But the real world does not always present subjects to you in such a straightforward way. For example, with either a reflected-light meter or an incident-light meter, if the main subject is very dark or very light, the indicated exposure will make the subject appear as a medium tone in the picture. The result will be incorrect exposure unless you apply your own judgement to the information the meter gives you.
Use a meter reading as a guideline rather than a dictate for correct exposure. This makes it important that you understand how your particular meter works so you can consistently get good results no matter what the lighting. The place to begin this understanding is the instruction manual that came with your meter or camera. The instructions should familiarize you with the meter’s specific features, its flexibility, and its limitations. Most camera and exposure meter instructions provide the basic techniques of light measurement and mention some of the situations that may “fool” the meter. If you can’t find the instructions, write to the manufacture for them.
Using reflective light meters
Once you have set the proper ISO on your camera or meter, you are ready to make the exposure-meter reading. With a reflected-light meter (in camera or handheld), point the camera or meter at the subject. The meter will measure the average brightness of the light reflected from the various parts of the scene. With an in-camera meter, a needle displayed in the viewfinder or an LCD display on top of the camera will tell you when you have achieved the proper combination of lens and shutter-speed settings. If the camera is fully manual. you must set both the aperture and shutter speed. Automatic cameras may set both shutter speed and aperture; or they may set just one of the controls, leaving you to set the other.
If you’re using a handheld meter, read the information on your meter and set the camera controls accordingly. An overall exposure reading taken from the camera position will give good results for and average scene with an even distribution of light and dark areas. For many subjects, then, exposure-meter operation is mostly mechanical; all you do is point the meter (or camera) at the scene and set the aperture and shutter speed as indicated. But your meter does not know if you need a fast shutter speed to stop action or a small aperture to extend depth of field. You will have to select the appropriate aperture and shutter combination for the effect you want. There will be other situations where either the lighting conditions or the reflective properties of the subject will require you to make additional judgements about the exposure information the meter provides, and you may have to adjust the camera controls accordingly.
A reflected-light meter reading is influenced by both how much light there is in the scene and how reflective the subject is. The meter will indicate less exposure for a subject that reflects little light, even if the two subject are in the same scene and in the same light. Because reflected-light meters are designed to make all subjects appear average in brightness, the brightness equivalent to medium gray, they suggest camera settings that will overexpose (make too light) very dark subjects and underexpose (make too dark) very light subjects.
Although reflected-light meters are influenced more by the largest areas of the scene, the results will be acceptable even when the main subject fills the picture but it’s still of average reflectance (neither very light nor very dark). However, what happens if a relatively small subject is set against a large dark or light background? The meter will indicate a setting accurate for the large area, not for the smaller, but important, main subject. Therefore, when the area from which you take a reflected-light reading is very light or very dark, and you want to expose it properly, you should modify the meter’s exposure recommendation as follows:
• For light subjects, increase exposure by 1 to 2 stops from the meter reading.
• For dark subjects, decrease exposure by 1 to 2 stop from the meter reading.
Using selective light readings
To determine the correct exposure for contrasty scenes with large areas that are much darker or much lighter than the principle subject, take a selective meter reading of only the subject itself. This can be done by moving the meter, camera or zoom your lens close to the subject. Exclude unimportant dark or light areas that will give misleading readings. In making close-up readings, also be careful not to measure your own shadow or the meter’s shadow which may be falling onto the subject.
Selective meter readings are useful for dark subjects against a bright background like snow, or for subjects in shade against a bright sunlit background such as someone stood on a beach with the sun lighting from behind them. There is also the reverse of this: The subject is in bright sun and the background is in deep shade. In all these situations, your camera has no way of knowing which part of the scene is the most important and requires the most accurate exposure, so you must move in close so the meter will read only the key subject area. For example, if you want to photograph a person posed on a snowy slope on a bright, sunny day, taking an average reading of the overall scene will result in underexposure. The very bright snow will overly influence the meter and the reading will be too high. The solution is to take a close-up reading from the skier’s face (or a piece of medium-toned clothing) and then step back the desired distance to shoot the picture. Some cameras with built-in meters have an exposure-lock button that you can use when you do this. This technique is useful anytime the surroundings are much brighter or darker than your subjects.
Landscapes and other scenes with large areas of open sky can also fool the meter. The sky is usually much brighter than other parts of the scene, so an unadjusted meter reading will indicate too little exposure for the darker parts of the picture. One way to adjust for this bias without having to move in close is to tilt your lens or meter down to exclude the sky while taking your meter reading. The sky will probably end up slightly overexposed, but the alternative would be to find a different shooting position excluding most or all of the sky. There are also graduated neutral density filters that work well in such situations. A neutral density filter absorbs all colors of visible light evenly, and you can position a graduated filter so that the darker portion is at the top of the image where it will darken the sky without affecting the ground below.
Bright backlighting with the subject in silhouette can also present a challenge. With the light shining directly into the lens or meter, aiming the meter into the light can cause too high a reading. If you don’t want to underexpose the subject, take a close-up reading, being especially careful to shade the lens or meter so that no extraneous light influences the reading.
Using substitute Readings
What if you can’t walk up to your subject to take a meter reading? For instance, suppose that you’re trying to photograph a deer in sunlight at the edge of a wood. If the background is dark, a meter reading of the overall scene will give you an incorrect exposure for the deer. Obviously, if you try to take a close-up reading of the deer, you’re going to lose your subject before you ever get the picture. One answer is to make a substitute reading off the palm of your hand, providing that your hand is illuminated by the same light as your subject, then use a lens opening 1 stop larger than the meter indicates. For example, if the reading off your hand is f/22, open up one stop to f/16 to get the correct exposure. The exposure increase is necessary because the meter overreacts to the brightness of your palm which is about twice as bright as an average subject. When you take the reading, be sure that the lighting on your palm is the same as on the subject. Don’t shade your palm.
Handling High Contrast conditions
How do you determine the correct exposure for a high-contrast scene, one that has both large light and dark areas? If the highlight of shadow areas are more important, take a close-up reading of the important area to set the exposure. With digital, keep in mind that you will get more acceptable results if you bias the exposure for the highlights, losing the detail in the shadows. Otherwise you might “blow” out the highlights, in which case you will be unable to recover the lost detail. It is much easier to recover data in the shadow areas of a digital file.
But what if the very light and very dark areas are the same size and they are equally important to the scene? One solution is to take selective meter readings from each of the areas and use a f-number that is midway between the two indicated readings. For instance, if your meter indicates an exposure of 1/125 second at f/22 for brightest area and 1/125 second at f/2.8 for the darkest area–a range of six stops–set your camera 1/125 second f/8. This is a compromise solution, but sometimes it is your only choice short of coming back another day or changing your viewpoint, and the composition of the picture, to eliminate the contrast problem.
How to use spot meters
Perhaps the best solution when you need a selective meter reading is offered by the spot meter. Handheld averaging meters generally cover about 30º, while handheld spot meters typically read a 1º angle The angle of spot meters built into the camera are usually wider, about 3 to 12º. The biggest advantage of a spot meter is that is allows you to measure the brightness of small areas in a scene form the camera position without walking in to make a close-up reading. Since a spot meter measures only the specific area you point it at, the reading is not influenced by large light or dark surroundings. This makes a spot meter especially useful when the principal subject is a relatively small part of the overall scene and the background is either much lighter or darker than the subject. Spot meters are also helpful for determining the scene brightness range.
A spot meter can take more time to use since it usually requires more than one reading of the scene. This is particularly true when the scene includes many different bright or dark areas. To determine the best exposure in such a situation, use the same technique described previously for high-contrast subjects: Select the exposure halfway between the reading for the lightest important area in the scene and that for the darkest important area in the scene. Bear in mind, though, all films have inherent limits on the range of contrast they can accurately record. Remember too, you can sometimes create more dramatic pictures by intentionally exposing for one small area, such as a bright spot of sunlight on a mountain peak, and letting the dark areas fall into black shadow without detail. Spot meters are ideal for such creative applications.
How to use incident light meters
To use an incident-light meter, hold it at or near the subject and aim the meter’s light-sensitive cell back toward the camera. The meter reads the amount of light illuminating the subject, not light reflected from the subject, so the meter ignores the subject and background characteristics. As with a reflected reading, an incident reading provides exposure information for rendering average subjects correctly, making incident readings most accurate when the subject is not extremely bright or dark.
When taking an incident-light reading, be sure you measure the light illuminating the side of the subject you want to photograph, and be careful that your shadow isn’t falling on the meter. If the meter isn’t actually at the subject, you can get a workable reading by holding the meter in the same kind of light the subject is in. Because the meter is aimed toward the camera and away from the background light, an incident reading is helpful with backlighted subjects. This is also the case when the main subject is small and surrounded by a dominant background that is either much lighter or darker.
The exposure determined by an incident-light meter should be the same as reading a gray card with a reflected-light meter. Fortunately, many scenes have average reflectance with an even mix of light and dark areas, so the exposure indicated is good for many picture-taking situations. However, if the main subject is very light or very dark, and you want to record detail in this area, you must modify the meter’s exposure recommendations as follows:
• For light subjects, decrease exposure by 1 to 2 stops from the meter reading.
• For dark subjects, increase exposure by 1 to 2 stops from the meter reading.
You will notice that these adjustments are just the opposite from those required for a reflected-light meter. An incident meter does not work well when photographing light sources because it cannot meter light directly. In such situations you will be better off using a reflected-light meter or an exposure table.
If the scene is unevenly illuminated and you want the best overall exposure, make incident-light readings in the brightest and darkest areas that are important to your picture. Aim the meter in the direction of the camera position for each reading. Set the exposure by splitting the difference between the two extremes.
I have found this resource a great source of information. If you want to learn more advanced techniques and understand the business side of photography it is well worth investing in a subscription. Monthly or yearly. Please click on the logo below for more information.

Source: http://www.miketurner-photography.co.uk/blog/?p=125
James’s Light Meter Collection
James’s Light Meter Collection: Weston Master III.
0
0
1
2730
15566
NUS
129
36
18260
14.0
Normal
0
false
false
false
EN-US
JA
X-NONE
/* Style Definitions */
table.MsoNormalTable
{mso-style-name:”Table Normal”;
mso-tstyle-rowband-size:0;
mso-tstyle-colband-size:0;
mso-style-noshow:yes;
mso-style-priority:99;
mso-style-parent:””;
mso-padding-alt:0cm 5.4pt 0cm 5.4pt;
mso-para-margin:0cm;
mso-para-margin-bottom:.0001pt;
mso-pagination:widow-orphan;
font-size:12.0pt;
font-family:Cambria;
mso-ascii-font-family:Cambria;
mso-ascii-theme-font:minor-latin;
mso-hansi-font-family:Cambria;
mso-hansi-theme-font:minor-latin;}
I believe this is the most comprehensive light meter collection that i have ever seen… check it out
§ Amerline
§ Bernhard Deltschaft Collux III
§ Bertram Electro Bewi Standard
§ DeJur Amsco Model 50 Auto-Critic
§ DeJur Amsco Dual Professional
§ Eastman Color Temperature Meter
§ Fotomatic Foto-Meter Model 92
§ GE DW-40
§ GE DW-47
§ GE DW-49
§ GE DW-58
§ GE DW-68
§ GE PR-1
§ GM Labs Skan View-Finder Deluxe
§ Harrison Light Corrector Attachment
§ Hickok Photrix Small-Spot Photometer
§ Optek
§ Pullin
§ Realt
§ Rhamstine Electrophot DHA and M-S
§ RFT Fris
§ Sekonic L-164B Marine Meter II
§ Voss M-6
§ Weston Model 703 Sight Light
§ Weston Model 736 Master II Cine
§ Weston Model S461-6 Euro-Master
