70 tips in Photoshop retouching
Beauty retouching is probably one of the most popular application areas in which Adobe Photoshop is used extensively. There are two simple reasons for that. First, Photoshop offers a variety of advanced tools to smooth out skin and hair, optimize body proportions and emphasize some beautiful details. And second, if you have some experience with Photoshop it is easy to learn the basics and quickly produce very impressive and beautiful results.
Of course, beauty-retouching is a quite deceptive art. The masters of Photoshop create illusions which are hard to tell apart — unless you have both a genuine photo and the final result in Photoshop and can directly compare them. In fact, every day we consume perfectly retouched stars and models online and offline which just look different in the real life.
Still, it is not the reason to avoid learning advanced Photoshop techniques for beauty-retouching and study examples of how it is done in practice. The list below presents both image-tutorials as well as video-tutorials. Most examples have a before-vs.-after-comparison and you can follow the modifications with Photoshop step-by-step.
You may want to take a look at the further Photoshop tutorials selections we’ve presented earlier:
- Adobe Photoshop Tutorials: Best Of
- Adobe Photoshop Video Tutorials: Best Of
- Adobe Photoshop Tutorials: Rainbows, Glows and Light Effects
Skin
- Beautiful Skin
Not everyone has beautiful skin but you can make it better – at least in your photographs.
- Smooth skin
How to make a skin like the ones you see in magazines like Playboy.
- Beauty Retouching
Beauty retouching is one of the most demanding parts of photo manipulation. The main trick for your results to be astonishing is patience.
- Remove Freckles
Reduce slight freckles naturally without using the Healing Brush. In this Photoshop tutorial, you’ll learn how to subtract freckles using a layer.
- Perfect Skin
How you can get rid of all the acne and pimples and blemishes and scars on your face.
- Skin looking smooth
During the course of this Photoshop Lunacore shows you how to make skin look smooth.
- Makeup makeover
How to remove hair in front of someone’s face, retouch skin and apply makeup using Photoshop.
- Dark skin – bright skin
This tutorial shows you how to make a dark skin bright(er).
- A chapter of Beauty Retouching
A free sample chapter of “Skin”, a Photoshop Retouching Book by Lee Varis about Beauty Retouching.
Hair
- Changing Hair Color
How to change hair color.
- Shining hair
Creating shining hair like shown in shampoo ads.
- Removing Hair Roots
A fairly straight-forward method for removing hair roots that takes mere seconds to accomplish.
- Color hair locks
Changing hair color in just few minutes.
Body (breasts, bum, figure, etc.)
- Trimming weight
Trimming weight off with the Liquify tool.
- Digital Nip Tuck
Photoshop is probably the cheapest alternative to plastic surgery possible.
- Digital Nose Job
Simple and easy photo editing technique to give someone a digital nose job.
- Spare Tires
In this tutorial we will see how to remove love handles (or the extra fat around the waist).
- Smaller Nose
This tutorial will walk you through the steps for reducing the size of a nose in a photograph using Photoshop.
- Bigger Bustline
Learn to make a bustline look huge and comically big.
Eyes, mouth and teeth
- Enhancing Iris Color
It is said that the eyes are windows into the soul. This tutorial details a simple yet powerful technique for altering eye color using basic Photoshop tools.
- Red Eye Tool
This photoshop tutorial will show you how to use Photoshop CS2’s Red Eye tool in a non-destructive way.
- Whitening Teeth & Eyes
Some methods to make natural elements white or whiter.
- Make eyelashes thicker
Learn how to make eyelashes thicker.
- Apply Eye Make-up
This photoshop tutorial will show you how you can add eyeshadow, eyeliner and mascara to any model easily.
- Eyebrow Piercing
This tutorial shows you how to add an eyebrow piercing to a photo.
- Photoshop dentist
Everybody can be a good dentist – with Photoshop.
- Whitening Teeth
Another way to make whiter teeth with Adjustment Layer.
Galleries
- Celebrities Before and After
Shows some photos of celebrities before and after beauty retouching.
- Greg Apodaca
Rolling the mouse over most of the images of this digital portfolio will display the original scan before it was retouched.
- Touch of Glamour
Photo Retouching and Enhancement for Pageant, Model and Glamour Photography – Rollover effect also here.
- Amy Dresser
Portfolio of a full-time retoucher and illustrator.
- Retouche
Norm Nason is a senior graphic designer and fine artist.
- The art of retouching
Glenn Feron was born, then found art and was born again.
- Digitalpablo
Portfolio of Pablo J. Castillo.
- Digital Retouche
A German professional retoucher.
- Artist 2 Design
Experience retouching thousands of actors headshots over the years has taught Shawn the art of what to retouch and what not to.
- Digital Retouching Services
From very basic blemish clean ups to full out magazine quality beauty skin retouching.
- Retouchme
Creative high-end beauty, fashion and product retouching.
- Retouche Demo
Nice flash demonstration how to retouche a photo.
Video-Tutorials
- A Perfect Lie In Photoshop
Cameron Rad turn a beautiful woman into a perfect one. “I went through about 40 different makeover techniques, until i found what i thought was the best balance for this photo.” A good “flawless” skin method.
- Hilary Duff
Hilary Duff makeover.
- Breast Enlarge
This tutorial shows you how to enlarge a breast.
- Smart Filters
Using smart filters to soften the skin of your subject gives you the ability to retouch your image while maintaining flexibility.
- Basic Beauty
Learn the absolute basics of beauty retouching in Photoshop.
- Beauty Saloon
Skin retouching with Photoshop.
- Model Beauty
Speed revision of a model beauty.
- Natural to Synthetic
Extremly makeover of a photo of Amy Lee from Evanescence.
- Gossip Girl
Leighton Meester super glam.
- Body makeover
Makeover to illustrate what photoshop can do.
- Magic
The fast way to loosing weight.
- Pretty
A little time and effort can do a lot.
- Extreme
A really nice Photoshop Makeover.
- Pretty face
Another Makeover.
- proof
Proof that you can in fact create top beauty images with a point and shoot camera.
- model job
Great digital makeup in photoshop.
- The Perfect Lie
High-speed Photoshop transformation.
Complete Workflow
- Pure perfection
Spin raw beauty into pure perfection. Very detailed tutorial.

- Beautify a Face
This extensive Photoshop tutorial will show you how to beautify a face.
- Ultimate Makeup
A series of steps to improve skin tones, modify shadow and light patterns to increase the impact, and enhance the eyes and hair to create a striking portrait.
Artistic Retouch
- Phoenix Hair Effect
With some simple brushing techniques, and a bit of color tweaking, you can spice up your photos with this flaming hair tutorial.
More beauty
- Longer Nails
You would like a woman’s nails to be longer? Here we go…

- Eliminate Cellulite
In this tutorial you can learn how to eliminate a person’s cellulite.
- Nail manipulation
Manipulating nails by increasing length and changing shade.
- Airbrush retouching
See what`s possible with Photoshop`s airbrush tool.
- Retouching for Beginners
This tutorial shows a couple of simple techniques you can use to enhance your portraits.
- Photoshop Beauty
Some ways to improve your photos with the help of using Photoshop.
- Tone Down Highlights
Sometimes the only thing that keeps a good portrait from being a great portrait is a little too much shine on the skin.
- Looking good
Great Techniques for Photoshop Beauty Retouching.
- New look
Whatever a model looks like, we can give her a totaly new, beautiful look.
- Glamour Style
Suzette Troche-Stapp is one of the most sought-after photographer/digital artists today. Source: http://www.smashingmagazine.com/2008/07/15/70-beauty-retouching-photoshop-tutorials/
[If you like this blog, please take a few seconds to take a look of the ads below. Thank you. TLRgraphy will continuously collect the best information about twin-lens reflex cameras]
Rolleiflex T

The Rolleiflex T was originally designed to fit between the budget Rolleicord and the Rolleiflex F models.
The ‘T’ designation is understood to stand for Tessar as the camera is fitted with the cheaper 4 element lens often found on Rolleicords rather than the Zeiss Planar or Schneider Xenotar found on the ‘F’ models.
Some say the T really stands for (T)heodor after its designer Theodor Uhl whose sevices were apparently dispensed with after the bean counters at Rollei saw his handiwork.
That didn’t stop the camera becoming a success with a production timeframe of 1958-76 and about 127,250 units being made.
My version of the camera comes in grey leather and judging by the serial number was produced in the early 1960’s as a rule of thumb most grey cameras are early (pre 1966) a majority of T’s are black.
A list of serial numbers can be found here
should you wish to date your Rollei.
The picture above shows the easiest way to tell the T model from a distance, it is the only Rollei with the shutter button on the side.
Even though the camera is positioned between the budget ‘cord and the pro ‘flex it certainly has more of the Flex’s ‘genes’
I’ve often seen people give the advice to get a Rolleicord over the T as the lenses are pretty much equal and the cords are cheaper, I’d advise that prospective purchasers should get a T as they are much better in daily use.
Below is one of the main reasons I prefer the T to my Rolleicord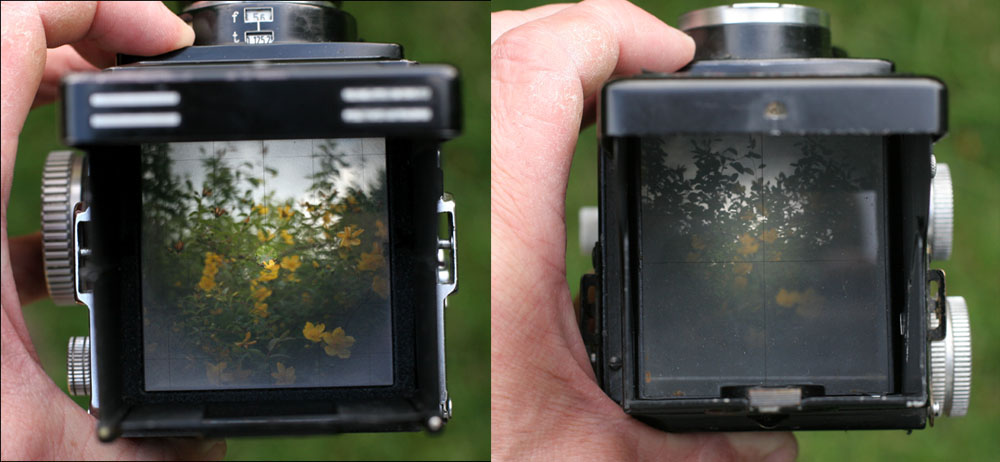
The view above graphically illustrates how much brighter the T is compared to a similar aged Rolleicord, no doubt later Cords have better screens but I’ve always found them duller and slower to focus.
The Tessar lens is a design classic, less elements than the Planar and by some accounts not as sharp at the edges, but for the Portrait type work that TLR’s excel it is a wonderful lens.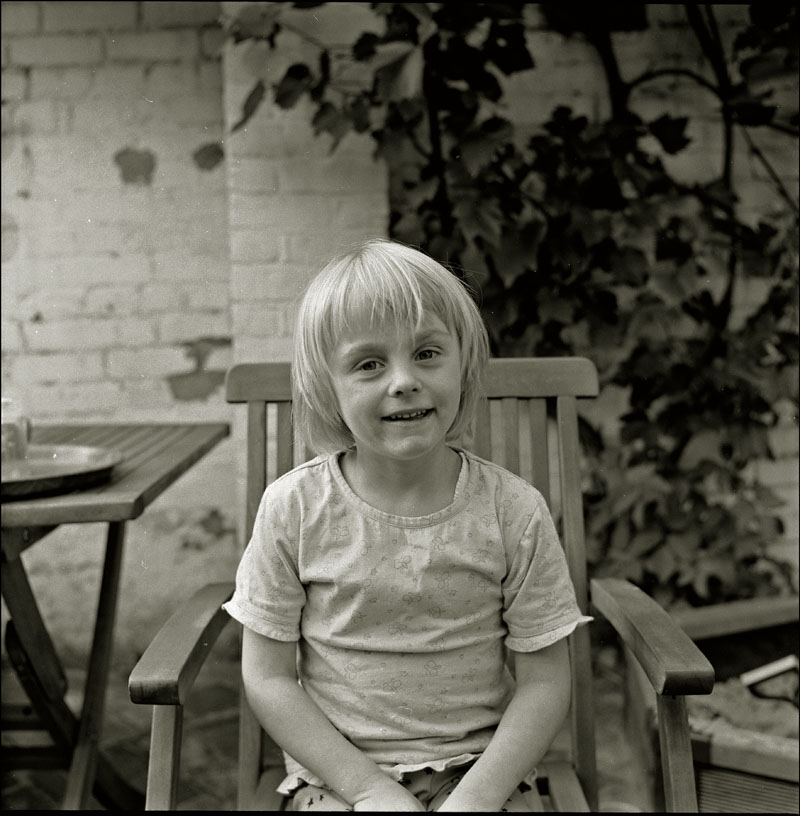
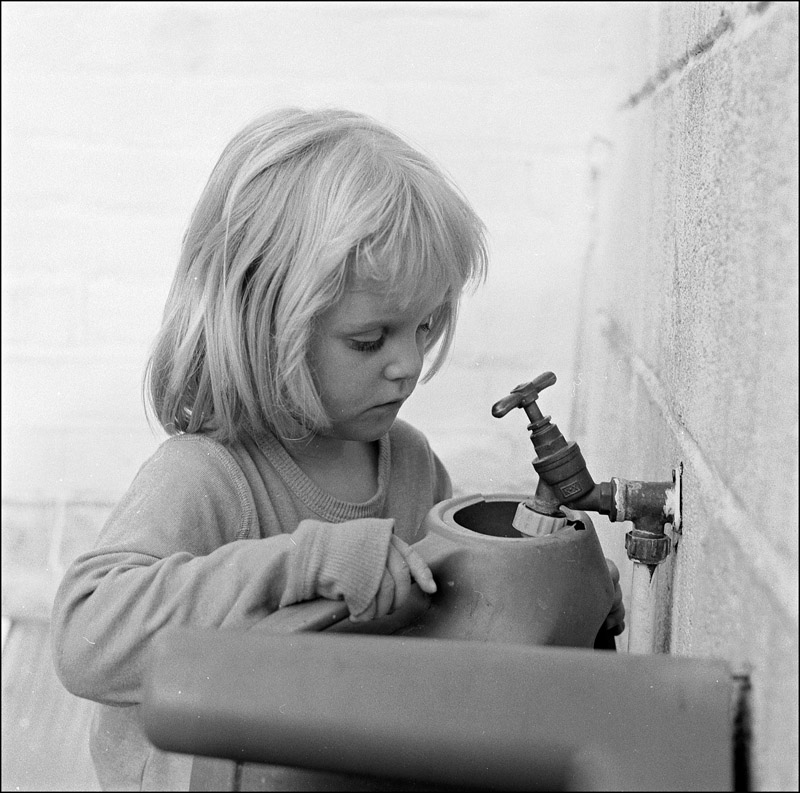
Both of the above images were taken within minutes of ripping open the box, they were taken on Neopan 400 with guessed exposures.
via Photo Utopia: Rolleiflex T.
[If you like this blog, please take a few seconds to take a look of the ads below. Thank you. TLRgraphy will continuously collect the best information about twin-lens reflex cameras]
Yashica 24 in action
Someone got me the Yashica-24 in a very good condition a while ago. I was very happy thinking it would take the 120 film format but then I realized that it takes only 220 films. I was quite disappointed at first but when Huda found some expired Portra films on E-bay, I thought I’d give it a try. I must say, the results turned up really good. I loved the colours. This is my first time using a medium format camera, other than the Holga of course, and I’ve got to admit, looking through the viewfinder is just heavenly. Although it was a bit hard for me to focus in the beginning because of the twin lens flipped viewfinder but then I slowly got used to it.
I have read many links and pages on people who have used 120 film in it, some were successful, some say no (
View original post 68 more words
