Rollei TLR Filters
Are you looking for some Rollei filters? We have a basket of filters for sale!!


Italian, Portuguese and Spanish (click on thumbnail)
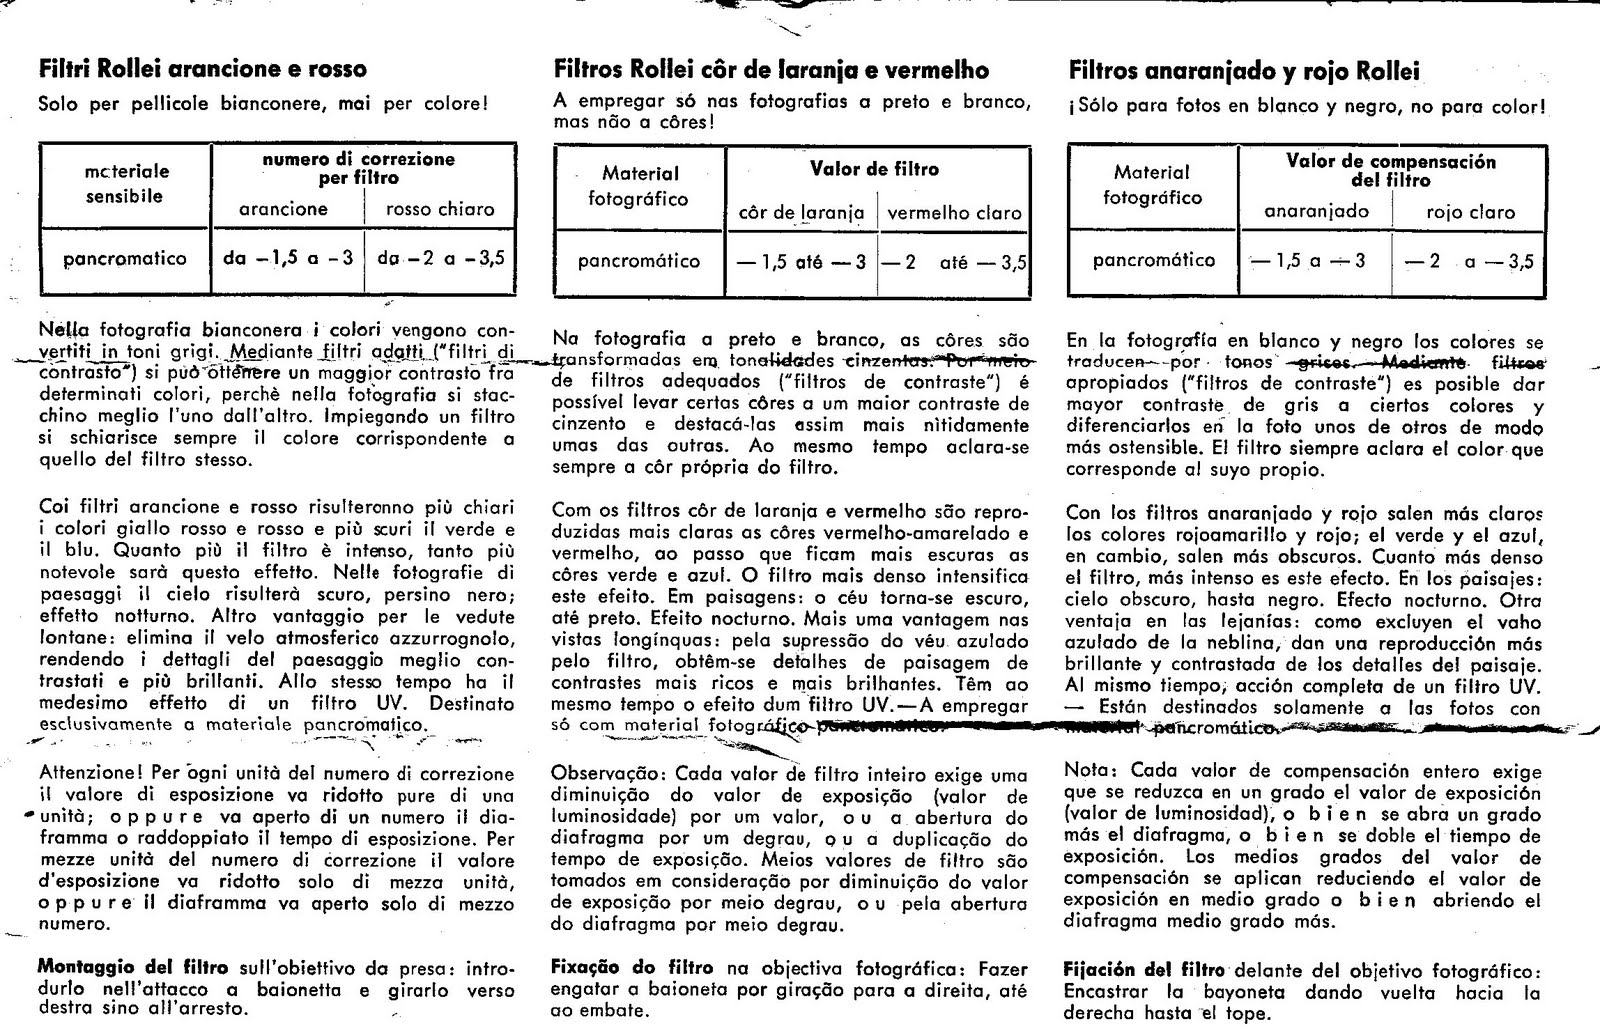
ROLLEI COLOR CONVERSION FILTERS

The table above explains the scale and system used for the colour filters effect and filters power and mentions each filter available for the regular three TLR cameras bayonet with the commercial code, the WA Rolleiflex B IV is not included (click on thumbnail)

Tables A and B work together for the Practical Accesories printed version, you can obtain some useful info anyway (click on thumbnail)
Filter factors for common filters
The table below gives approximate filter factors for a variety of common photographic filters.
| Filter purpose | Wratten number | Other designation | Filter factor |
|---|---|---|---|
| Ultraviolet | UV(0) | 1 | |
| Skylight | 1A or 1B | KR1.5 | 1 |
| Contrast filters | |||
| Yellow | 8 | Y, K2, Y48, 022 | 2 |
| Yellow-green | 11 | X0 http://www.hoyafilter.com/products/hoya/cf-09.html | 4 |
| Orange | 21 | G | 3 |
| Light Red | 25 | 090, R2 | 4 |
| Red | 29 | 25A, 091 | 8 |
| Green | 58 | X1 http://www.hoyafilter.com/products/hoya/cf-09.html | 6 |
| Infra-Red | 89B | R72 | 16 |
| Colour conversion (blue) | |||
| 3200 K to 5500 K | 80A | KB15 | 4 |
| 3400 K to 5500 K | 80B | KB12 | 3 |
| 3800 K to 5500 K | 80C | KB6 | 2 |
| Warming filters | |||
| 3400 K to 3200 K | 81A | A2 | 1.4 |
| 3500 K to 3200 K | 81B | 1.4 | |
| 3600 K to 3200 K | 81C | KR3 | 1.4 |
| 3700 K to 3200 K | 81D | 1.5 | |
| 3850 K to 3200 K | 81EF | KR6 | 1.5 |
| Cooling filters | |||
| 3000 K to 3200 K | 82A | B2, KB1.5 | 1.3 |
| 2900 K to 3200 K | 82B | 1.5 | |
| 2800 K to 3200 K | 82C | KB3 | 1.5 |
| Colour conversion (orange) | |||
| 5500 K to 3400 K | 85 / 85A | KR12 | 1.6 |
| 5500 K to 3200 K | 85B | KR15 | 1.6 |
| 5500 K to 3800 K | 85C | 1.3 | |
| Neutral density | |||
| 0.3 | 96 | NDx2 | 2 |
| 0.6 | 96 | NDx4 | 4 |
| 0.9 | 96 | NDx8 | 8 |
| 3.0 | 96 | NDx1000 | 1000 |
| Polarizers | |||
| Linear polarizer | PL or LP | 3 to 4 | |
| Circular polarizer | PL-Cir, C-PL, CP | 3 to 4 | |
Mamiya TLR Restoration/ Repair Lessons
For the older photographers in our forum, that use or plan to use Mamiya TLR cameras and lenses. Here are my lessons learned from repairing a couple of used “chrome” Mamiya TLR lenses. The usual disclaimer, use the lessons learned at your own risk.
Zero, before you start handling the lenses wash your hands. Use a clean white towel on a well lighted table as your work area. Should a part or screw fall out it will not go far and can be seen.
First, do not remove the lens from the back plane frame, there is no need to access the lens from that side. Front and rear optical assemblies unscrew. There is no need to use a spanner wrench on the retaining clamps that secure the lens to the supporting frame.
Second, if the shutter will not cock the chances are a single screw has come loose within the shutter assembly that can be restored. This screw is located at the two O’clock position viewing the exposed taking lens shutter assembly straight on with upper rings and cam plate removed, viewing lens at 12 o’clock.
Third, if the shutter cocks but does not operate the blades when released a different screw is loose or has fallen out, that can be restored. This is located just south of the release lever mechanism. Check all screws for tightness.
Fourth, never use oil on any part of the shutter mechanism or ring assemblies or aperture assemblies.
Fifth, if the aperture blades mechanism is stuck or sticky, this can be cured using small amounts of 91% isopropyl rubbing alcohol applied with a damp Q-tip. To access the aperture internal assembly, This will require unscrewing the rear optical assembly. Work the mechanism manually using the aperture selector arm, do not touch the blades with your fingers and use another Q-tip to remove excess and any grime. Do not use oil. Be sure to remove any lint left behind by the Q-tips prior to reassembly.
Sixth, if the shutter ring is sticky or the clicks indents are not “sharp”, disassemble the two rings and clean them with isopropyl alcohol. Slightly bend the metal finger on the cam plate that engages the indents on the shutter selection ring.
Seventh, screws are tiny, and can be lost in a flash. For most repairs I have done only one screw has to be removed.
Eighth, acquire the proper tools, i.e. jewelers screwdrivers, needle nose tweezers, etc. A spanner wrench designed for lenses is required (see lesson 10) to remove the optical retaining rings that hold the individual elements. If you do this be sure to note on paper which side is up, in or out facing. Do not rely on your memory.
Ninth, use ROR per the instructions to clean the optics, and do not use canned air.
Tenth, use rubbing alcohol mentioned above with your finger tips (no fingernails, just skin) in a circular motion to remove fungus clouds from optical surfaces. It may require several times to completely remove the fungus. Do not allow excess to drip anywhere. Clean with a lint free, chemical free (no anti static chemicals used in the dryer), white cotton t-shirt. Then use ROR with a t-shirt to remove any residues.
So far, I have restored two Mamiya TLR chrome shutter lenses and both are working fine now. They were a lost cause when I started. They are simple in design and easy to restore.
If you have any second thoughts I recommend taking your lens to a repair facility. But if you are a risk taker and have some common mechanical sense, my lessons learned may prove useful. Search the web for other information sources, and photographs of the lens assembly.
Good luck,
d2f
Wedding Photography – Recommended
Bill Hunter’s book “The best of wedding photography” is one of the best photography books I love to read.
It not only discusses about the techniques and tools in wedding photography, but also the mindset of wedding photographer as well as the landscape of wedding photography market. The book is written in a complete inside-out approach, i.e., start from the mindset and heart of a wedding photographer, towards the techniques, equipments, as well as design.
Below is the wedding index. If you are lucky, you may find some online materials available through google search.
Could you imagine how photographers do wedding using TLR? I heard from many that 40-50 years ago it is actually very popular to use TLR to do wedding…
Seems that you can get the book here.
| 89 | |
| 98 | |
| 106 | |
| 109 | |
| 119 | |
| 120 | |
| 124 | |
| 128 | |
