Film Review: 120-Format Kodak Ektar 100
Just cannot live without 120 film.
I managed to get my hands on some120-format Kodak Ektar 100 before it was available to the general public, and I was given the opportunity to conduct an informal review of the film. Based on the hype surrounding this film, I was quite happy to test it out. After shooting 5 rolls through a few different cameras, I was not at all disappointed with the results as I scanned them in.
I found the colors to be extremely natural and pleasing under daylight conditions. And the sharpness and grain are absolutely to die for. In general, the film has the best characteristics from both slide film and color negative film. Read on for my informal review.
ABOUT THE FILM


Kodak Professional Ektar 100 is a color-negative film (using the C-41 process) available in 35mm and 120-formats. It is claimed to have extremely fine grain (the world’s finest for color-neg) and high color saturation, making it ideal for nature, landscape, and travel photographers.
In September, 2008 the Ektar 100 became available in 35mm format. Due to popular demand, Kodak has made the film available in 120-format in April, 2009 (I believe it’s available for purchase through a few vendors right now).
MY NON-TECHNICAL REVIEW


Equipped with a pro-pack of the Ektar 100, I loaded up my two medium format cameras and headed out on a few photowalks along the coast. One camera was my old 1956 Minolta Autocord MXS (twin lens reflex) and the other was my Diana+ (toy camera). I must admit, putting this film into a plastic toy camera felt a bit like ripping the engine from an F-1 car and strapping it to a tricycle.
The first day I shot this film, the weather turned heavy overcast quite rapidly, but I managed to finish off three rolls. I went out a few days later and shot the last two rolls in full sunshine. The film can certainly be used in either condition, but its white balance is intended for daylight use. The overcast photos just scanned in a bit cold — and I could have adjusted it, but it seemed fitting to leave them as is.


Up to this point, I’ve been shooting mostly Kodak Portra VC color-neg films on medium format (and a little bit of Velvia slide). The Ektar 100 seems quite comparable to the color saturation of these films, but the colors on the Ektar 100 seem more “realistic” to me. The color saturation and contrast isn’t so overbearing that it looks unnatural, and the colors seems to closely represent the actual colors of the scene. One thing I did notice, though, is that the greens tend to be more saturated than the other colors — sometimes a bit too much.
The shots (especially those from the TLR) appear to be very sharp and free from grain. I might even go so far as to say that the Ektar 100 is comparable to Ilford’s PanF Plus black and white film (which is the primary film I use with my Autocord). Though I’ve only scanned the film (which tends to present softer grain versus an optical enlarger), I was hard-pressed to find any signs of grain even at 100% zoom on a 3200 ppi scan.
GRAIN? WHAT GRAIN?
If you don’t believe me, see for yourself. Here’s an image with a decent exposure — the little box is the spot I’ve taken the 100% crop for the image immediately below it. The full image is approximately 50MP, or 7000 x 7000 pixels.


The softness of the 100% crop probably comes from scanning the film since I don’t use any sharpening while scanning. Even so, I can usually make out the grain easily on most films — it’s just not as sharp as with an optical enlargement. The Ektar 100 scans don’t show much sign of grain.
MY FINAL THOUGHTS


I like it — a lot. When I decide to shoot color on my TLR, I’ll probably use the Ektar 100 exclusively. The colors look great and the shots appear to be very sharp and fine-grained. I’m still undecided with the Diana+… I might try a few more rolls and see how it goes, but I’m still leaning toward the Portra VC films just because I have a history of good results with it.
The Ektar 100 film seems to have similar features of slide film (high saturation and fine grain), but with a more forgiving dynamic range of a color negative.
But the thing that gets me most about this film is how natural the colors appear. Color film often has a “film-like” appearance to it because of shifted colors or grain. The Ektar 100 (to me) looks more like a well-processed digital than it does a typical film.
Would I recommend this film for color enthusiasts? Certainly! It seems well-suited for landscape and nature photography, but even skin tones in portraits aren’t completely unnatural.
Yashica LM 44, review, tech specs, film 127
Overview and Personal Comments
The Yashica 44 LM is a twin-lens reflex (TLR) camera that is basically a copy of the Baby Rolleiflex. It uses 127 size film (just slightly smaller than standard 120 medium format) to shoot 44mm x 44mm “superslide” square format photos. The LM added a “Light Meter” to the Yashica 44, which is based on the Yashicamat system. The 44LM is the last of the 44 series. Using the text or images on this website without permission on an ebay auction or any other site is a violation of federal law.
I purchased this as part of a larger lot of cameras at an auction in North St. Paul in 2003.01. I was originally going to sell it to fuel my habit hobby, but looking at the photos that other people have taken (see links below), I was swayed to keep it. The Tessar type lens seems to really glow but in the end I ended up selling it.

Interesting quirks
The camera does not sport a cold-shoe for flash mounting! Instead you use an accessory shoe that mounts over the viewfinder.
 |
 |
 |
I talked with Mark Hama who worked in the factory that made these cameras. Apparently the 44LM came in 7 different colors and was known as the “rainbox” camera. My own is a light grey. This is the 40 year precursor to the multicolored Hasselblad 501CM! Using the text or images on this website without permission on an ebay auction or any other site is a violation of federal law.
Very new to that age, the camera has a built-in partially coupled CDs lightmeter. You dial in the ASA speed of your film, the camera body automatically relays the shutter speed, and you push the black “meter” button on the rear of the camera. The dial on the tells you which f/ stop to set your lens to. Great!

I can’t figure out for the life of me why there’s a ASA/DIN film reminder on the left focusing crank; and also one on the right film winding crank! One’s to calibrate the light meter, the other is…. all I can guess is that they kept the crank from the older 44.
127 film is harder to get these days, but you can still get it from B&H Photo in New York or Freestyle Photo in California. Yashica 44s are rare, most people will think you have a Baby Rollei.

Technical Details
|
Camera Name
|
44 LM |
|---|---|
|
Manufacturer
|
Yashica |
|
Place of Manufacture
|
Body: Japan |
|
Date of Manufacture
|
1958.4 ~ 1962.4 |
|
Focusing System
|
Twin lens reflex |
|
Fixed Lens
|
Taking lens: 60cm f/3.5 Yashinon (multicoated) Viewing lens: 60cm f/3.5 Yashinon (multicoated) |
|
Shutter
|
Copal S-V 1 sec – 1/500 sec. |
|
Metering System
|
Selenium cell mounted on camera body (above the lens ATL) GN 1-10 |
|
Flash Mount
|
M-X switch Cold-shoe mount on left side PC-cable attachment on front side |
|
Film type / speeds
|
Type 127 film (medium format) ASA 6-400 |
|
Battery type
|
hah! |
|
Dimensions and weight
|
|
|
Note: Using the text, table, or images on this site in an ebay auction without permission is a violation of your ebay Terms of Service. I will report you to ebay if I discover such a violation taking place. This may result in your account being cancelled. I also reserve the right to file claim for civil penalties.
|
|
About Yashica/Kyocera/Contax
The Yashica Corporation began making cameras in 1957, releasing its first model in 1958 (the Yashica 35). They produced a very well regarded series of twin-lens-reflex (TLR) medium format cameras under the Yashica-Mat brand and 35mm rangefinders under the Yashica Electro name. Yashica became a subsidiary of the Kyocera Corporation in October of 1983. For the next two decades, Kyocera continued to produce film cameras under the Contax marquee, including a very nice 35mmContax SLR series (which used Zeiss lenses), a medium format system, and the Contax G1/G2 rangefinders (also with Zeiss glass).The Yashica name was only used for a small series of dental cameras and point and shoots. In March of 2005, Kyocera announced that it would cease production and sales of film and digital cameras under the Contax marquee. Thus ends 30 years of a wonderful camera line. The Contax name will most probably revert back to the Zeiss foundation, thus who knows what will happen in the future. Right now, the name “Yashica” appears to have been bought by a Chinese company for their inexpensive digital cameras.
Manual for operating Yashica LM 44 can be found here.
The yashica LM 44 uses 127 film, which is very rare nowadays. developing the film is also going to be a problem.
here is an introduction to 127 film and places you can find them.
The 127 film is a paper-backed rollfilm, 4.6cm wide, originally designed to store eight pictures in 4×6.5cm format. It was created by Kodak for their Vest Pocket model – hence 127 was often called Vest Pocket film. Many of the first generation of 127 film cameras were similar folders, and frequently inherited Vest Pocket or VP in their names – for example the Dolly Vest Pocket. See Category: 4×6.5.
In 1930, during the Great Depression, the camera makers tried to optimize the use of film, and cameras began to appear taking 16 exposures in 3x4cm format on the 127 film, the first one being the Zeiss Ikon Kolibri. See Category: 3×4.
In Japan, the 127 film was called “Vest film” (ベストフィルム; Besuto firumu) until approximately the 1950s, because the film was introduced for the Vest Pocket camera.
In the 1950s there was a short revival of the 127 film with cameras designed to take 12 exposures in 4x4cm format. Several firms produced high-quality cameras, primarily twin-lens reflexes, in this format. The film was available in color slide emulsions, and the resulting 4x4cm slides could be projected in a normal projector designed for 24x36mm slides. They were advertised as Superslide. Kodak made such a range of very basic cameras. Rollei made a more advanced Rolleiflex Baby camera until the beginning of the 1960s. Togudu and Yashica in Japan produced outstanding examples. See Category: 4×4.
After the 1960s, 127 film declined in popularity as camera manufacturers focused on 35mm. Kodak ended production of 127 in 1995 and other major manufacturers immediately followed.
Fotokemika in Croatia was an exception, and it is still making highly-regarded “Efke” brand 127 black and white films. In 2006, Bluefire in Canada began manufacturing 127 C-41 color print films which are made using film stock from major factories, which is machine-rolled onto custom-manufactured spools and backing paper. Dick Haviland, a retired Kodak executive, has for many years made 127 films by hand from salvaged spools and custom-printed backing paper, which he sells through major on-line retailers. It is expected that 127 will continue to be available from boutique manufacturers for many more years.
120 Film Scanner Review
Scanner Review: CanoScan 9000F.
If you are using TLR, you must have a good scanner… here is a good review from image sources.
CanoScan 9000F —
Scanning at 9600 dpi

By MIKE PASINI
Editor
The Imaging Resource Digital Photography Newsletter
Review Date: May 2010
While Canon’s CanoScan 8800F and Epson’s V600 battle it out in the sub-$200 flatbed film scanner sweepstakes, Canon has quietly trumped them both with its highest resolution film flatbed ever: the CanonScan 9000F.
With 9600×9600 dpi optical resolution, you can just about paint your house with a 35mm slide. And at just $50 more than the CanoScan 8800F, the upgrade won’t make you wince.
We’ve been using a review unit for a few weeks now. Retail units had not started shipping when we wrapped up this review. But only the white box gave away the pre-production nature of this unit.
ONE CAVEAT | Back to Contents
While all three of these scanners are impressive little boxes delivering more value per dollar than we’ve ever seen in a flatbed, the process of scanning your film and print archives is no less arduous than it’s ever been.
So we always feel obliged to warn readers that, in practice, a flatbed scanner is most likely to be used to squeeze every bit you can out of an important image. It is least likely to be digitizing your entire lifetime of memories. The scanning process is just too slow for that.
Our V600 review, being the first for this class of device, includes a Short Course on Scanning. It also includes our recommendation for reasonably digitizing your photo collection. We even name names.
We’ve been skeptical that this class of device can handle the demands of faded originals and difficult emulsions (like Kodachrome). And we’ve been suspicious of the dynamic range they can capture, particularly an issue with slides. We’ve been disappointed that none of them provide a way, out of the box, to build a scanner profile, although SilverFast and VueScan can do that if you don’t mind an additional purchase (plus the IT8 targets).
But in a sense, we’ve missed the boat. The LED lamps in these things are pretty consistent so the default profiles supplied by the manufacturer’s work pretty well. Where the software is most likely to fail is with color negatives (which, unfortunately, is likely to be the most common storage medium). They just aren’t as sophisticated as SilverFast or VueScan when it comes to color negative scanning.

But, frankly, you can get pretty close. We’ve peppered this review with quite a few images to show just how close.
FEATURES | Back to Contents
With no lamp warm-up time required, the USB 2.0 High Speed CanoScan 9000F gets to work when you do. Scan speeds themselves are brisk but because any scan involves a preview and adjustments before the final scan, that’s only a small part of the time it takes. And it does depend on the scan sampling rate or resolution, as well.
The CanoScan 9000F offers a full 9600×9600 dpi optical scanning resolution, exceeding the 7200×7200 of the dedicated 35mm Plustek OpticFilm 7600i film scanner. If you crop 35mm film for enlargement beyond 8×10, this may matter to you, but for routine prints of 35mm frames, it doesn’t matter at all.
IT8 Targets. CanoScan 9000F (top) CanoScan 8800F, Epson V600 and Microtek M1
It also includes seven EZ buttons on the lid dedicated to common tasks. The attraction of simply pressing a button is undeniable but it’s only really helpful when you really need a document feeder. When, that is, you have to repeatedly feed material to the scanner and run back and forth to the keyboard. For routine image scanning they really don’t come into play.
More importantly, the CanoScan 9000F scans 48-bit color and 16-bit grayscale with an option to save those raw scans. Canon doesn’t divulge the density range of its scanners.
Three film holders are included with the unit for scanning two strips of 35mm negatives, four mounted slides and four 120mm frames.
The hardware feature you’ll most appreciate is the compact size of the CanoScan 9000F. It goes the CanoScan 8800F, which is nearly identical, by hiding the bulking data cable in the lid.
Another nice feature you don’t see by looking at the CanoScan 9000F is ScanGear, Canon’s TWAIN driver, which is what you use when scanning from your image editing software. Canon also provides MP Navigator EX, a scanning application that is linked to the seven EZ buttons, to control the CanoScan 9000F. Both products can restore faded colors and optimize an image.
Finally, the CanoScan 9000F includes Canon’s FARE technology to repair physical defects like dust and scratches using an infrared scan.
SPECIFICATIONS | Back to Contents
Canon has documented the following specifications for the CanoScan 9000F:
Scanner Type: Flatbed
Scanner Element: Charged-Coupled Device, 12-line color
Light Source: White LED
Features: 7 EZ Buttons, 9600 dpi CCD Sensor, Auto Document Fix, Auto Scan Mode, Built-In Power Supply, FARE Level 3, Film Scanning (35mm film/120 format film), Gutter Shadow Correction, High-speed Scanning, Light Guide, OCR Text Data Conversion, PDF Password, Sensor Carriage, Super Toric Lens, White LED, Zero Warm-up Time
Scanner Buttons: Auto Scan, Copy, Email and four PDF buttons
Maximum Resolutions: Optical: 9600 x 9600 dpi for film and 4800 x 4800 for all other media; Interpolated: 19,200 x 19,200 dpi
Scanning Mode: Color: 48-bit internal/48 or 24-bit external
Grayscale: 48-bit internal/16-bit (film scanning only)/8-bit external
Maximum Document Size: 8.5 x 11.7 inches
Interface: Hi-Speed USB
OS Compatibility: Windows 7/Vista/XP/2000 and Mac OS X v10.4.11 to 10.6.x
Power: AC 100-240V, 50/60 Hz
Software: Setup Software & User’s Guide CD-ROM, Adobe Photoshop Elements 8, ArcSoft PhotoStudio, MP Navigator EX
Maximum Power Consumption: 15W (0.9W standby)
Environmental Conditions: (without condensation) Operating temperature: 50-95 degrees F; Operating humidity: 10-90 percent RH (20-80 percent RH for film scanning)
Warranty: One-year limited warranty with InstantExchange program. One-year toll-free technical phone support.
It’s worth pointing out that the version of Photoshop Elements that ships with the 9000F is the latest. That is rarely the case these days. Applause for Canon.
IN THE BOX | Back to Contents

The retail box includes:
- CanoScan 9000F scanner – Document kit with Adobe Photoshop Elements DVD, Photoshop Elements Sheet, Cross Sell Sheet, Quick Start Guide, Setup Software & User’s Guide CD-ROM and Warranty Card
- Film Guide Mount
- Film Guide Strip
- Film Guide Medium Format
- Film Retainer Sheet Mid Format
- Power cord
- USB cable
SETUP | Back to Contents
There are two stages to setting up the CanoScan 9000F. The first is the software setup, the second is the hardware installation. It’s so simple that Canon doesn’t bother to supply a poster. The front page of the Quick Start Guide shows you in three diagrams what to do: Insert the CD, Unlock the Scanner, Plug it in.

No poster, just three steps.
Software Installation. To install the software, just drop the CD in and run the setup application.
The ScanGear driver and on-screen manual are installed. Then Canon’s MP Navigator EX and Solution Menu applications are installed. Finally ArcSoft’s PhotoStudio is installed. You can install Photoshop Elements v8 separately.
You are also prompted to register your scanner with Canon online. Windows users are prompted to participate in Canon’s Extended Survey Program.
Canon wants you to install the software first so that the driver is installed before you plug the scanner itself into your computer.
The printed Quick Start Guide doesn’t explain very much. The on-screen manual is really your reference guide to the scanner. That’s a reasonable approach, saving trees and providing quick access to the details with a searchable electronic document.
Note also that you will want to check the configuration of the scanner buttons later. That’s explained only in the on-screen manual.
Hardware Setup. Unpacking the scanner is quick and easy. A power cable (with no brick) and a USB cable are included. The two top corner Styrofoam blocks pop off and the lightweight scanner lifts out easily. It’s a dead ringer for the CanoScan 8800F with the protective plastic and orange tape removed.

Lock (left), corner guide (arrow) and film holder pin (back).
Find a place for the scanner and unlock it using the big button visible by the hinge when you open the lid. Once you’ve unlocked it, you don’t want to move it without locking it again.
The lid’s hinges expand about an inch to accommodate thick materials.
Then plug in the power cord and the USB cable. And attach the USB cable to your computer.
HARDWARE TOUR | Back to Contents
Although it’s long, the CanoScan 9000F is one of the more compact flatbed film scanners we’ve tested and noticeably smaller than the Epson V600. It’s still another box to put on your desk, unlike a multifunction device that can scan film like the MP980.

Cover latch open
It actually looks a little sleeker than it is because it’s shaped somewhat like a boat with a hull that is narrower than the deck. The transparency adapter is not as thick as most, and is not marred by a very thick electrical cord connecting it to the scanner at the back as was the CanoScan 8800F.
Also on the back, where they should be, you’ll find the power port and the USB port.

USB port, power port
From the front, the shiny piano black plastic fans out to embrace a row of buttons. Those include the Power button (ringed with a blue LED to indicate status), auto Scan, four PDF buttons and two task buttons to Copy and Email.
The top stays up by itself once you’ve opened it more than 45 degrees or so. The white back lifts out to reveal the film light source. The plastic latch on our model was a little stiff, but workable.
Transparency light source
On the glass platen, an embossed arrow indicates the corner to orient your original material. Along the back edge a small pin indicates where to attach the film holders. On the front edge a small tab shows where to seat the other end of the film holders.
The three film holders are very simple. They each have a calibration area near the pin end that should be kept clear.
The 35mm film strip holder takes two strips of up to six frames. You pinch the inner plastic frame to release it, swing it up and insert your film. Nothing in the frame rubs against it but there are guides to properly align it as well as a boxed R to indicate how to orient the original.


Film Holders. Negative strips (top), four slides (loosely positioned) and 120 film (bottom).
The 120 film strip holder works just the same but includes a stiffer plastic piece to help hold that larger film size flat if it’s curled. There’s no other tension applied by the film holder.
The 35mm slide film holder merely contains up to four mounted slides you drop into the open areas. It’s the simplest holder of the three.
And yes, you can scan without a holder. The actual scan area is 3.125 x 9 inches. But you might as well use the 120 holder if you’re going to do that.
In sum, the device is lightweight and compact but very well engineered, down to the film holders. Nothing requires any particular manual dexterity or elaborate physical gestures. It’s as if Canon did a time/motion study on scanning.
CANON TECHNOLOGY | Back to Contents
There are two technological features of the CanoScan 9000F worth pointing out before we get to work.
The first is Canon’s FARE technology.
Canon’s Film Automatic Retouching and Enhancement technology removes dust and scratch marks automatically from film scans using an infra-red process much like SilverFast’s iSRD or Digital ICE.
Level 2 and 3 performs several automatic corrections. Fading Correction that restores hues and tints, transforming faded film originals into vivid color. Grain Correction removes grain from high ISO film.
Level 3 also includes Backlight Correction to lighten dark subjects standing in front of a bright background.
The second technological feature worth mentioning is ScanGear, Canon’s scanning driver and application. It’s one of the best scanning applications we’ve used. What we appreciate most is the clarity of its workflow decisions and how easy it is to find the settings you need to configure.
Canon simply makes it more pleasant than most, certainly less frustrating than Epson and on a par with Kodak and HP.
Even if you know nothing about scanning, this software makes it easy to get good results.
ABOUT THOSE BUTTONS | Back to Contents
We’re not a fan of buttons. Mainly because we like to do everything from the keyboard. But if you have to stand at the scanner to load a set of documents or prints, they can be very helpful. You don’t have to run back to the computer to scan, then run back to the scanner to load.

The buttons depend on Canon’s MP Navigator EX application for both their custom settings and button functions. It’s something of a command central for the scanner, providing a simple-to-use application to scan photos, documents and film.
The Auto Scan button detects what kind of document you’ve loaded (first by checking if the Film Adapter Unit Protective Sheet is in place), configures the scanner for that kind of document, scans it and saves it to your hard disk.
There are four PDF buttons:
- The Color button scans lettersize/A4 images at 300 dpi by default.
- The Black and White button scans lettersize/A4 images in black and white at 300 dpi by default.
- The Custom button scans images using settings you specify beforehand.
- The Finish button ends the scanning operation, saving the scans in a PDF document.
The Copy task button prints the scanned image on your printer, emulating a copy machine.
The Email task button attaches the scanned image to a new email message.
To assign functions like Auto Scan, Save, Copy, Print, Mail, OCR, Scan or Show Main Menu to the Auto Scan, Copy or Email button, use MP Navigator EX’s Scanner Button Settings preference panel.
You may have to restart your computer for changes to the buttons to take effect.
SCANGEAR | Back to Contents
If you’re working from an image editing application like Photoshop, you won’t use MP Navigator EX to control the CanoScan 9000F. Instead, you’ll use ScanGear, a TWAIN driver that functions in three modes: Basic, Advanced and Auto Scan.
| ScanGear Preferences | |
 |
 |
|
Scanner options |
Preview settings |
 |
 |
|
Scan options |
Color settings |
ScanGear is a well thought-out scanning application (something we rarely say) that provides help where you need it and gets out of your way when you don’t. We prefer it to Epson Scan, find it equivalent to HP’s and Kodak’s equivalents and would rank it higher than SilverFast or VueScan for its interface if it provided one or two more key functions (like IT8 target profiling).
Basic Mode makes scanning as simple as possible, dividing the task into three steps: Select the Source (is a color photo, a color negative, positive film, etc.), Preview the Image (decide if you want to scan for a print or some other format, adjust the automatic crop, adjust the image (fade correction, backlight correction, gutter shadow correction), adjust the color by viewing a set of thumbnails set to different tints) and Scan the image.
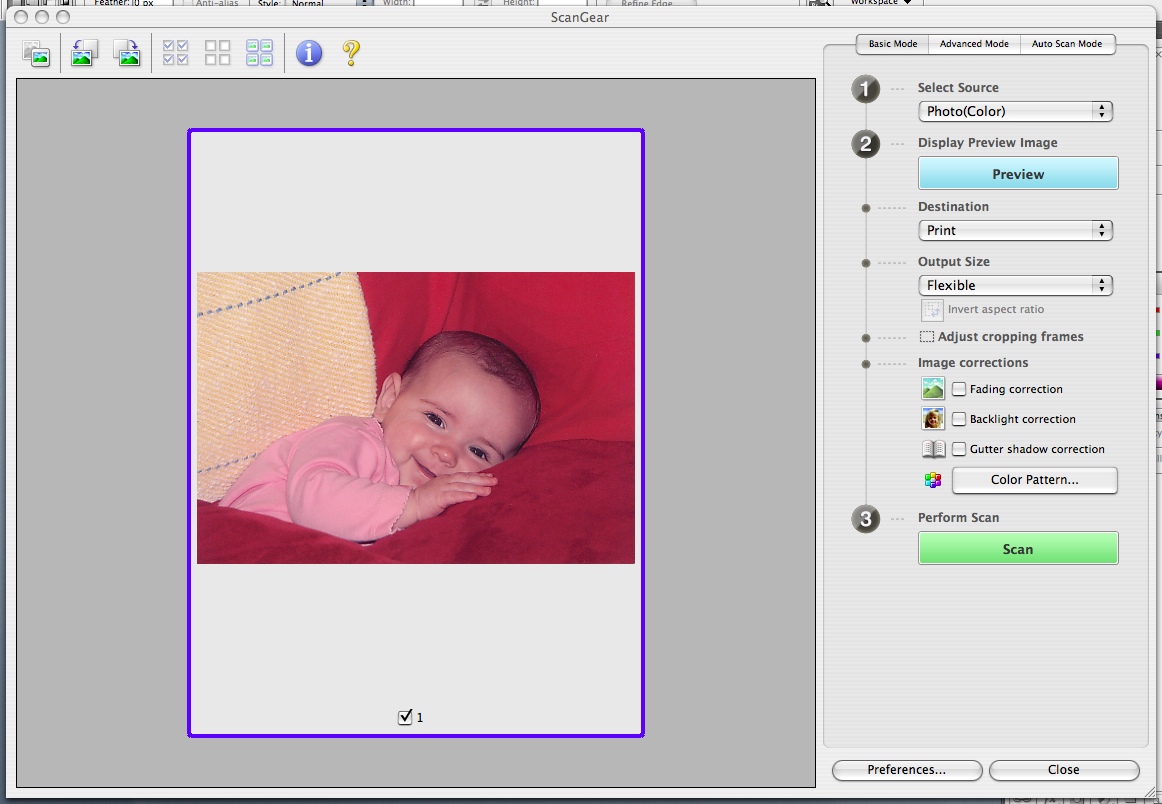
Basic Mode. Basic settings (above) and the Color Pattern option.
The image corrections are checkboxes not sliders. If you find that’s too restrictive, you’re ready for the next mode.
Advanced Mode gives you quite a few more options on the right-hand panel. It may appear a bit intimidating at first, but the driver fills in the fields where it can. And it does that with some intelligence, we observed.
Advanced Mode. Settings options.
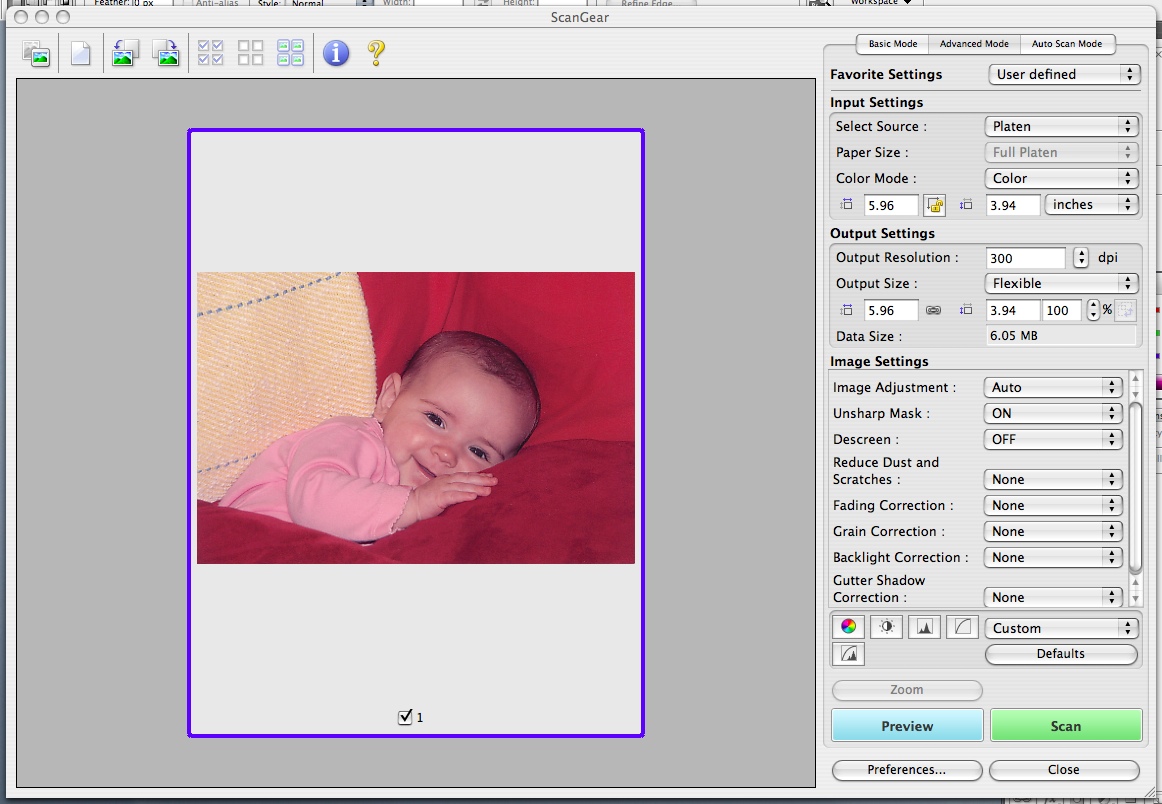
You follow essentially the same steps as in Basic Mode, but you have more options. You can, for example, specify the output resolution (which is how we got our 9600 dpi scans). And Image Settings provides degrees of corrections rather than the checkboxes in Basic Mode.
Auto Scan Mode. One click and close your eyes.
In addition, you have a full Curves dialog to shift color in the scan. And controls for brightness and contrast, as well.
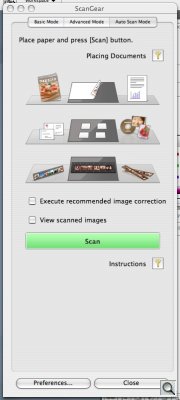
Auto Scan Mode is a one-step process. After you load the scanner, just press the Scan button. Optionally, you can enable a checkbox to let the driver correct the image. There’s another one to view the scan, too.
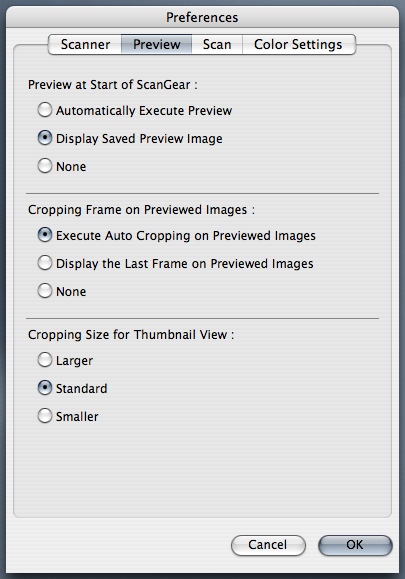
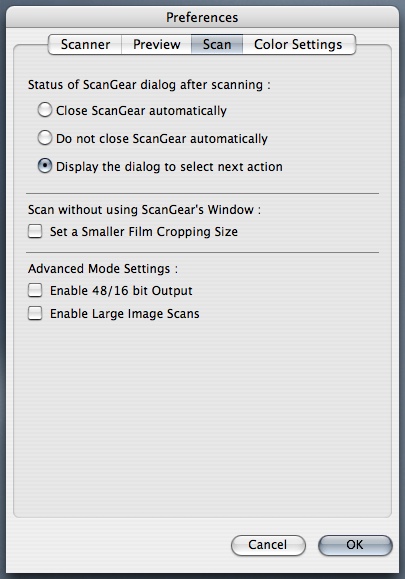
Preferences. Some of the power of ScanGear is hidden in the Preferences. The Scan panel, for example, enables 48/16-bit output (otherwise the scanner converts from 48-bit to 24-bit color and 16-bit to 8-bit grayscale). It also enables image scans up to 4.0-GB in Advanced Mode but disabling backlight correction.
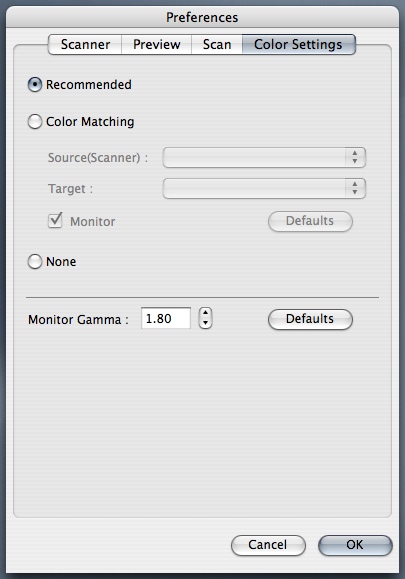
You can also set color profiles for the scanner, target and monitor or opt for automatic color matching using the default, built-in target. Because Scan Gear doesn’t build a profile, however, this isn’t much use.
Toolbar. Finally, ScanGear offers a toolbar for handling the preview scans. Options include Check/Uncheck All Frames, Rotate Left/Right, Clear the Preview, Crop, Move, Enlarge/Reduce, Mirror, Auto Crop and more.
In sum, whether you know nothing at all about scanning or you’re an old pro, ScanGear provides an interface you can feel comfortable using to get very good results from the CanoScan 9000F.
USING THE SCANNER | Back to Contents
With the scanner software and hardware installed, you’re ready to start scanning. We scanned a variety of materials but concentrated on film scanning because it’s the most difficult task.
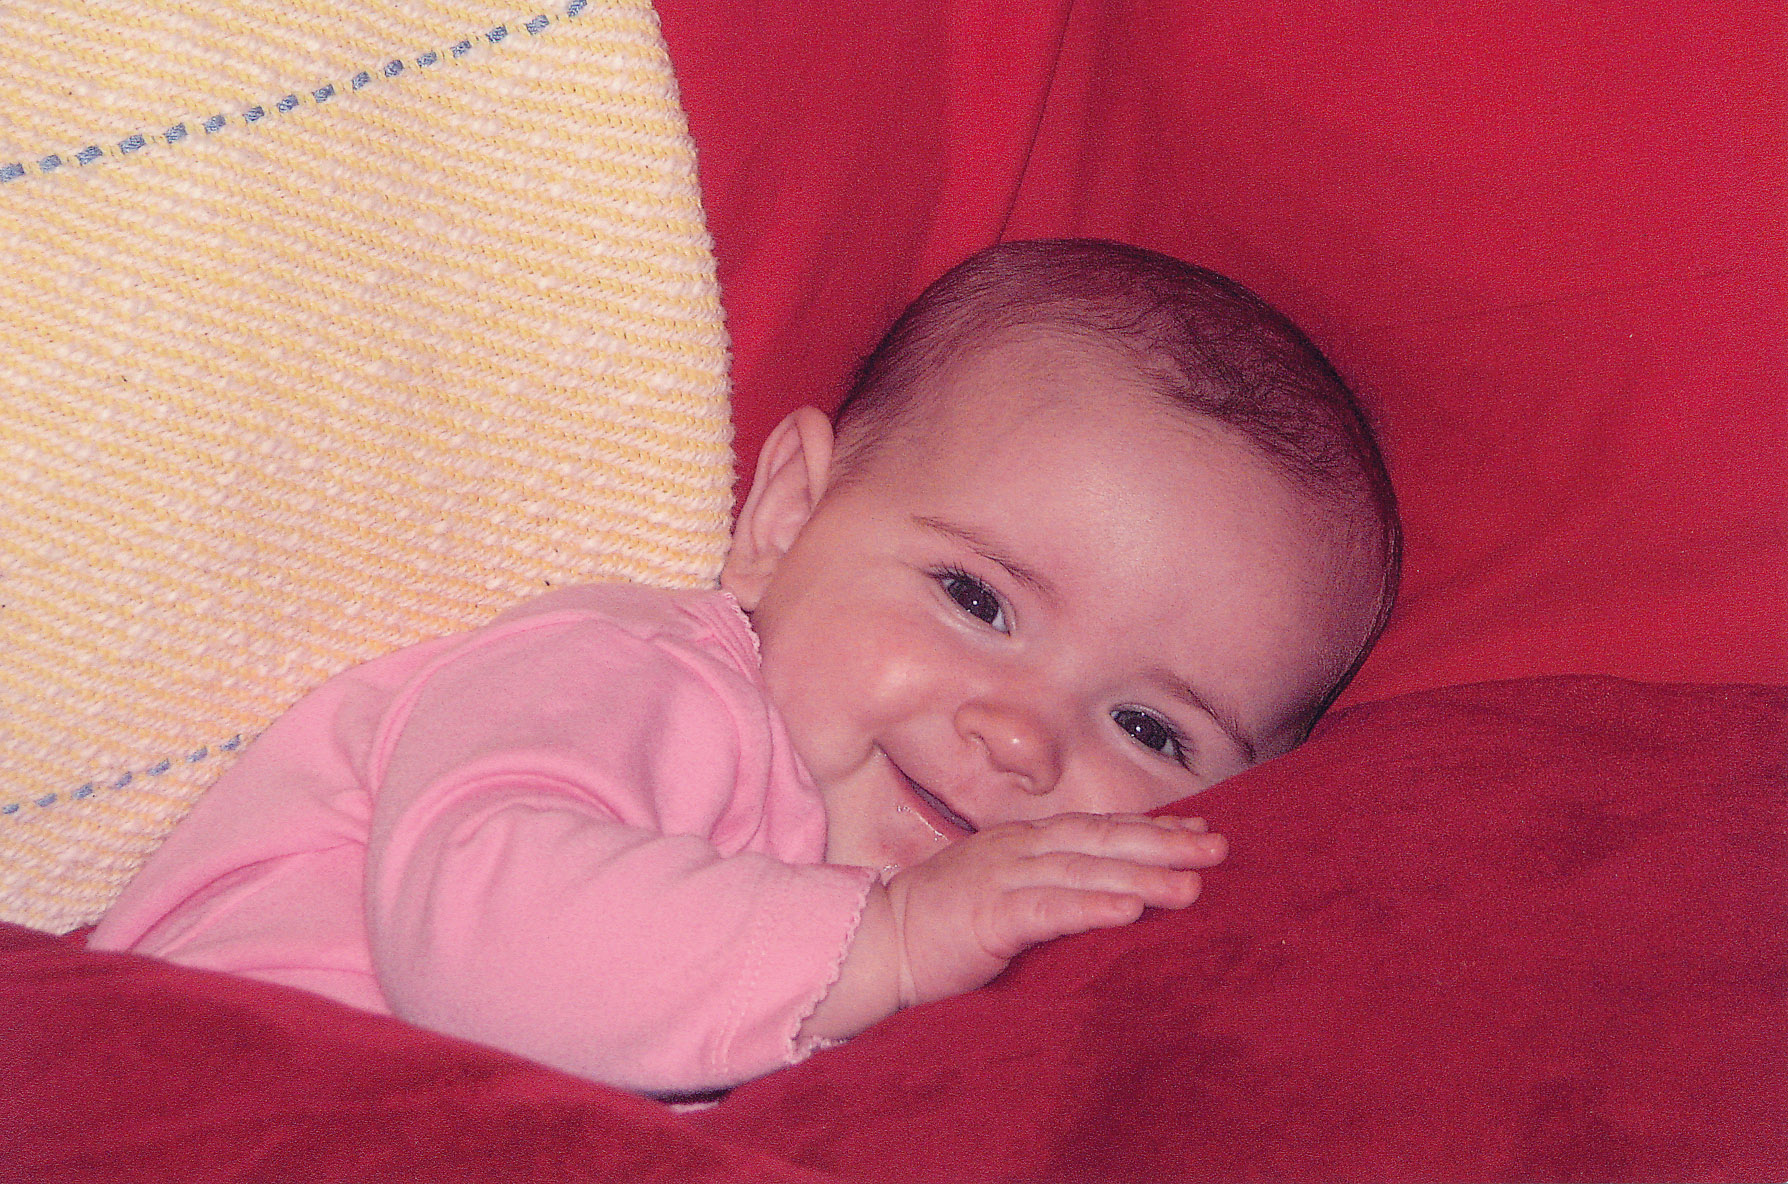


Prints Using Basic. Our usual infant from a Canon inkjet print and an antique print with unsharp masking (bottom) to help the old print.
Color Photo. We started with our color print of a baby. We did a simple scan using ScanGear’s Basic tab default settings and were pleased with the results. There was shadow detail and the highlights were not burned out. Eyelashes were clearly delineated and the red cushions accurately rendered, as were the flesh tones. We really saw no reason to edit the scanned image.
We also tried scanning the photo using the Auto Scan button. That brought up MP Navigator EX, as we expected, and after we clicked OK on a dialog box, saved the scan to our hard disk.
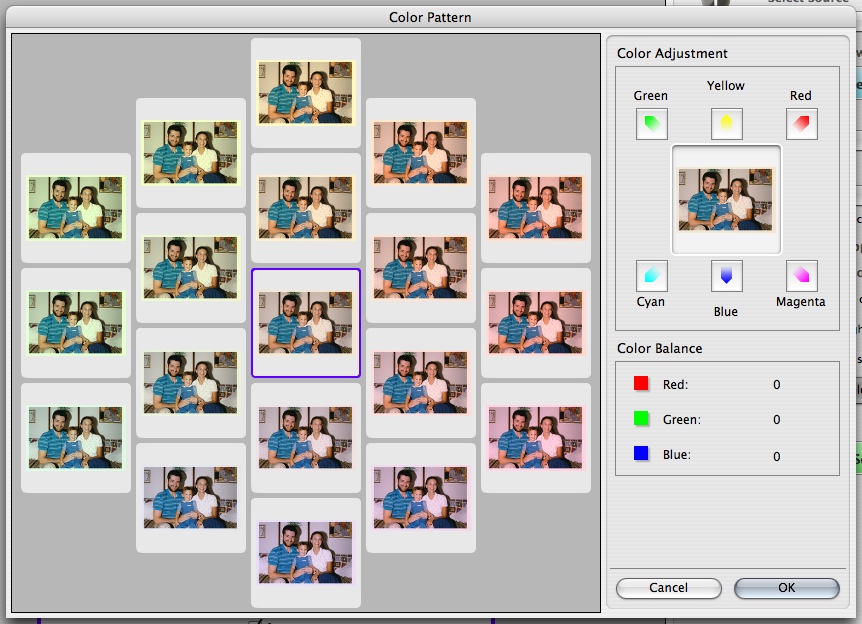
When we scanned a second print, we used Advanced Mode to restore faded colors. That turned out to be a mistake. The print, despite being 20 years old, had survived well. Even a low level of fade restoration delivered too much saturation. We were better off making a color correction using the Color Pattern option of Basic Mode and letting the scanner figure it out.
Color Pattern makes color judgements a lot easier by providing 18 variations of the image on one screen. You just pick the one that looks more natural. It would help if the thumbnails were a little bigger, but that’s our only complaint.
Black and White Negatives. o test the tonal range of the scanner, we scanned a 120 film negative in both ScanGear and VueScan. ScanGear’s Advanced Mode did an admirable job, presenting a perfectly acceptable histogram of the image.

120 Film. This is a large download (6592×5344) but the thumbnail shows nice tonal range and detail (plenty of dust and scratches).
Don’t be surprised that the Remove Dust and Scratches option isn’t available when scanning black and white film. The emulsion, which is itself layered, shows up as a defect on the infrared scan, so the feature is disabled for this film.
Color Negatives. The hardest job for this class of scanner seems to be a color negative. High-end scanning software asks you to choose the emulsion of your film from a long list. That’s because the scans have to be transformed into a positive. This is a lot more complex than simply inverting the color values and filtering the orange mask. No one formula works for all color negative emulsions. They all have their own personality.
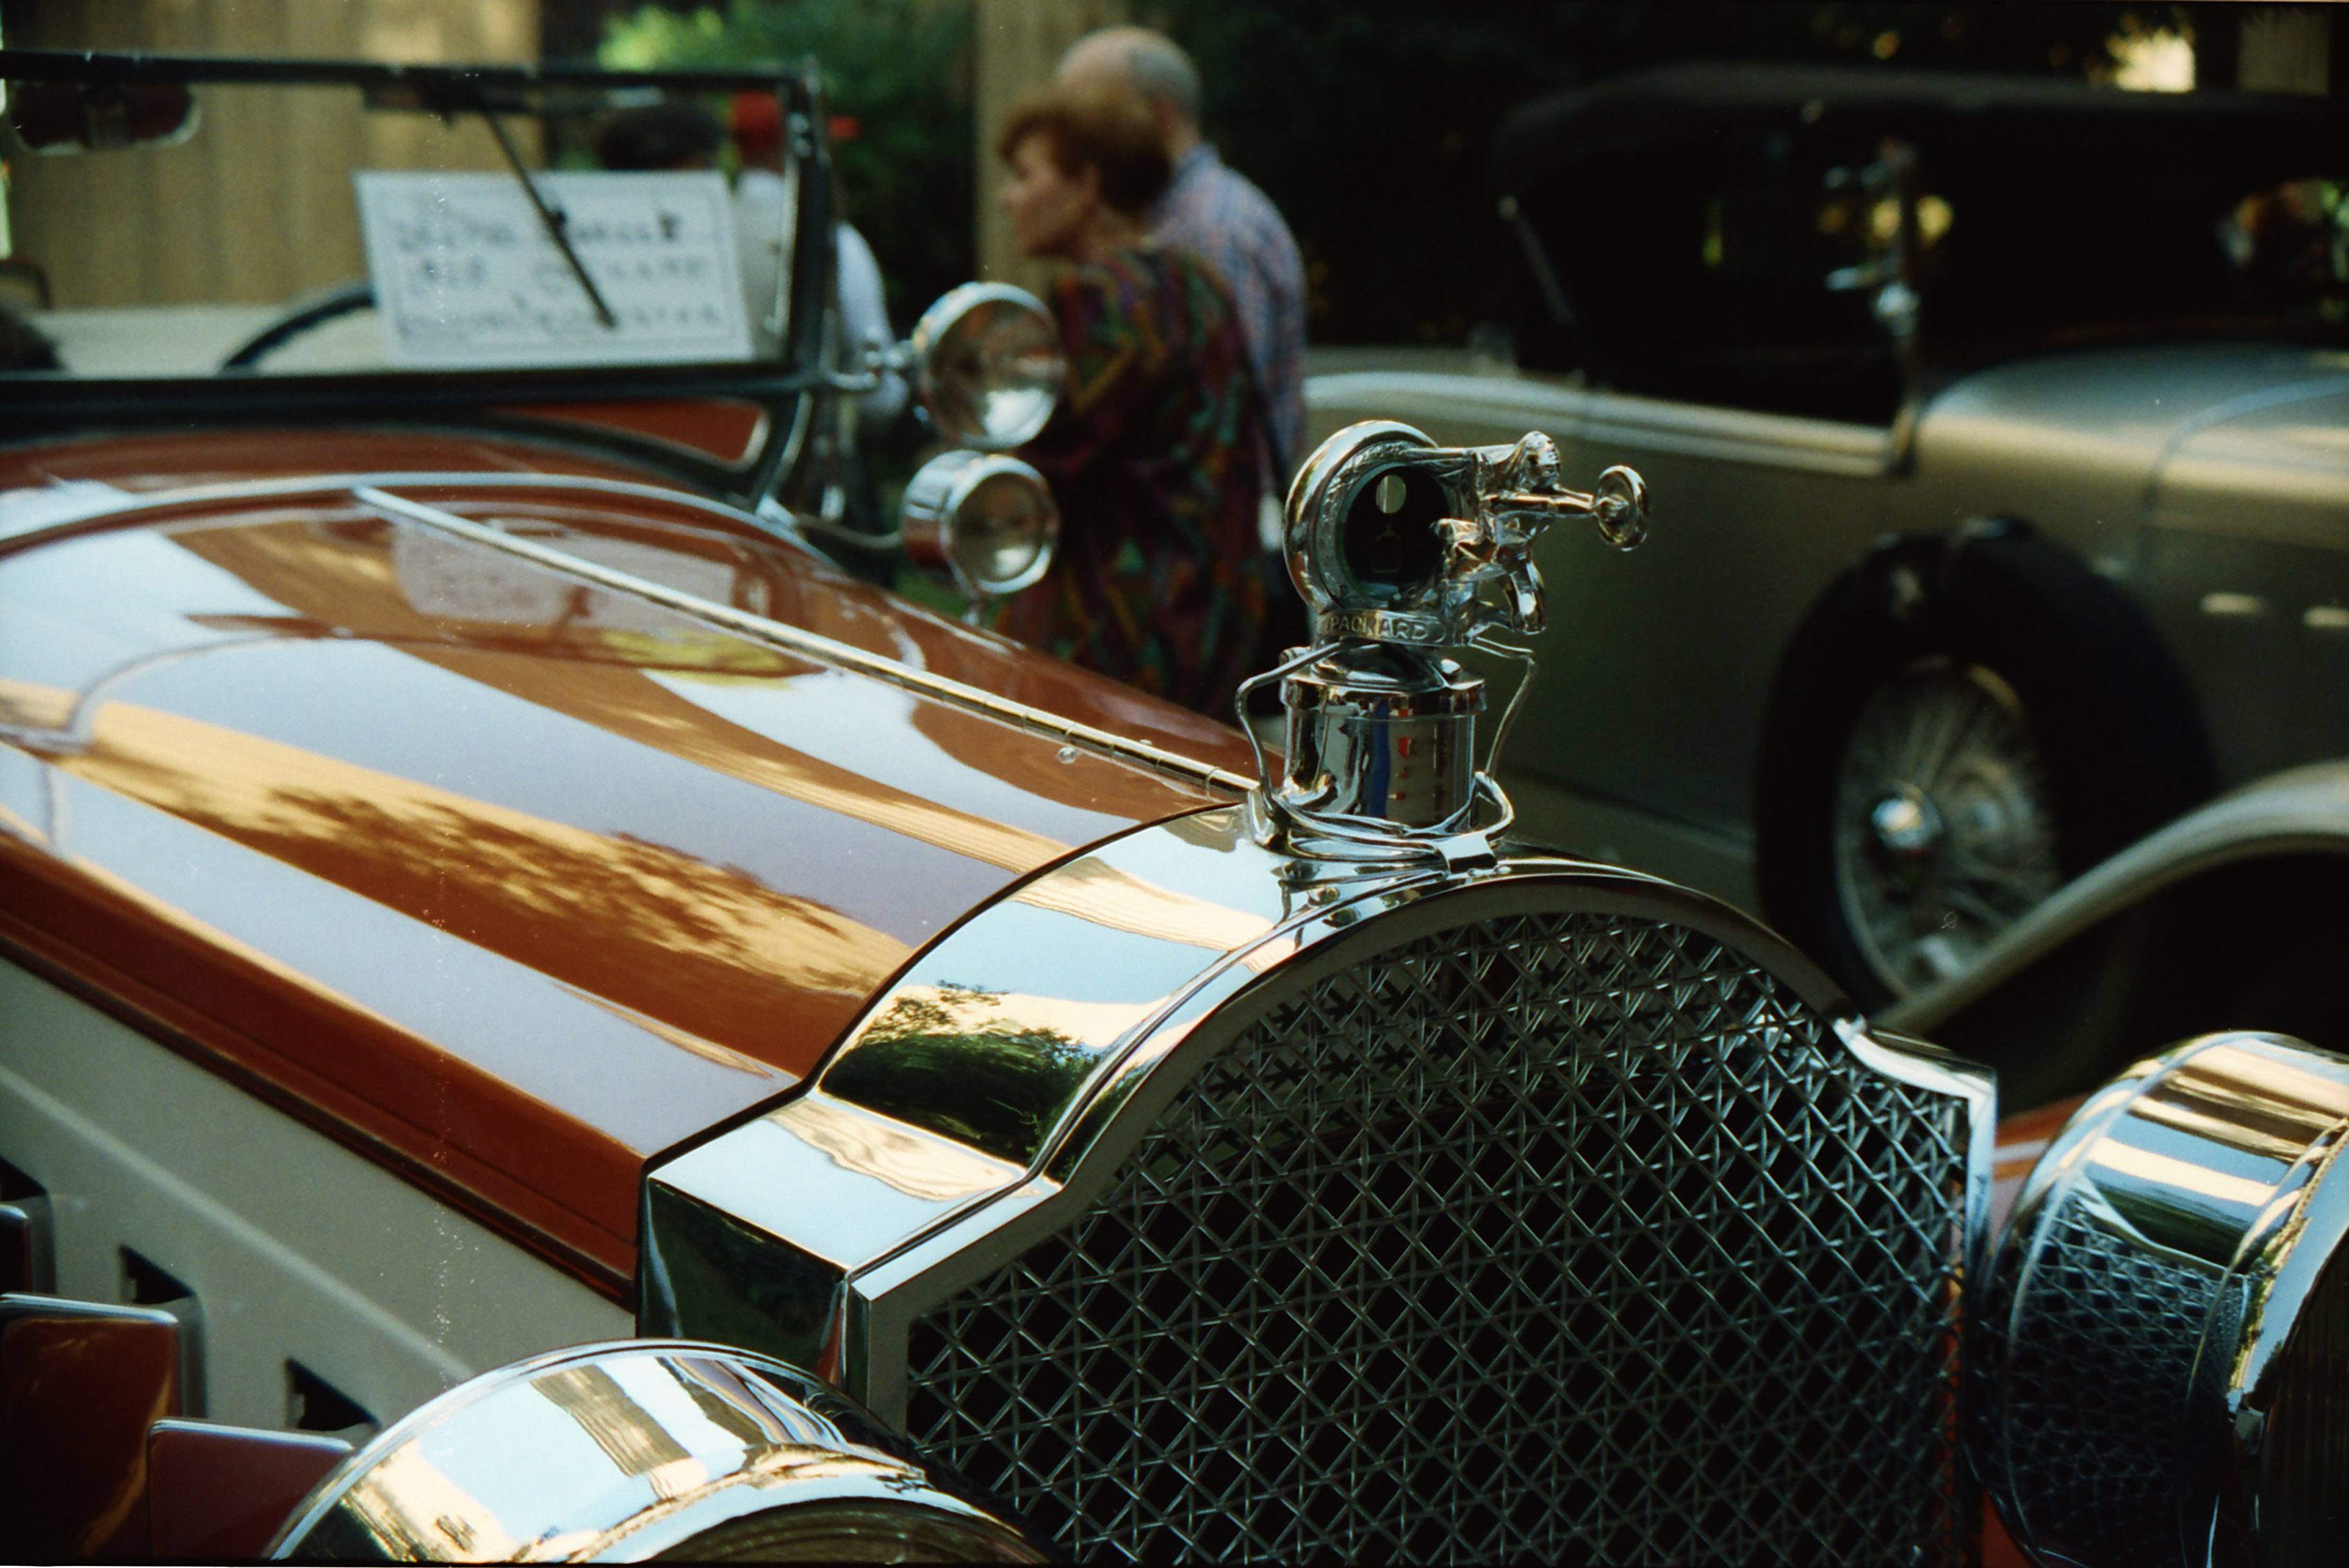
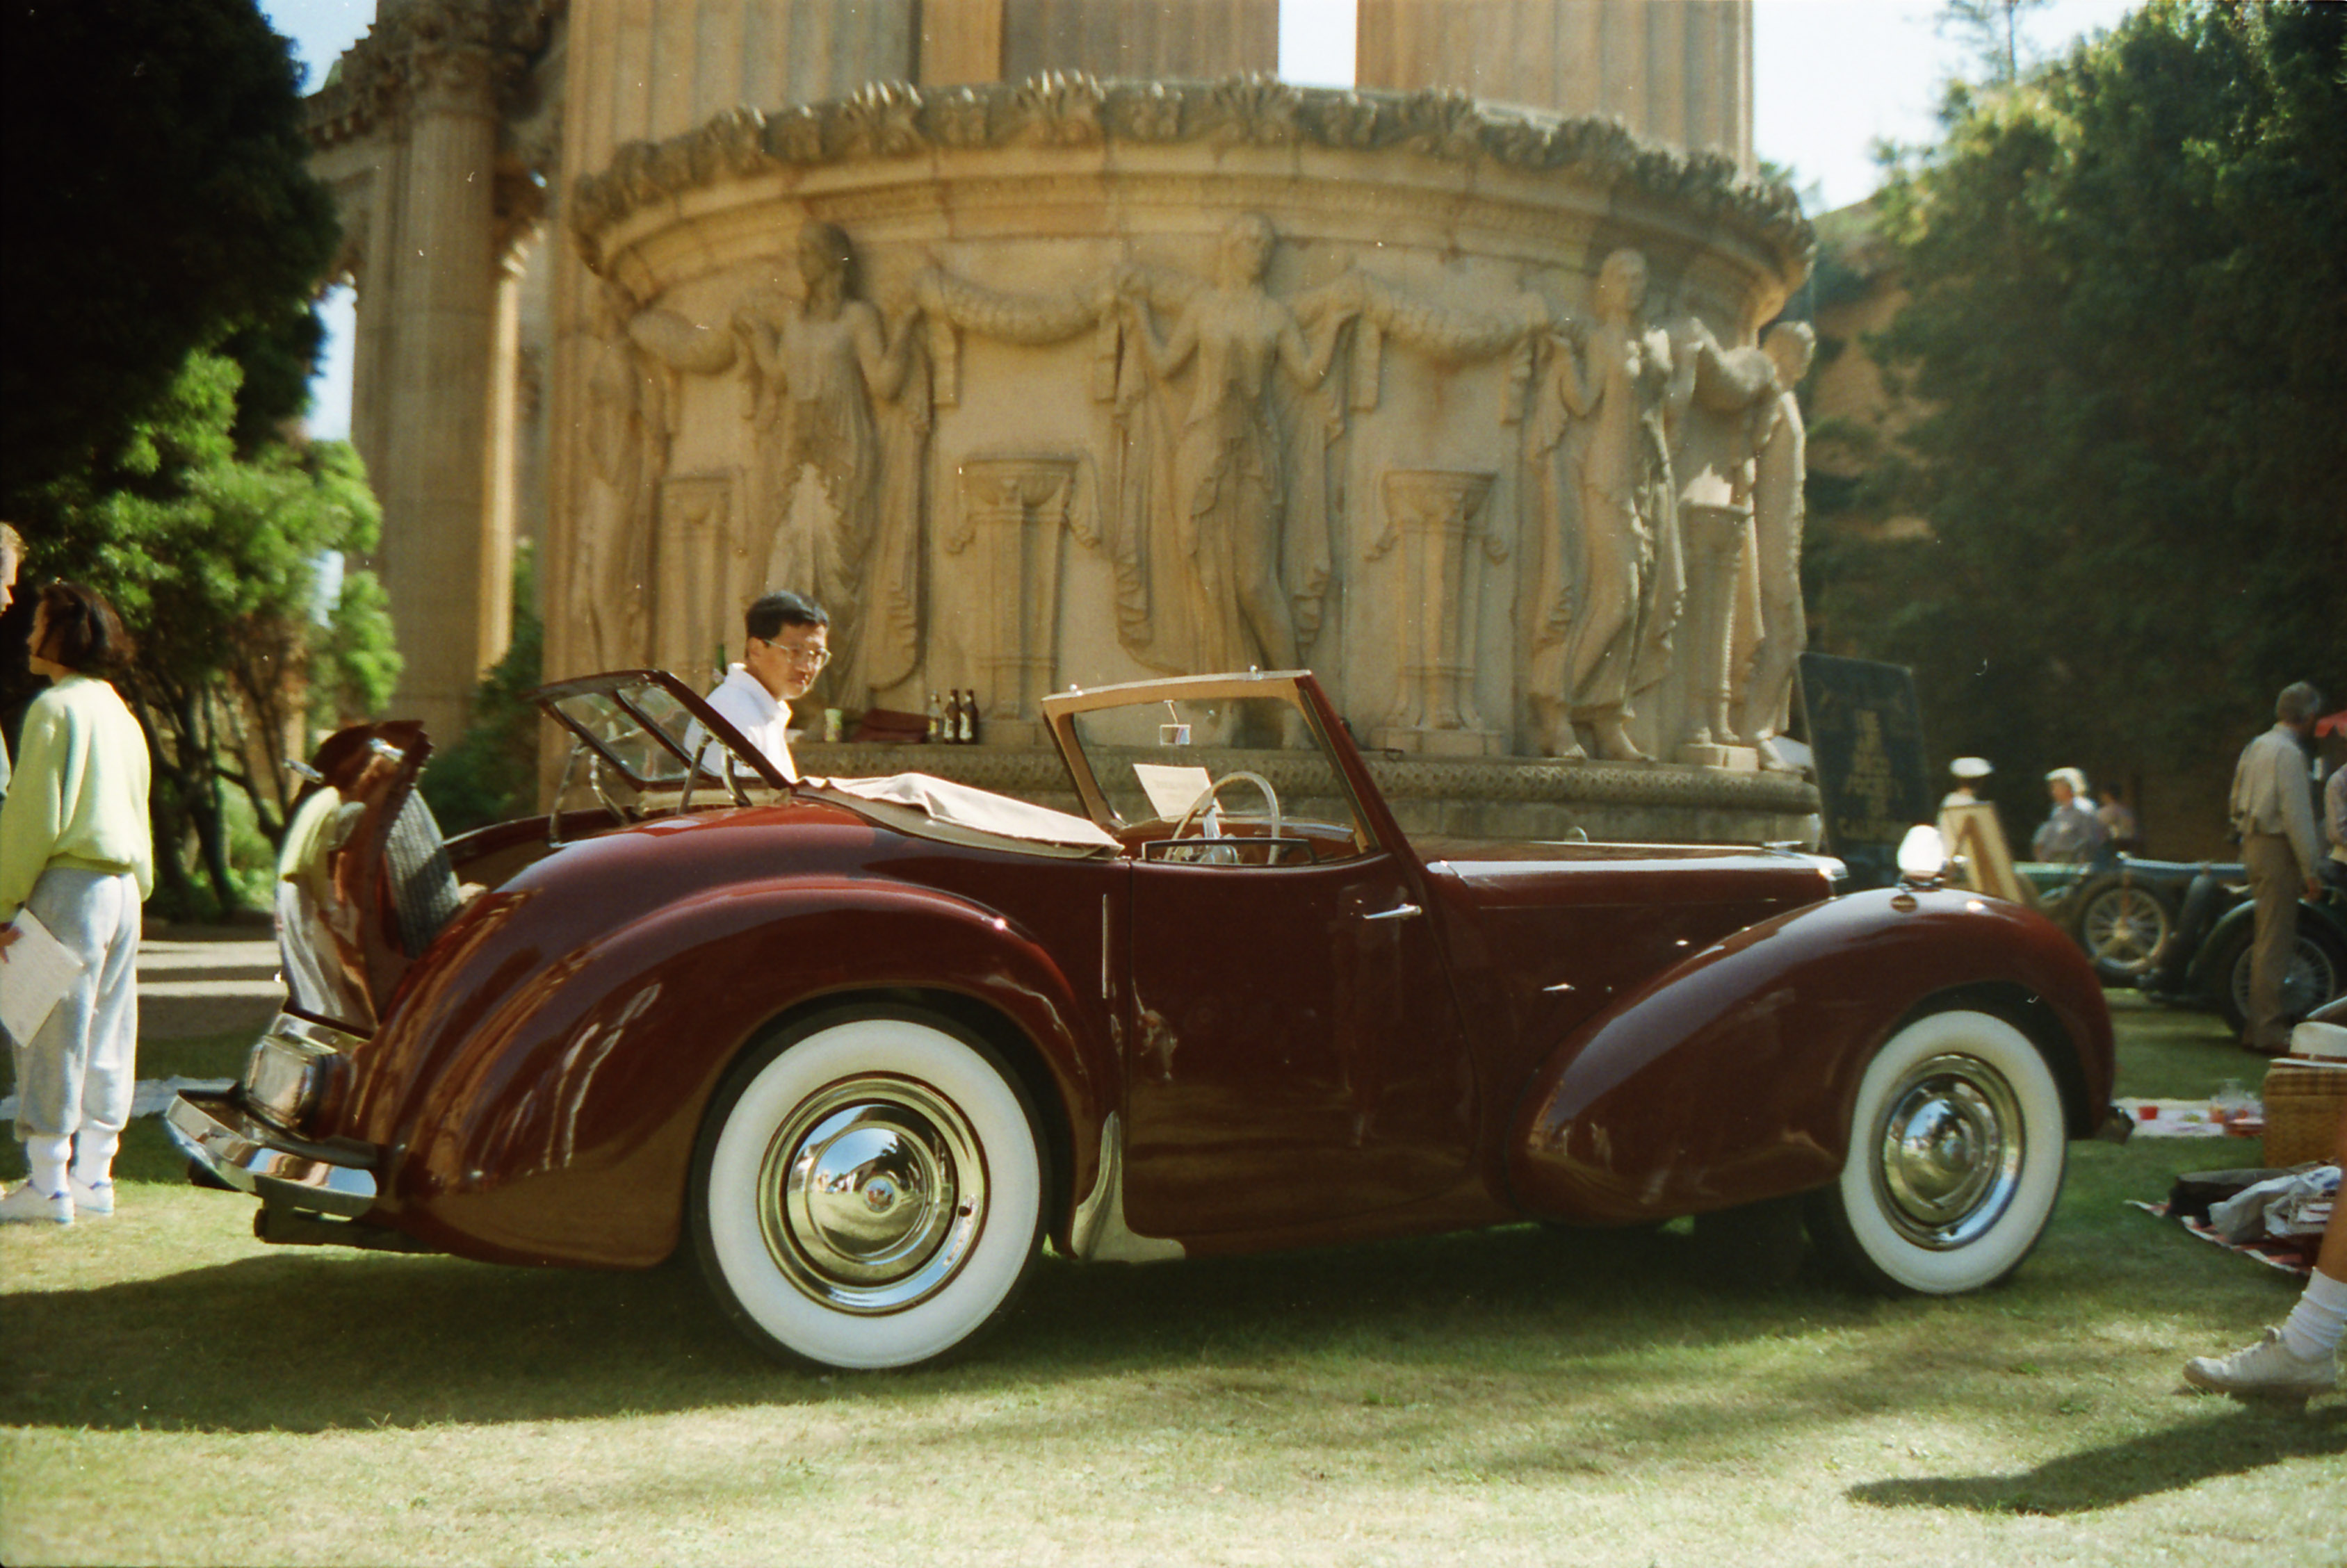
Packard |
Triumph |
That’s why SilverFast and VueScan handle this by providing a library of color negative transformations. You just pick the one that matches your film.
ScanGear doesn’t seem to provide that. It’s all behind the curtain so we can’t say how it works, but you have no choice. And the scanner can’t itself tell. The proof, of course, is in the color balance of the scan.
Ektachrome. Good dynamic range on this high contrast slide.
As with the CanoScan 8800F, we found the scan color of our antique autos (a Packard and a Triumph here using Kodak 400 film) just a bit off. Detail was visible in both the highlights and shadows (and much better captured than the 4×6 Jumbo prints had been).
Because VueScan doesn’t yet run the CanoScan 9000F, we weren’t able to profile it and run a comparison test, as we did for the 8800F.
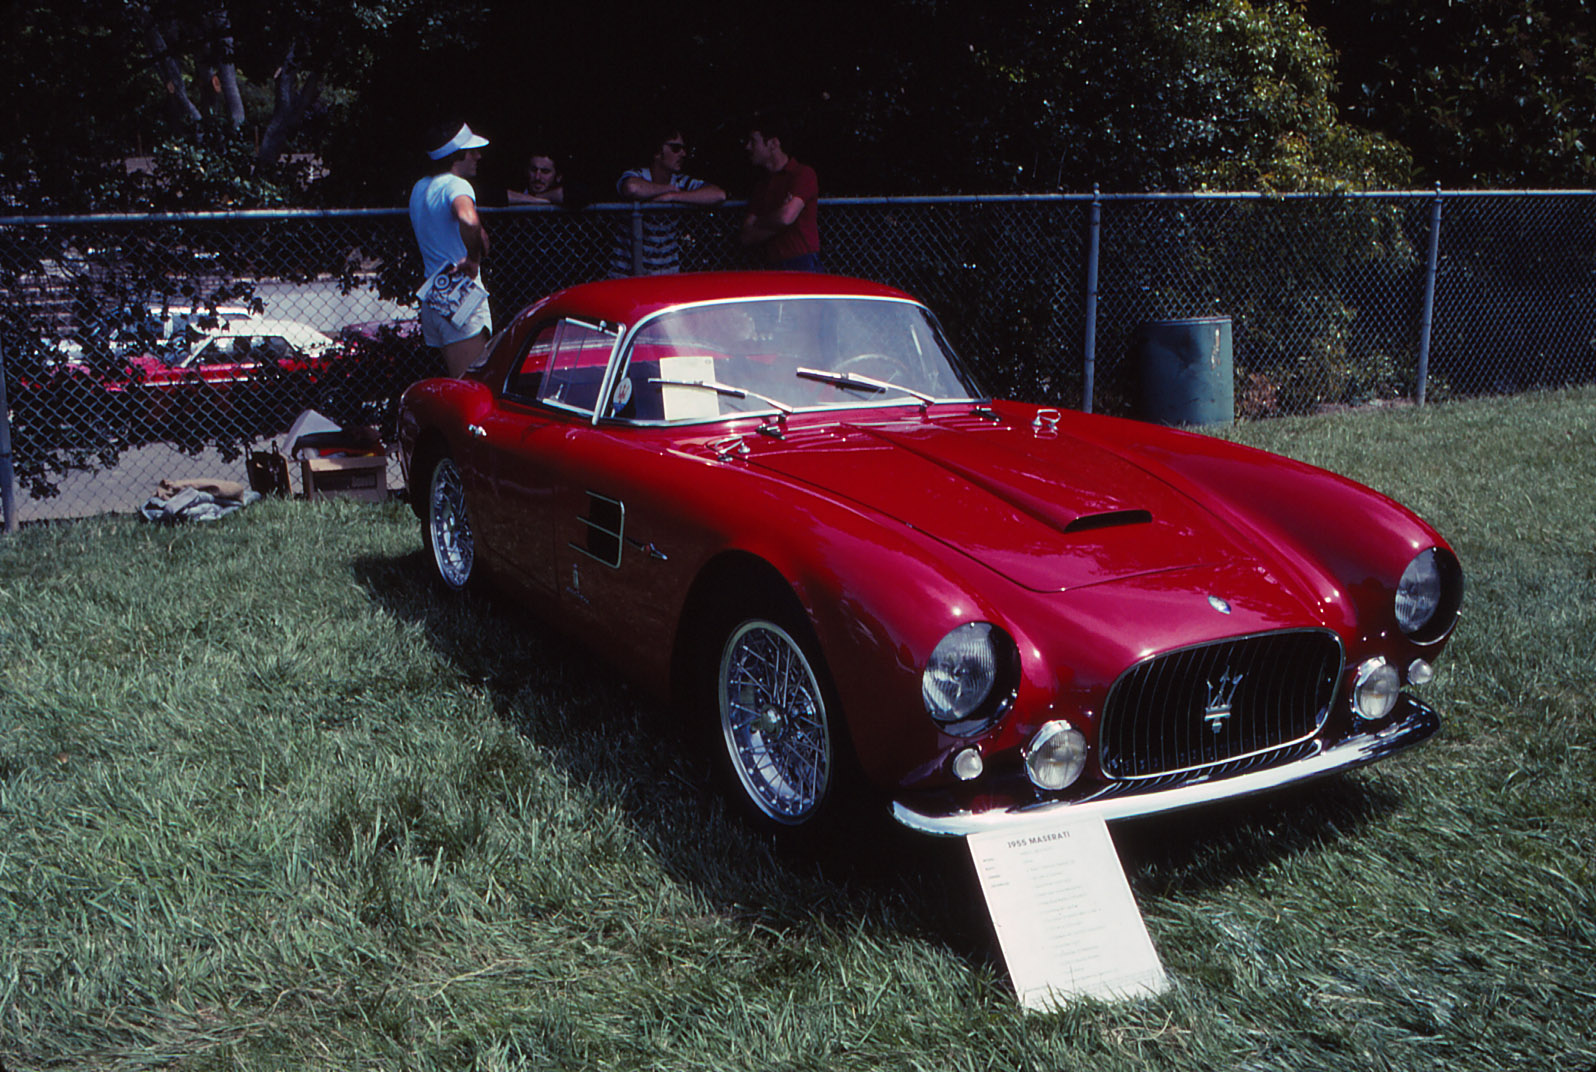
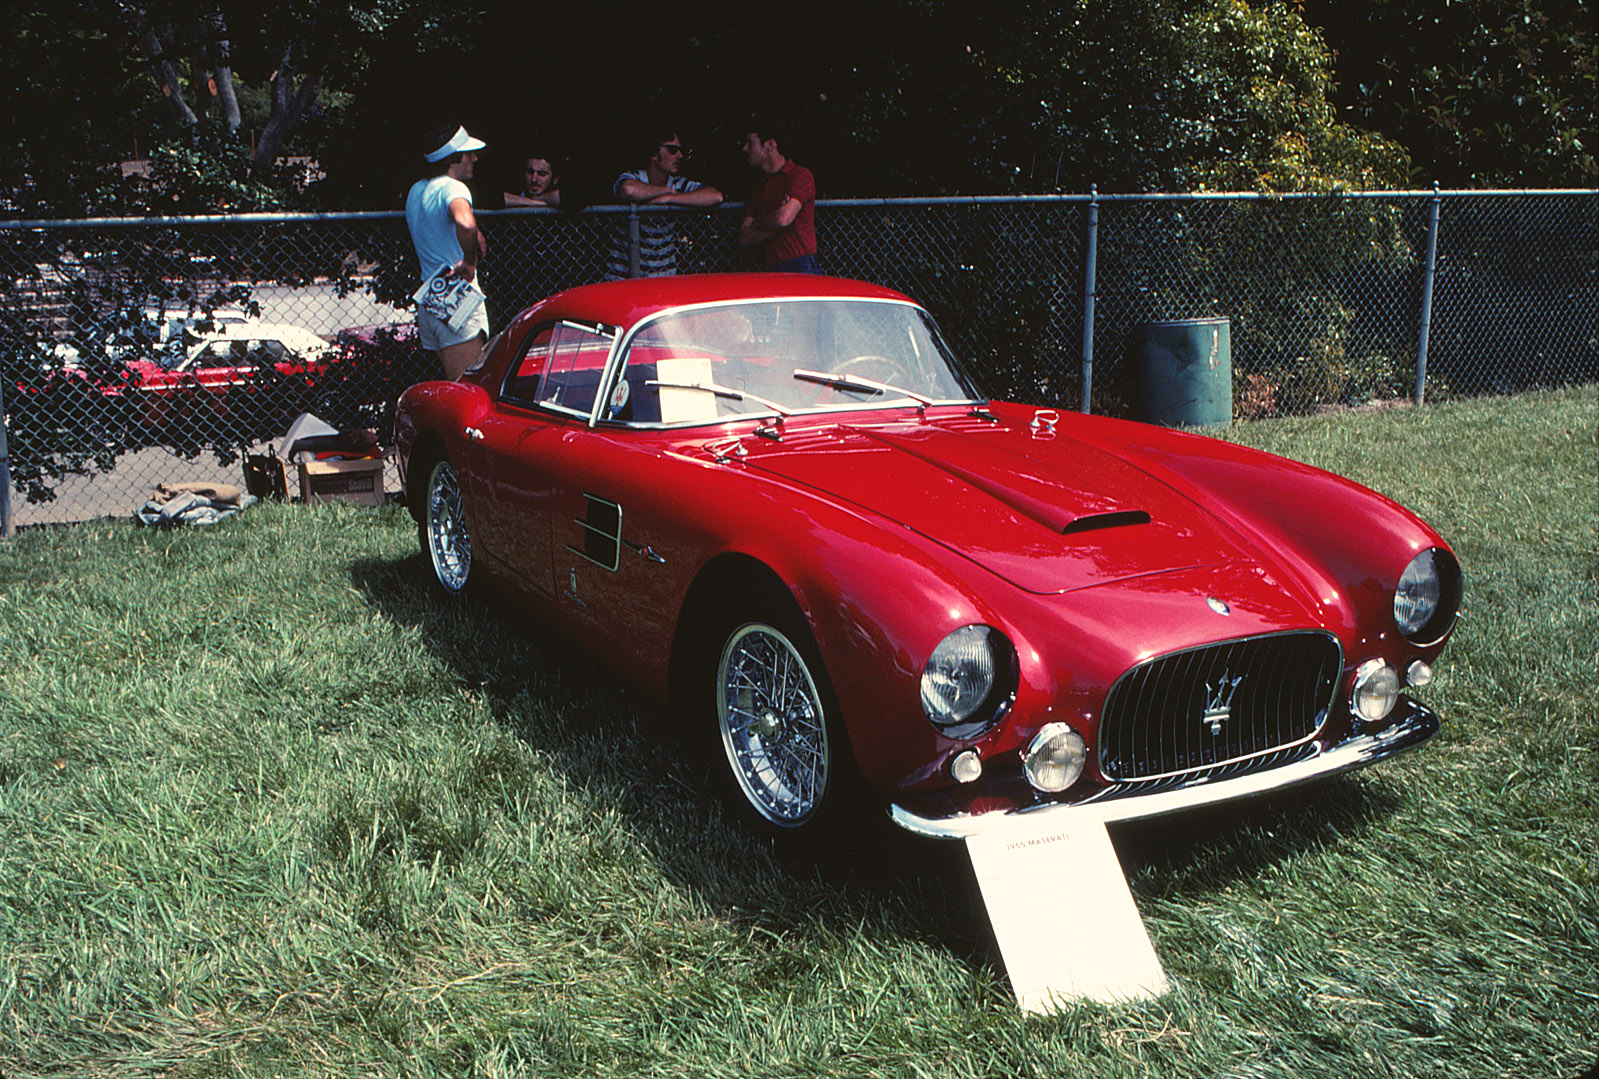
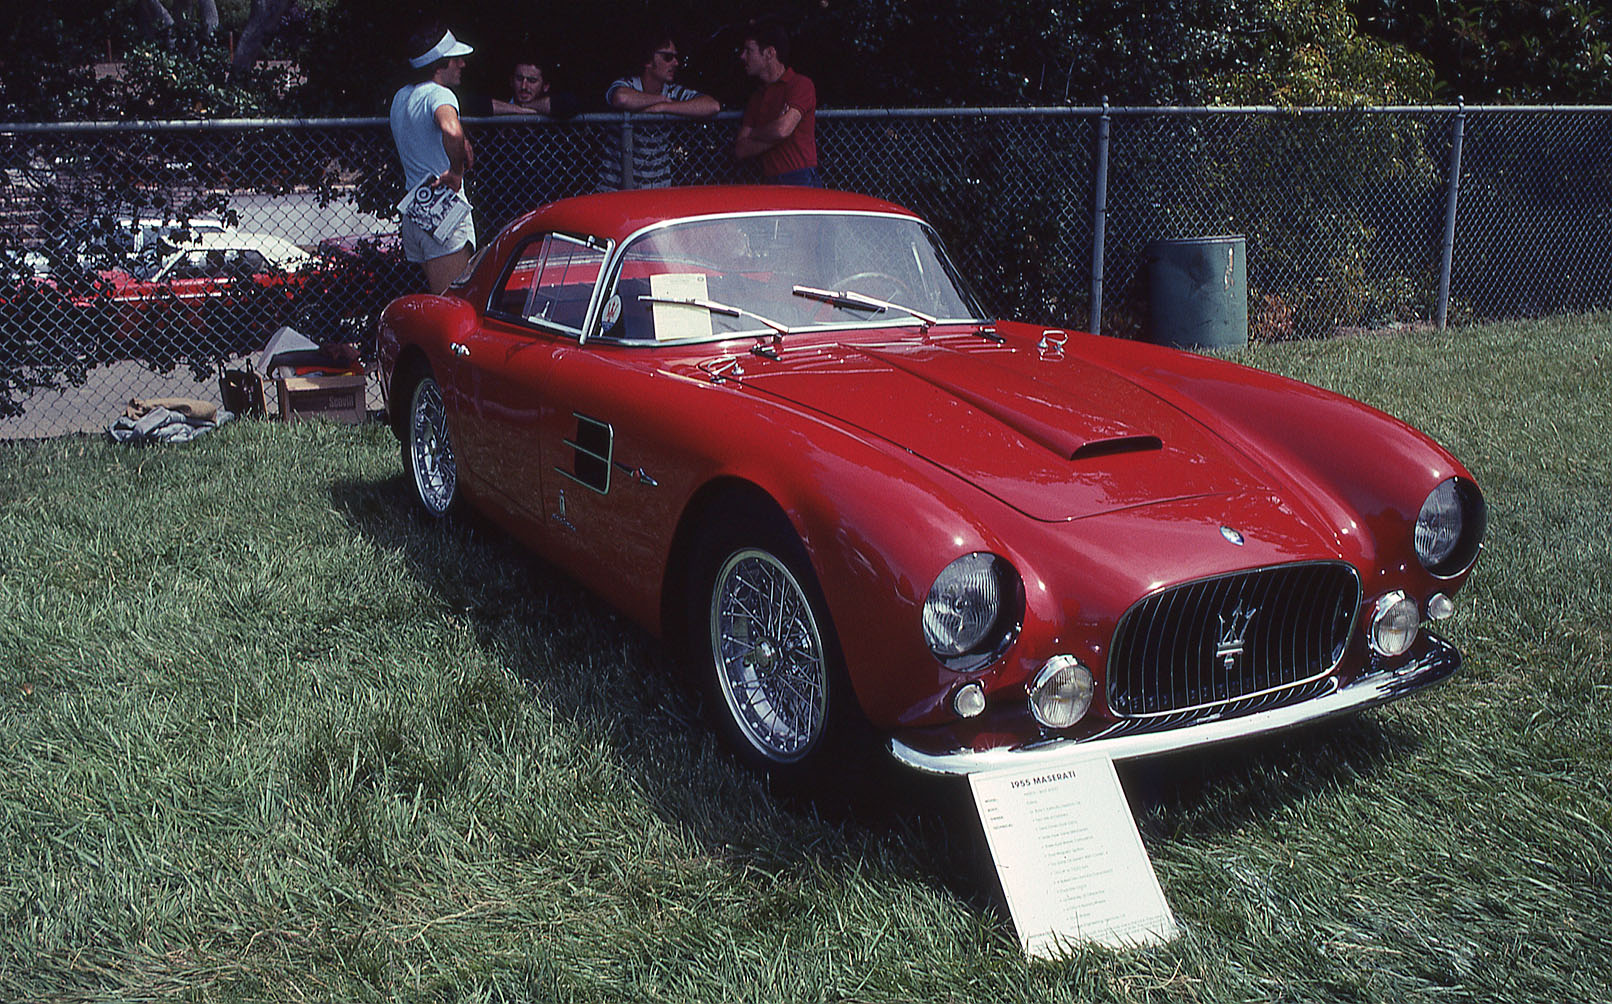
Color Slides. We were, however, able to throw a high-contrast Ektachrome slide and our Kodachrome slide of gorgeous Maserati at the CanoScan 9000F.
Kodachrome is a tough nut to crack. It tends to scan a bit too blue, requiring a calibration target of its own, and it doesn’t work with infrared defect removal, like black and white film.
 |
 |
|
ScanGear in Basic Mode (9000F) |
CanoScan 8800F (Advanced) |
 |
 |
|
Canon MP980 |
Epson V600 |
We scanned it using both Basic Mode (shown here) and Advanced Mode. And we compared it to the test scans of the same slide from the CanoScan 8800F, Epson V600 and Canon MP980. And we also did our resolution comparison tests with this image.
Once again we were able to achieve a very good scan of this difficult image. It rivaled not only the 8800F and Canon MP980 scans that we ranked highly but also the Microtek M1 scan.
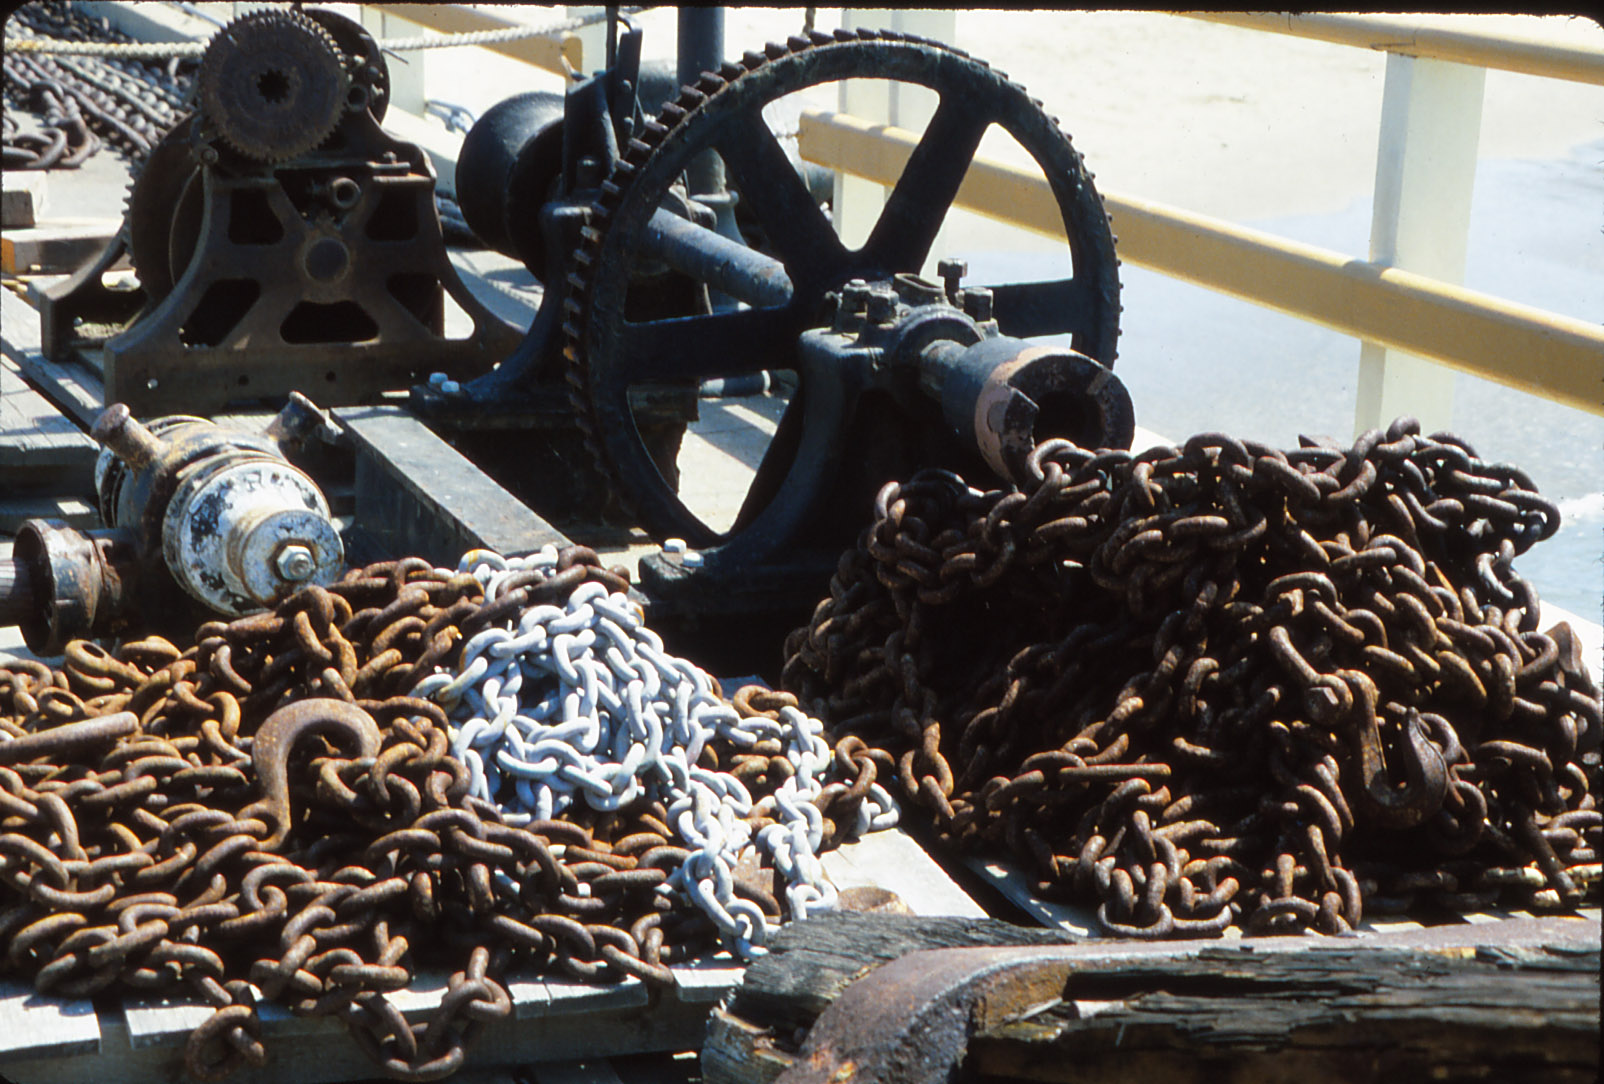
The Ektachrome slide did well, too, holding detail in the light colored chains as well as in the shadows of the rusty chains and the dark gears.
COMPARISONS | Back to Contents
In fact, very little distinguishes the $250 CanoScan 9000F from the $200 8000F except a more refined profile (the electronics are in the hinge, not in a bulky cable) and its maximum 9600-dpi resolution. You’ll only need the extra resolution if you have small originals (like slides) that you want to enlarge substantially.
Here’s a chart showing how scanning a 35mm original and a 4×6 print at different resolutions yields a different maximum image size depending on the printer resolution required:
| Original | Desc | Scanner DPI | Printer DPI | Output H | Output W |
|---|---|---|---|---|---|
| 35mm frame | Inkjet (min) | 1,200 | 150 | 8.00 | 12.00 |
| 35mm frame | Dye sub | 9,600 | 300 | 32.00 | 48.00 |
| 35mm frame | Inkjet (high) | 9,600 | 450 | 21.33 | 32.00 |
| 35mm frame | Lightroom max | 9,600 | 722 | 13.30 | 19.94 |
| 4×6 print | high res scan | 9,600 | 250 | 153.60 | 230.40 |
| 4×6 print | high res scan | 4,800 | 250 | 76.80 | 115.20 |
| 4×6 print | high res scan | 2,500 | 250 | 40.00 | 60.00 |
| 4×6 print | high res scan | 1,200 | 250 | 19.20 | 28.80 |
| 4×6 print | normal scan | 300 | 250 | 4.80 | 7.20 |
You can see that 9600 dpi scanning is not something you need to do 35mm frame enlargements to 13×19.
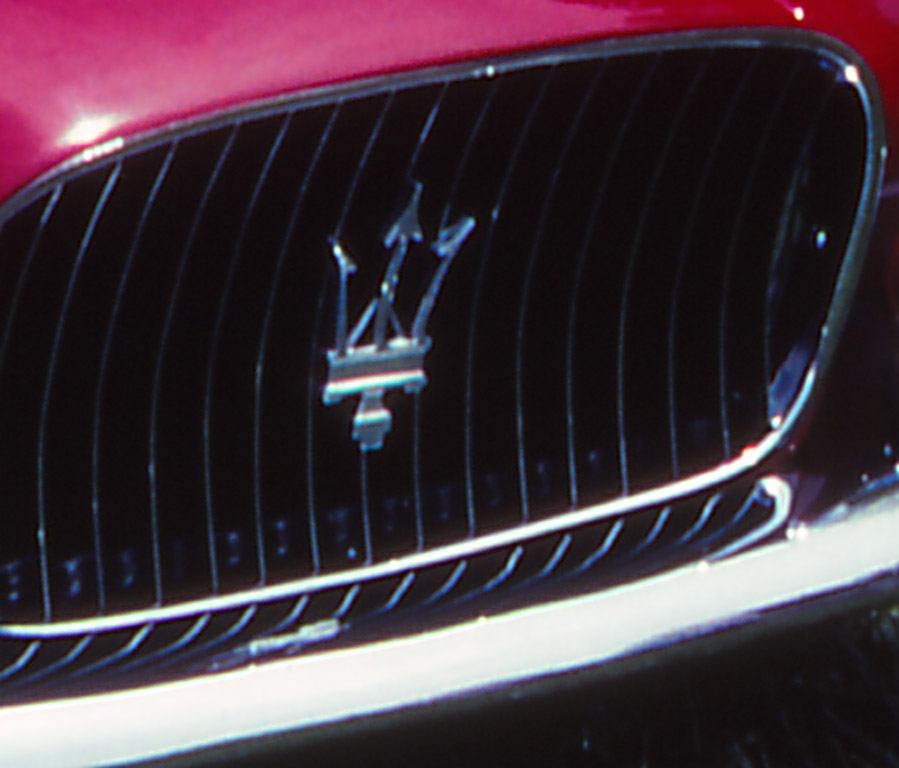
The two scans of the Maserati grill further illustrate the point. Click on the thumbnails below to see the detail captured at 4800 dpi and compare it to the detail captured at 9600.
Both scans were done in ScanGear with Unsharp Mask enabled. ScanGear doesn’t let you fiddle with any unsharp masking controls or even the general strength of it. It’s either on or off. And what it’s doing when it’s on, we can’t tell.
As we note in our Short Course on Scanning, any high resolution scan requires sharpening and, just like the Raw files from a dSLR, there are several stages at which the image profits from judicious sharpening. In particular, a raw scan requires input sharpening as well as output sharpening with what Bruce Fraser called creative sharpening a useful option in between.
Canon does provide sharpening with its Unsharp Mask option and it helps the 4800 dpi scan very nicely. But we felt we could do better with the 9600 dpi using Nik Sharpener 3.0’s Raw Preprocessor and Output Sharpener options.
Keep in mind the image sizes of the 4800 dpi scan and the 9600 dpi scan are significantly different (even if the thumbnails are not). The comparison is between the two 9600 dpi scans, where the Nik version is crisper.
4800-dpi Scan |

9600-dpi Scan |

9600-dpi Scan (Nik Sharpener 3.0) |
And, as we pointed out in our review of the CanoScan 8800F, quality is comparable to the MP980 multifunction device (which is no slouch). But the MP980 can’t handle 120 film and only scans one strip of negatives at a time.
Compared to high-end scanners like the Epson V700/750 and the Microtek M1/F1, you are giving up multi-exposure. But SilverFast and VueScan both offer that for an additional cost.
The Epson V600 is a closer match to the 8800F than the 9000F but we prefer ScanGear to Epson Scan. Substantially.
CONCLUSION | Back to Contents
We have to applaud both Canon and Epson for shaking up the scanner world with affordable flatbeds that have the horsepower to scan film at a reasonable price.
Where they fall a bit short is in software and that’s only because they’ve tried to make scanning easy for novices. Which, again, we have to applaud.
The missing feature is profiling but you can get that with third-party scanning software and some IT8 targets. That adds a little more work to a labor-intensive task, but it does deliver the best possible results.
Even without going that far, though, the CanoScan 9000F delivered credible results. Like the Epson V600 and CanoScan 8800F, the LED lamp seems to be easier to profile generically.
We were surprised by how well our slides were captured with detail in both the highlights and shadows (whatever the mysterious density range of the scanner is). But we were just a bit miffed by the slightly off color of the color negative scans. They had an aspect of day-old bread to them. But that’s typical of this class of software, with no library of color negative emulsions to refer to. Upgrading the software helps.
Is this good enough for the recently retired amateur with a couple or three generations of images to digitize? Perhaps, if they took early retirement. Scanning is laborious and enthusiasm can quickly fade with a mountain of originals to dig through.
But any of these moderately priced units have the horsepower to make nice images. And the CanoScan 9000F has the highest resolution and nicest looking box of the bunch.
ADDENDUM: SCANNING WITH SILVERFAST & VUESCAN | Back to Contents
Shortly after the Canoscan 9000F shipped, both Lasersoft and Hamrick Software updated their third-party scanning utilities to support it. We acquired copies of SilverFast and VueScan to test with the 9000F.
We had a few questions:
- Would multiexposure (scanning once for highlights and again for shadows, a feature in both third-party solutions) matter?
- Would profiling the scanner using an IT8 target matter?
- Would one matter more than the other?
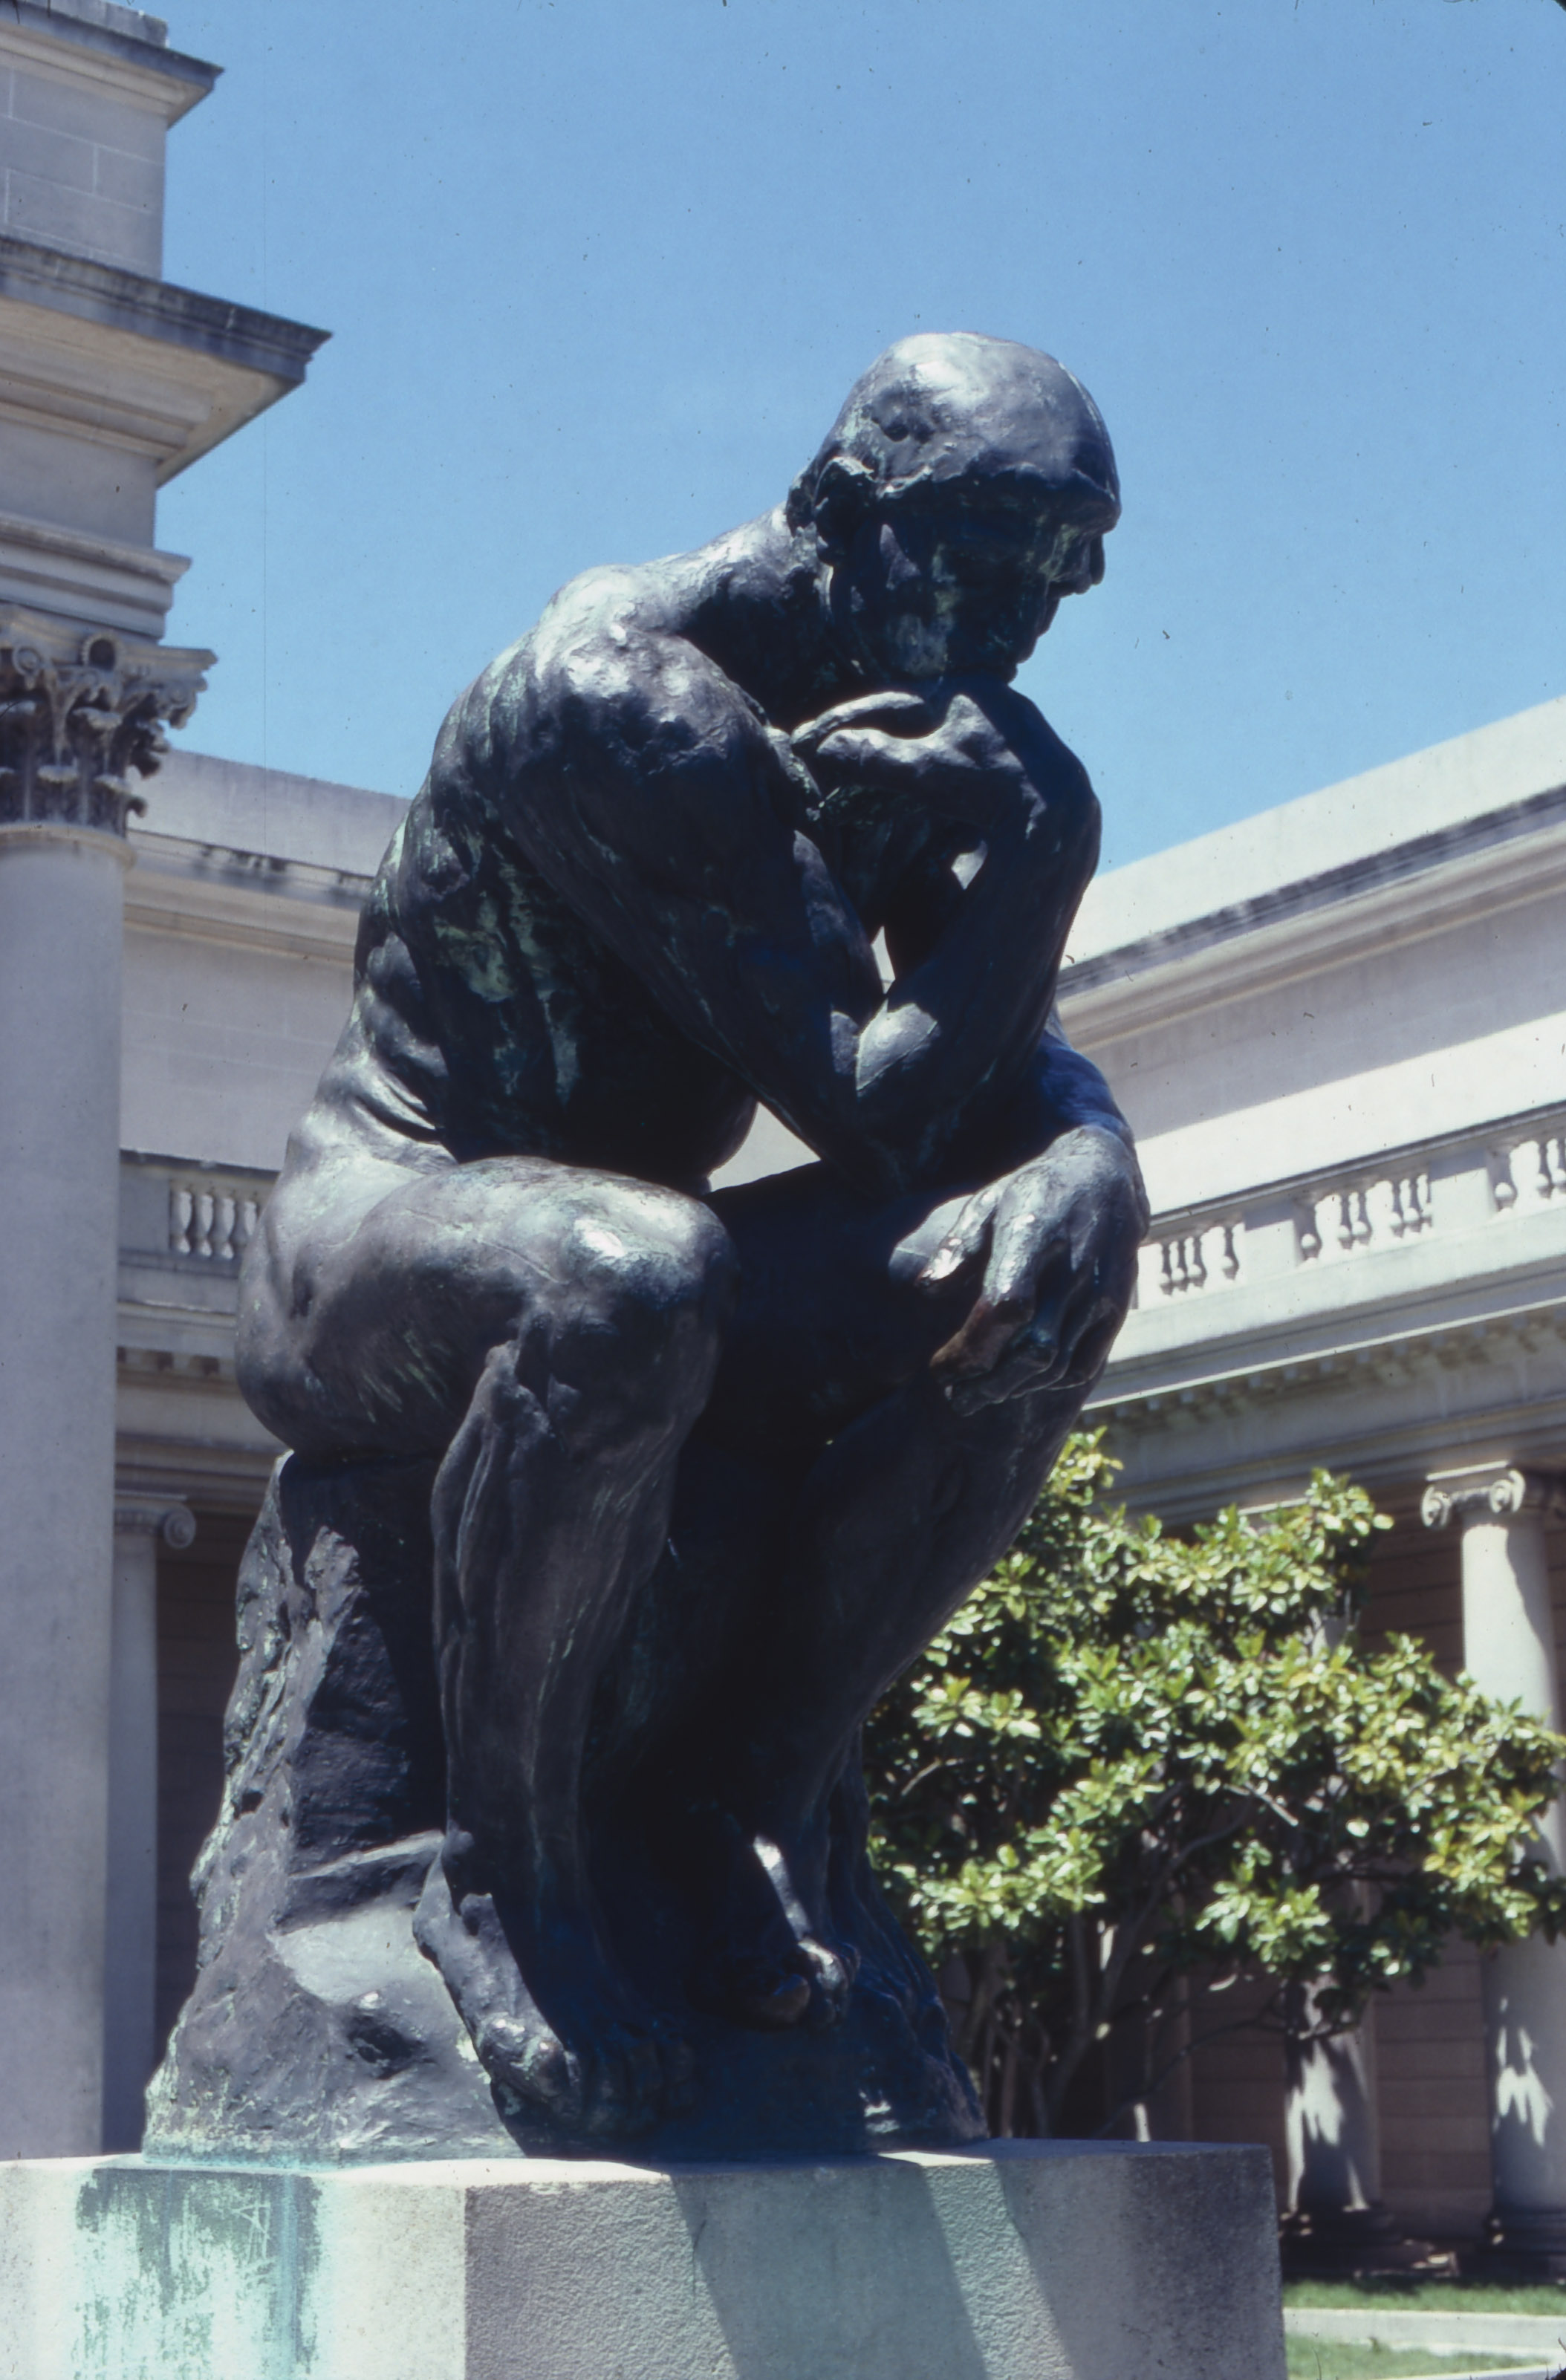
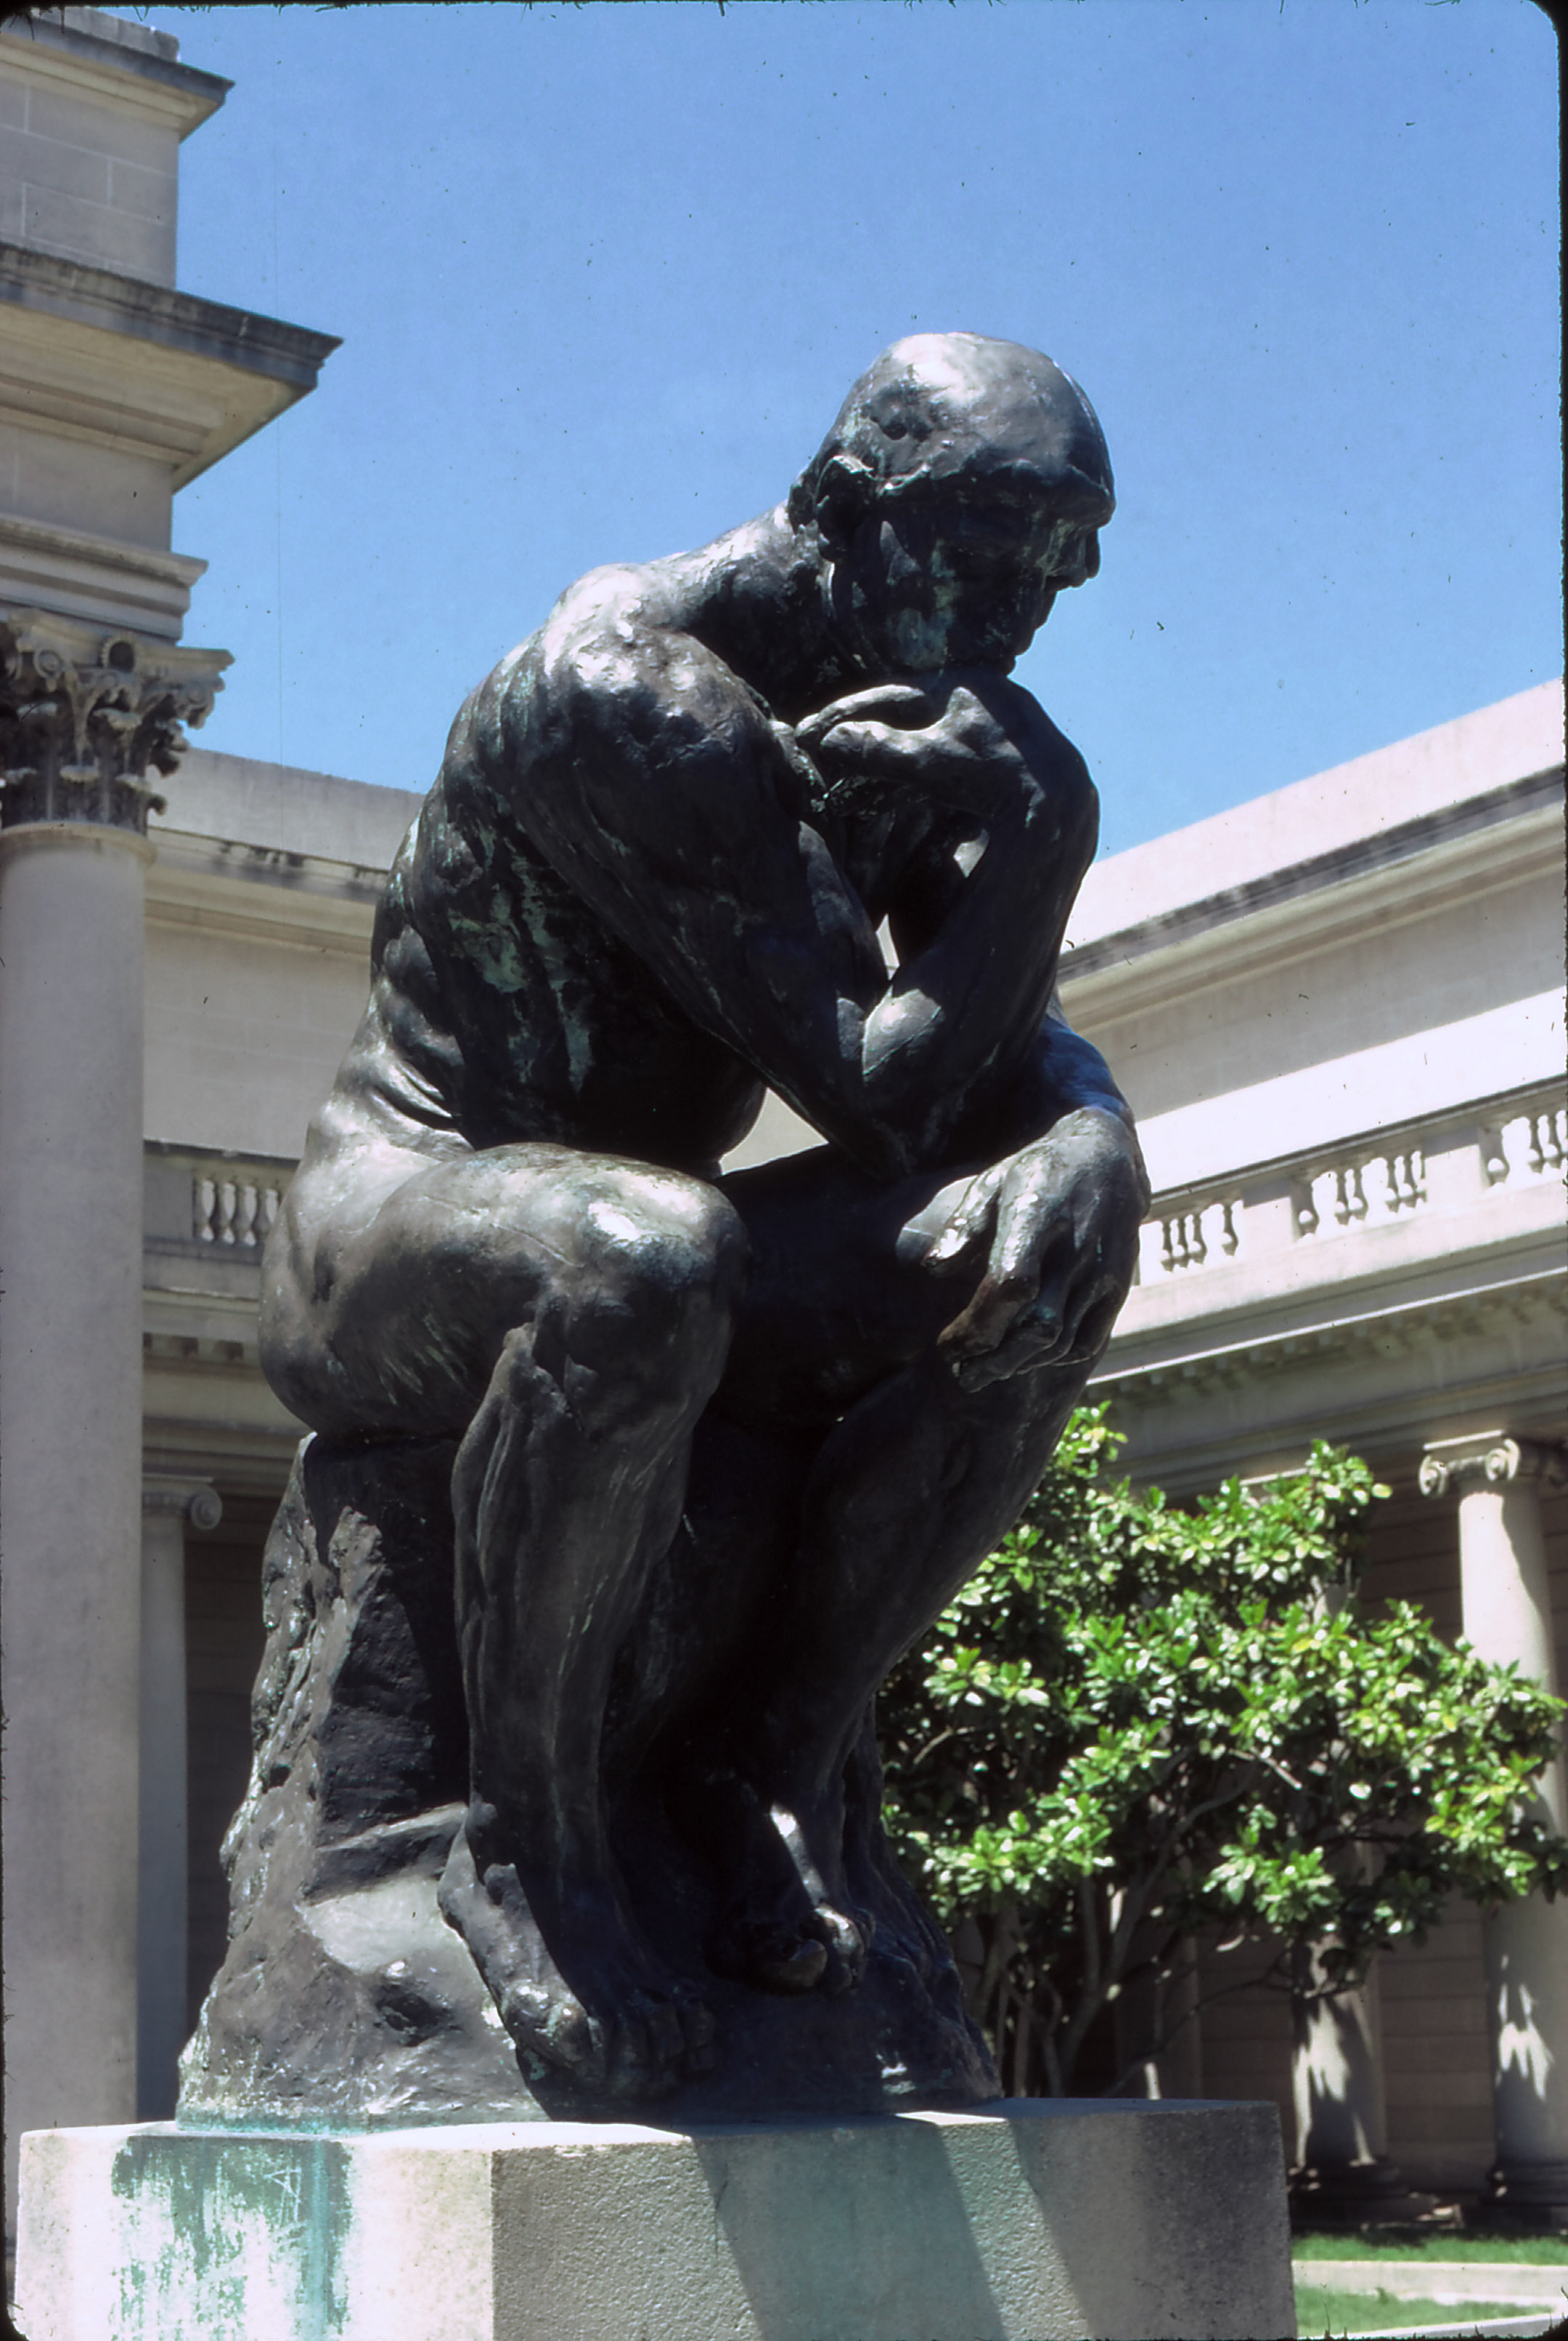
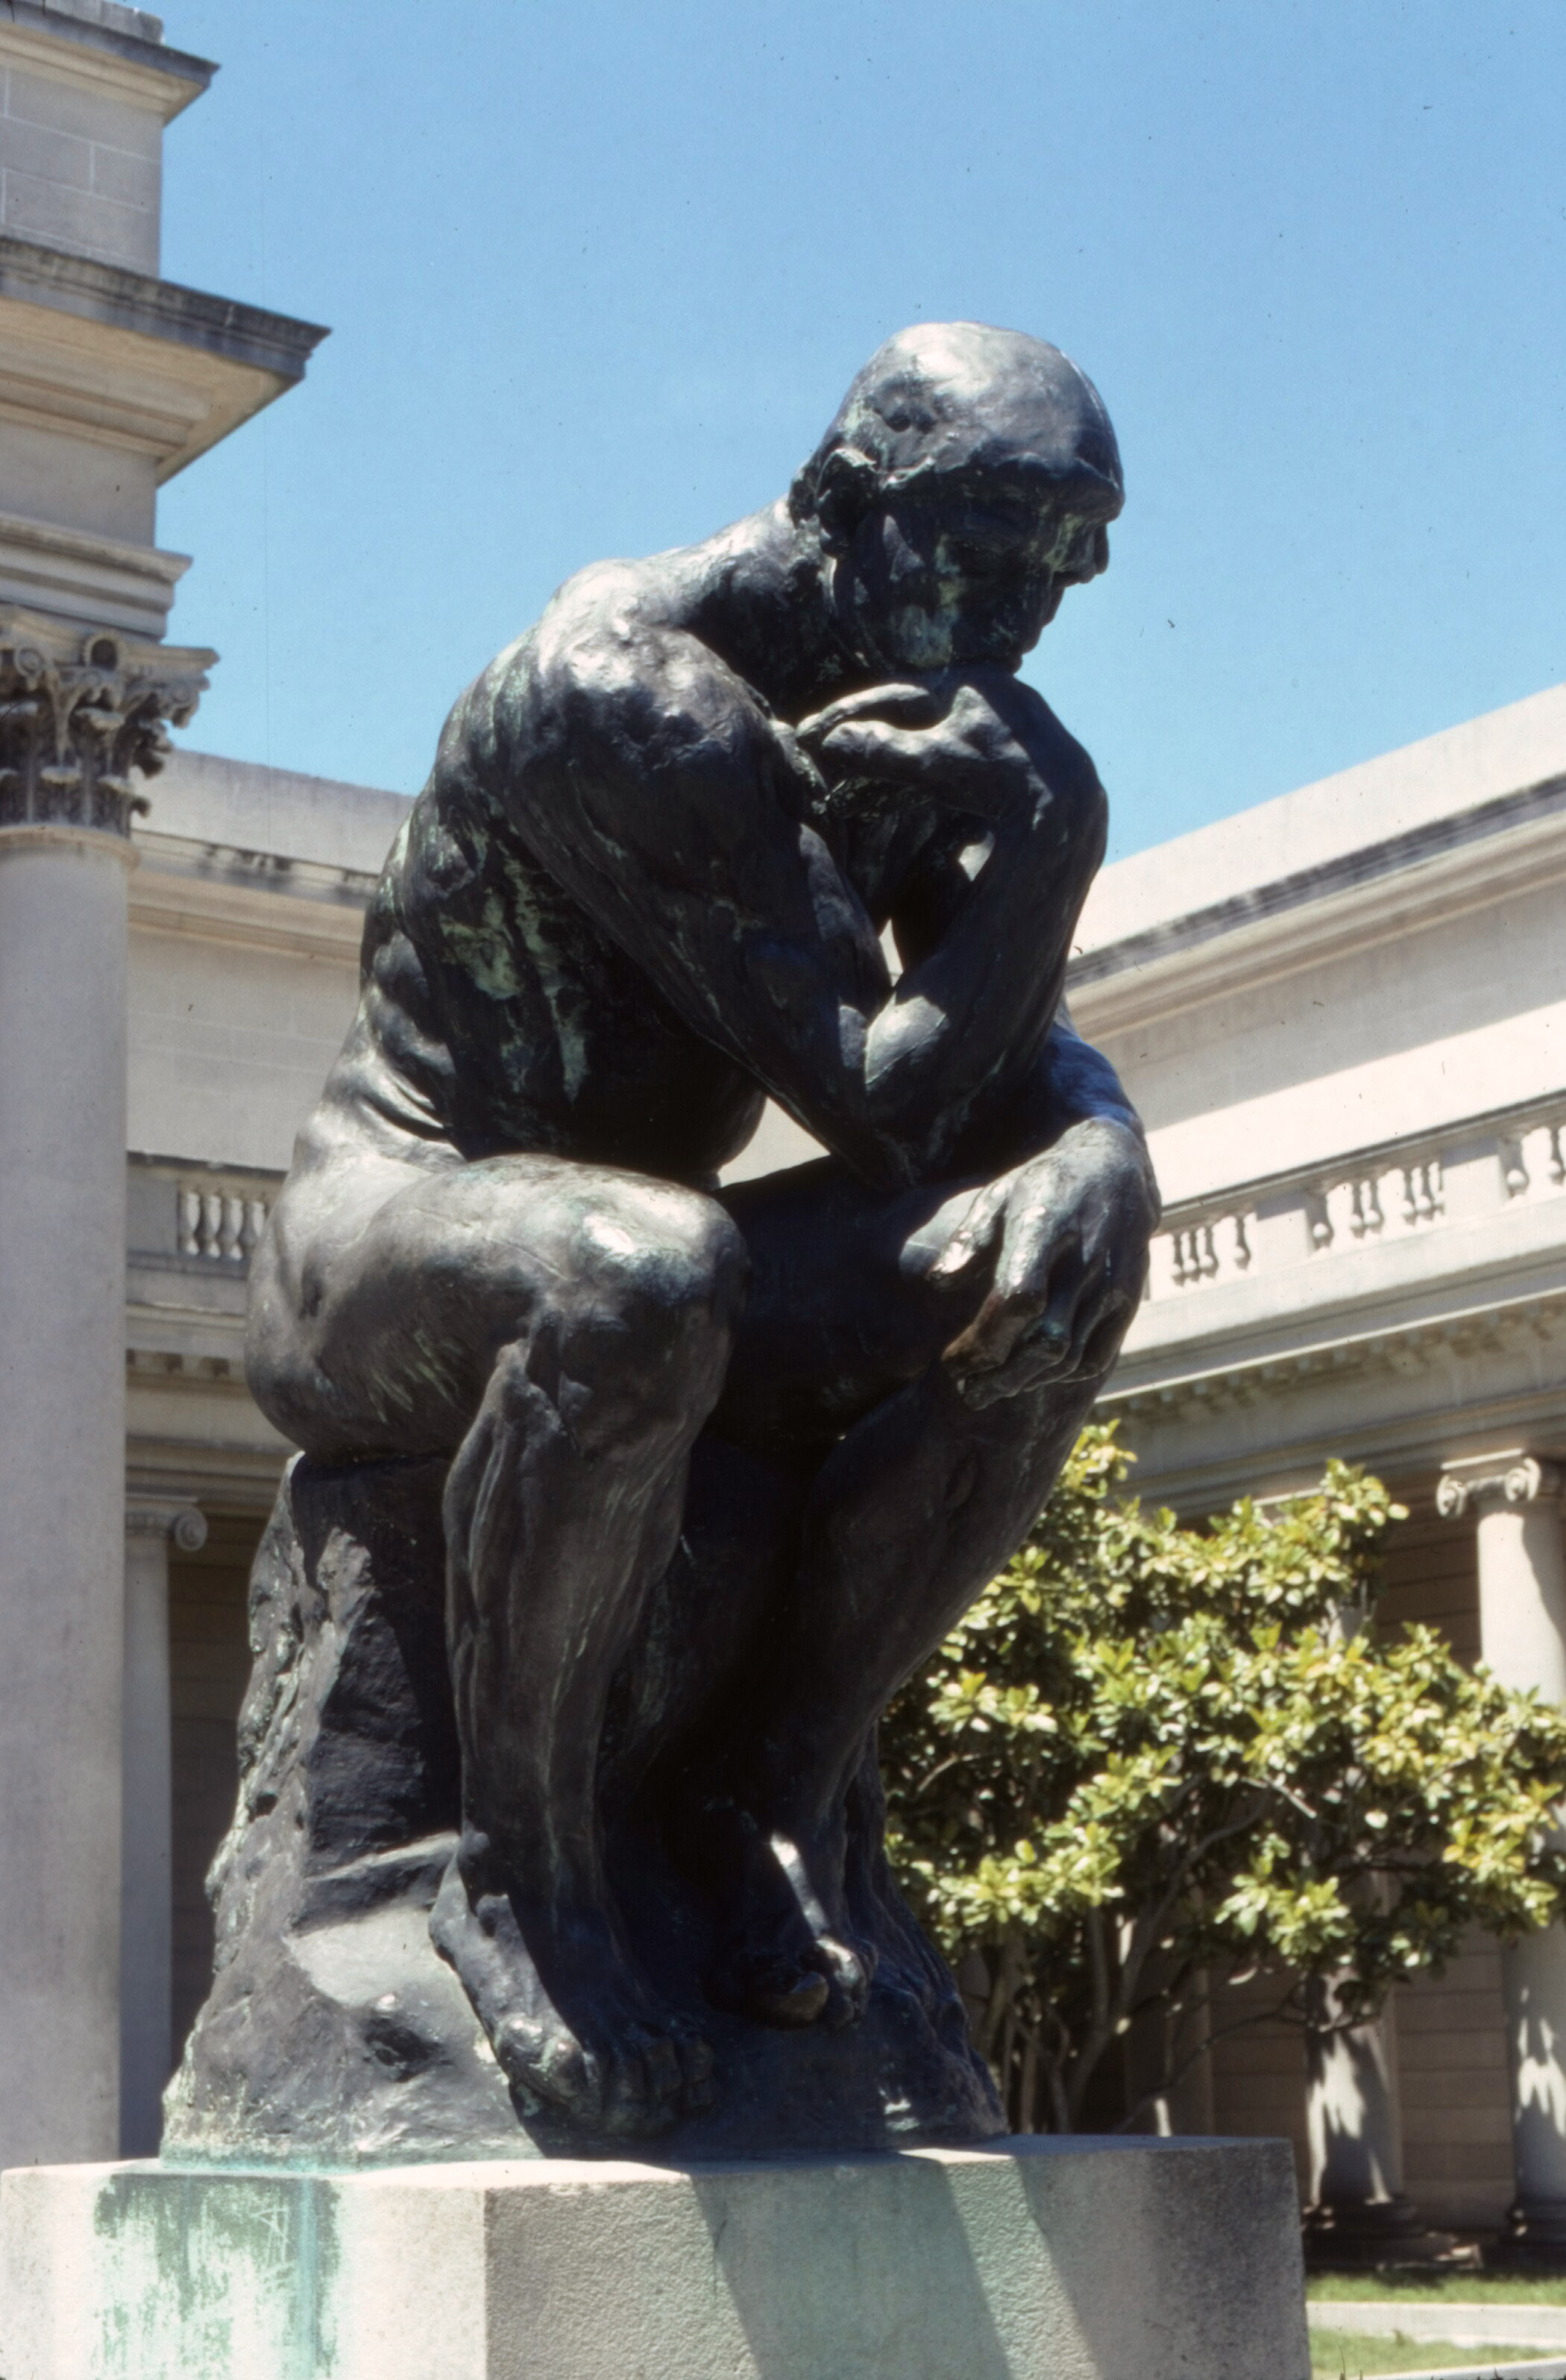
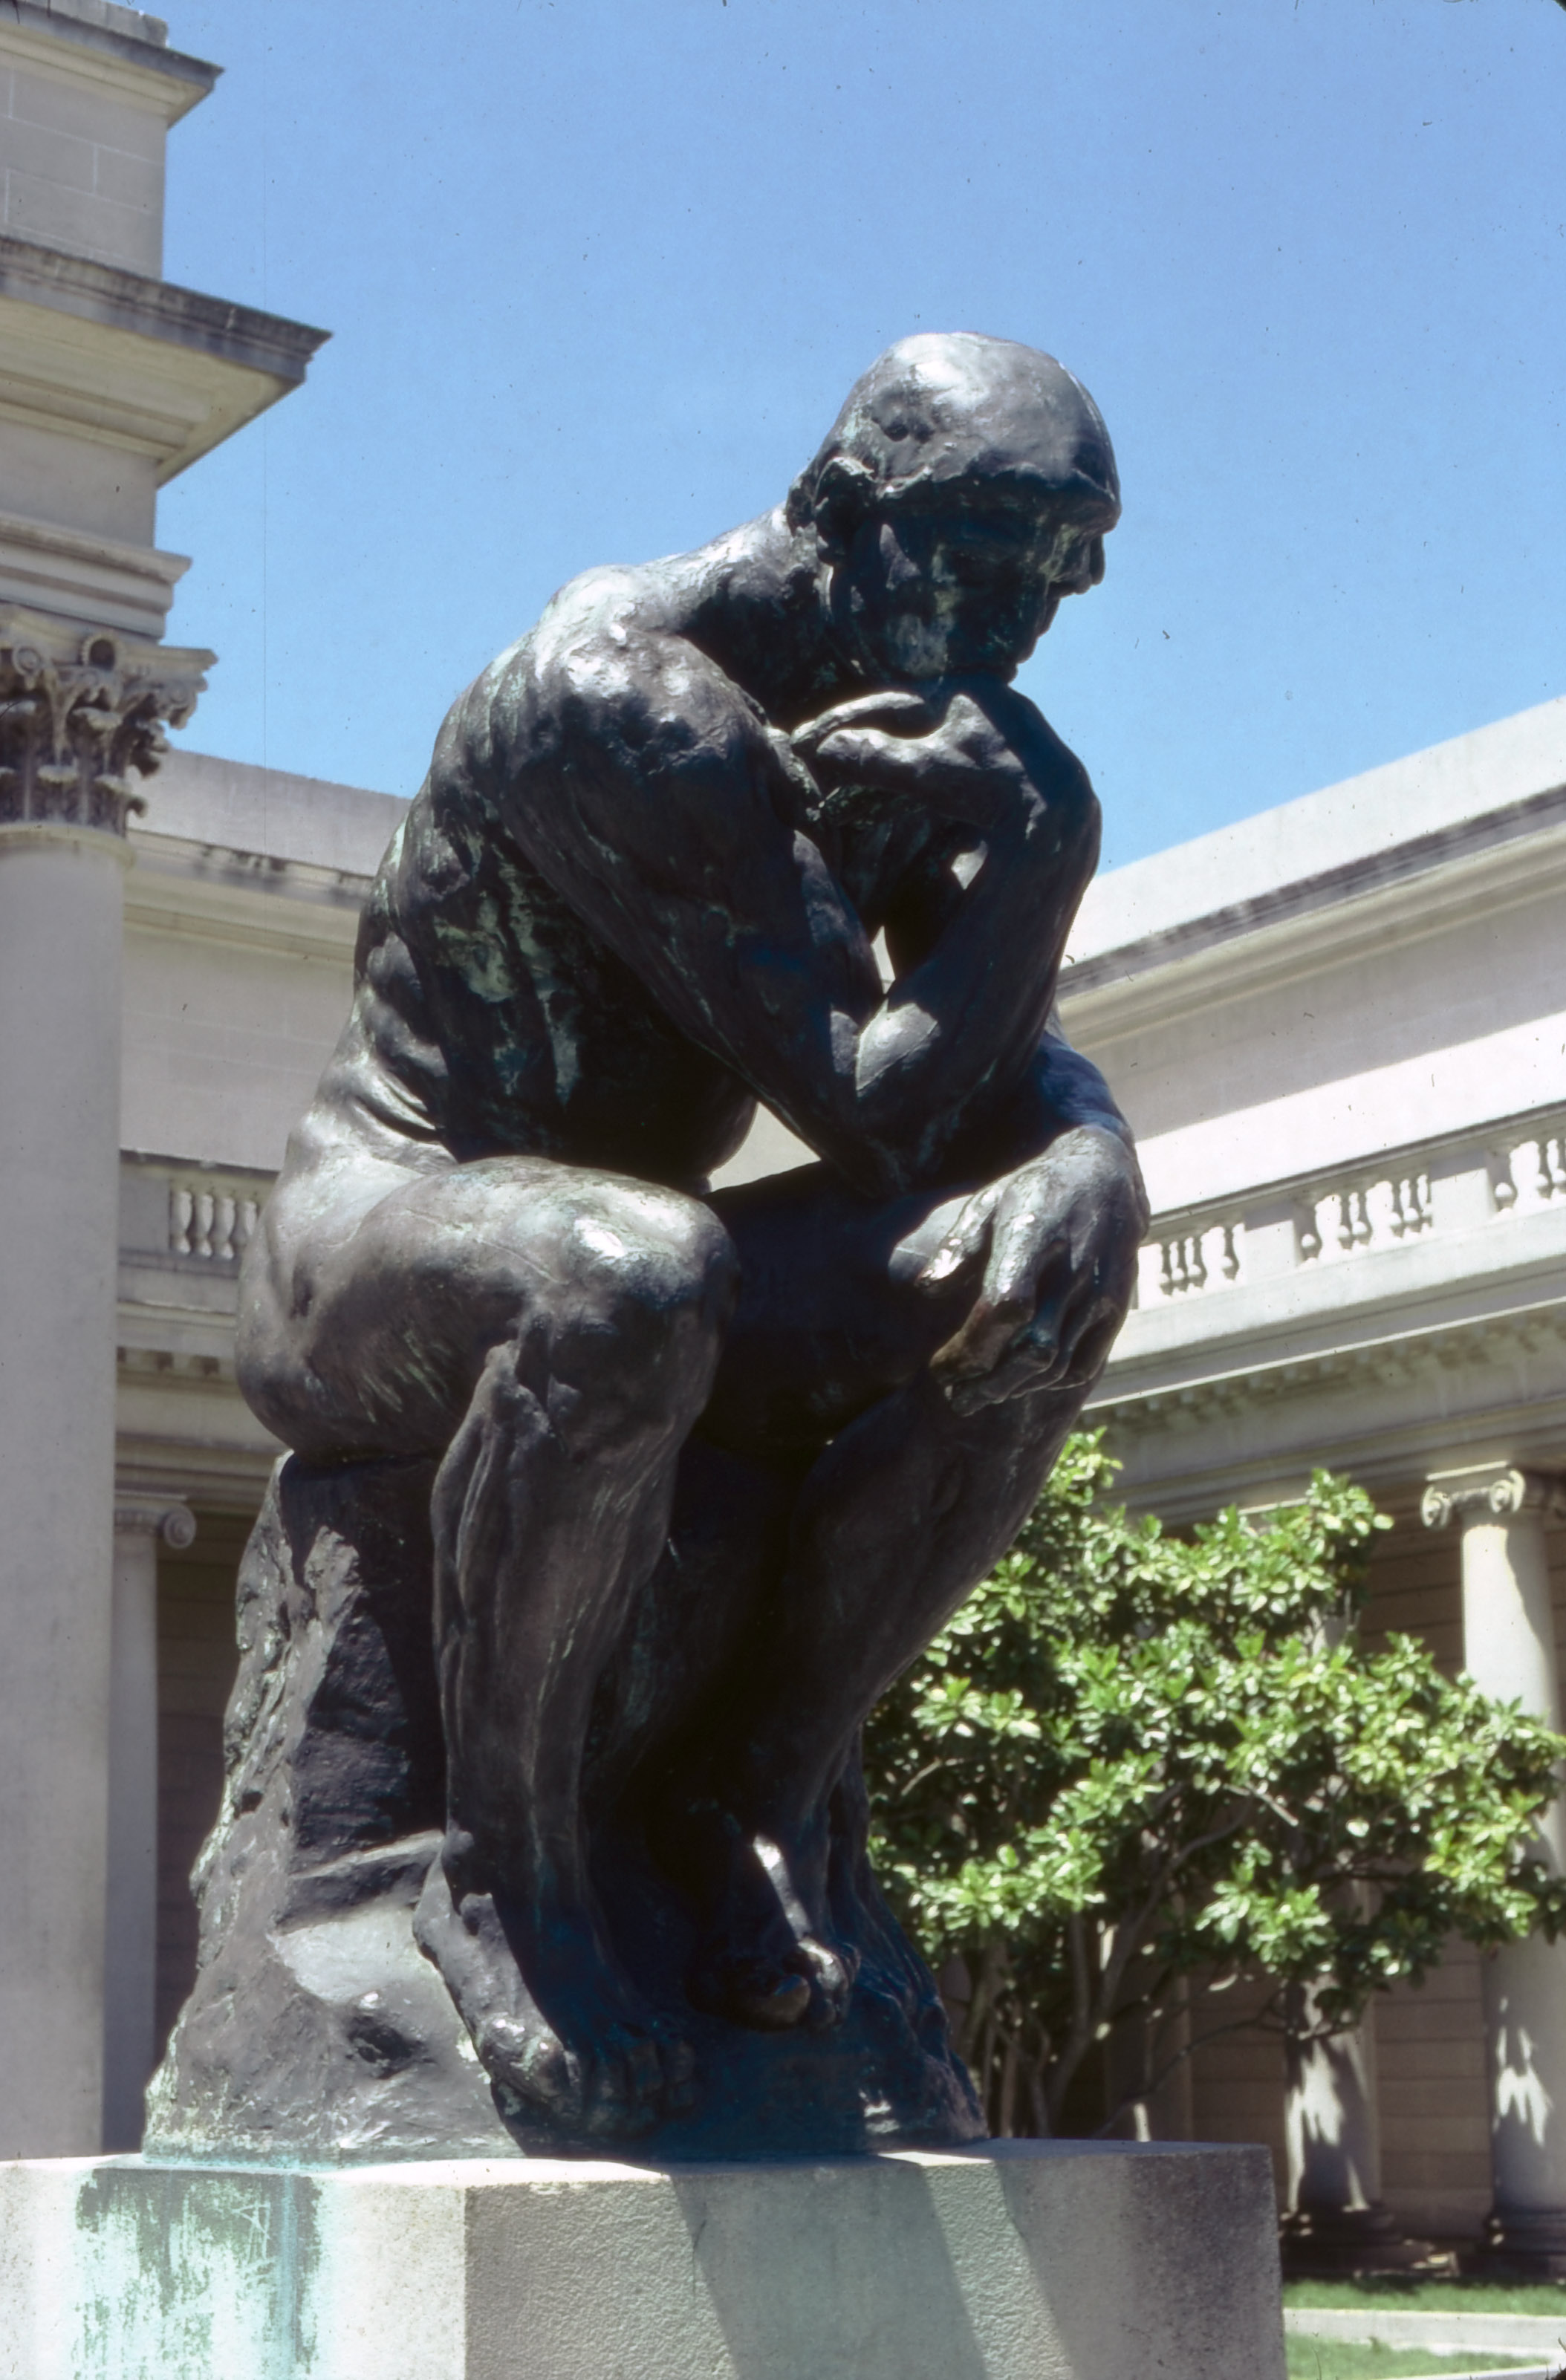
To shed some light on these questions we scanned a high contrast Ektachrome slide of Rodin’s Thinker at the Palace of the Legion of Honor in San Francisco using Canon’s ScanGear software, SilverFast and VueScan.
But we configured each application differently:
- ScanGear doesn’t offer a multiexposure option. We didn’t calibrate an IT8 target either, using Canon’s built-in profile instead (as we did for every other image scanned in this review). This would be our baseline.
- With SilverFast, we profiled the scanner using the program’s IT8 calibration feature and a SilverFast bar-coded IT8 target. It was quick and painless, as usual. We also enabled the multiexposure feature.
- For VueScan, we did not calibrate the scanner, but used the same built-in profile that ScanGear uses (we think). But we did enable multiexposure.
So ScanGear gave us our baseline image with no enhancements, VueScan showed what multiexposure alone could do and SilverFast showed the value of profiling the 9000F and using multiexposure.
We added three other steps, though:
- Because nothing’s perfect, we allowed ourselves the use of each program’s image editing tools to adjust contrast, saturation and color. We made very modest changes but we did make changes to all three images, just as we would for a real job.
- We tweaked each image in Photoshop using iCorrect EditLab. We wanted to see how much headroom each scan gave us to optimize the image. EditLab allows us to quickly optimize the image beyond what we see on the screen, compensating for any limitations of the screen display or our own vision.
- We used our usual unsharp masking settings for screen display on the edited images.
Both versions were saved for comparison. And here are the six thumbnails of the 2400-dpi scans (19.3-MB images, approximately):

ScanGear |

VueScan |
SilverFast |
ScanGear edited |
VueScan edited |
SilverFast edited |
What can we conclude?
Custom Profiling. We found that calibration using an IT8 target did not measurably improve the color capture. The best raw scan was achieved by VueScan with little color editing. The poorest was with ScanGear. Both of those programs used the scanner’s built-in profile.

Custom Profile. The Lab plot of our 9000F profile from SilverFast.
Because the CanoScan 9000F uses relatively consistent LED illumination, we suspect a generic profile can do very well. So this isn’t an argument against profiling. But you may be able to get by with the default profile on an LED scanner, something we can’t say of a cold-cathode fluorescent lamp.
Multiexposure. We were also surprised by how well ScanGear captured highlight and shadow detail in one pass compared to either of the multiexposure scans.
The darkest part of the image is the black between the legs of the statue. The highlight is the shiny left knee. All three scans maintained detail throughout. If you saw the original slide, that would surprise you. It’s a high-contrast shot of a dark bronze in bright sunlight.
All three programs were configured to scan 16 bit channels before recording 8-bit channels. We believe that’s ScanGear’s mode of operation anyway (from the option to enable 48/16 output in the preferences), but can’t be sure.
The LED illumination is brighter than fluorescents, it seems to us, making it easier to “see” shadow detail.
The good news here is that not using multiexposure means your scans take half as long. That’s another plus for the amateur with a lot of scans to do.
We also detected what seems to be a very slight misregistration in SilverFast’s multiexposure that softened the image. It’s detectable at 100 percent in the full resolution image.
What Matters? A profile of some sort matters most, the generic built-in one doing a very good job. Multiexposure can take that further, extending the density range the scanner can capture, but for this image it didn’t matter.
But the biggest factor seems to be the LED illumination. That seems to be a significant advance, making that built-in profile more useful than we suspected and helping to open up the shadow detail.
We have to hedge our bets here because we just don’t know what is essentially proprietary information. What we do know is the results each approach delivered. And we hope the comparison is useful.
