DIY Replacing Mirror in Old twin lens reflex cameras
 |
This time, replace the mirror surface (mirror surface reflection) is the name of the domestic machine Ricoh flex VII.
Twin-lens reflex, so it is most similar to the structure, time does not change the Minolta auto code in Rolleiflex. Mirror surfaces are then extracted in this way is usually degraded. Focus position is not changed even by changing the mirror surface of the structure because it is pressed against the stopper plate spring on the left. |
 |
To which the mirror surface is available, those sold for repair camera is generally very expensive.
Cut glass is in the hardware store. It is sufficient for the cheapest ones. |
 |
It is a simple glass cutting than I had expected. I think the bend while pulling on both sides put the scratches in the glass cut it hang. Can not peel off the protective sheet until the end of the blue.
Repair of dozens of twin-lens reflex is possible with a single mirror of ¥ 1,890. No doubt because it is so you do not put a face sheet of blue glass cutting shed. |
 |
You have put a protective sheet surface of the front side blue. I’ll leave this up to the mounting surface of the sheet, so very weak. |
 |
This is a Ricoh flex, it is exactly the same procedure in the Rolleiflex. |
 |
The mirror is fixed by simply pressing plate spring. Then, peel off the protective sheet of blue. |
 |
Shiny. Brightness of the finder was felt more than doubled to experience.
I want to try so very simple. Finder of the old twin-lens reflex is to regain the glow of the time. |
|
|
This flex Aires automat (with Nikkor).
Hood focus of many twin-lens reflex depart with four screws. |
 |
Severe degradation of the mirror surface. Is how the mounting plate is pressed against the stopper in the spring as well. Even if there is no movement of the focus to be replaced. |
 |
We cut a new surface mirror. Since the tip of the cut glass is not stable at normal scale, I will use one that does not slip if there is a certain thickness.
Cutting units of 100-yen shops, this is also useful as a mouse pad actually. |
 |
Here but have to peel off the sheet, those who do not have good peel.
So I tried to put Fresnel incidentally here buying. |
|
WARNING *** *** Let’s not act to earn margins, such as auction based on information that has been opened to the public on amateur camera repair workshop. |

The Copal MXV Shutter in a Yashica D TLR Camera – Ratfactor
The Copal MXV Shutter in a Yashica D TLR Camera – Ratfactor.
This is really a fantastic step-by-step instruction by Dav Gauer…
If you have problem with your Yashica D, maybe can have a try!
The Copal MXV Shutter in a Yashica D TLR Camera
A Step-by-Step Guide by Dave Gauer
My tale begins with an eBay auction. Some strange fascination with TLR (Twin Lens Reflex) cameras has brought me here. $32 later (plus shipping) and I’ve got my very own Yashica TLR. I discern that it is the D model from the manual shutter cocking, right-side focus and film advance, and other visual cues.
When I started to play with the critter, I realized that the shutter was not opening. Well, the eBay seller had made no promises to the contrary. It was time to crack the camera open. Join me as we enter a world of gears and springs where life is cheap and parts are small.
Putting the camera back together is pretty much just the reverse of the above. Here is a handy checklist to make sure you don’t miss anything:
- Put the flash sync spring back on the screw/post and replace the flash sync (if you took it off)
- Put the shim(s) or washer(s) in place where the speed regulator goes
- Put the speed regulator in and screw it down
- Put the self timer back in and secure it with the snap ring. My self timer was damaged, as I have mentioned. The shutter works fine without it, but at least the frame of the self timer is needed so that the speed cam detent spring can be placed on it.
- Put the shutter speed cam back on the shutter mechanism. Be sure that all of the pins (shown in the picture) clear the various holes and slots provided.
- Put the shutter speed cover on the cam so that the holes line up with various pins (on mine, the printed “B” aperture setting lined up with the post protruding out of the top of the speed cam.)
- Carefully screw down the cover ring. Be sure it is threading properly before applying any force.
- Turn the set screw to secure the cover ring
- Work the shutter to make sure all of the controls work properly
- Align the shutter release lever so that it fits into the slot in the mounting plate
- Underneath the shutter, arrange the stack of rings so that they align. On mine, I needed the ring containing the manual shutter reset lever to be in the right position and all of the rings needed to have a slot lined up with a hole in the mounting plate so that a post from the shutter went through them all and secured them
- Screw the lens barrel onto the back of the mounting plate, breath a sigh of relief
- If detached, re-connect the small spring that resets the shutter reset lever
- Line up the aperture and shutter speed levers with the controls inside the shutter cover and put the shutter cover back on. Make sure that rotating the aperture and speed wheels on the cover operate the shutter controls. Secure the cover with the five screws
- Screw the shutter lever knob back on counter-clockwise
- Re-attach the lens assembly to the body of the camera with four screws
- Put the top cover back on the lens assembly with four screws
- If desired, re-glue the leatherette. You’ll probably want to play with the camera for a while to make sure it works before you do this. I’ve still got my leatherette off and am debating whether or not to glue the old one back on. Update: I still haven’t. I think it looks fine without.
Good luck, and I hope the Copal Shutter in your Yashica camera is now fully functional!
Minolta Autocord CDS Restoration/ Repair
Below is a google translation of a japanese camera restoration website
Source: http://endoscopy.jp/moto/camera/camera_repair/minolta_cds/
I think Autocord CDS Model I released in 1965. The shutter is Citizen MVL, 1-1/500.

First machine with a built-in exposure meter Cds. In order to decompose the aperture began to wee on. |
|

Structure is almost the same as the old code auto. |
|

Must be removed so that it will screw (knob switching of flash and the flash bulb) parts of the arrow. |
|

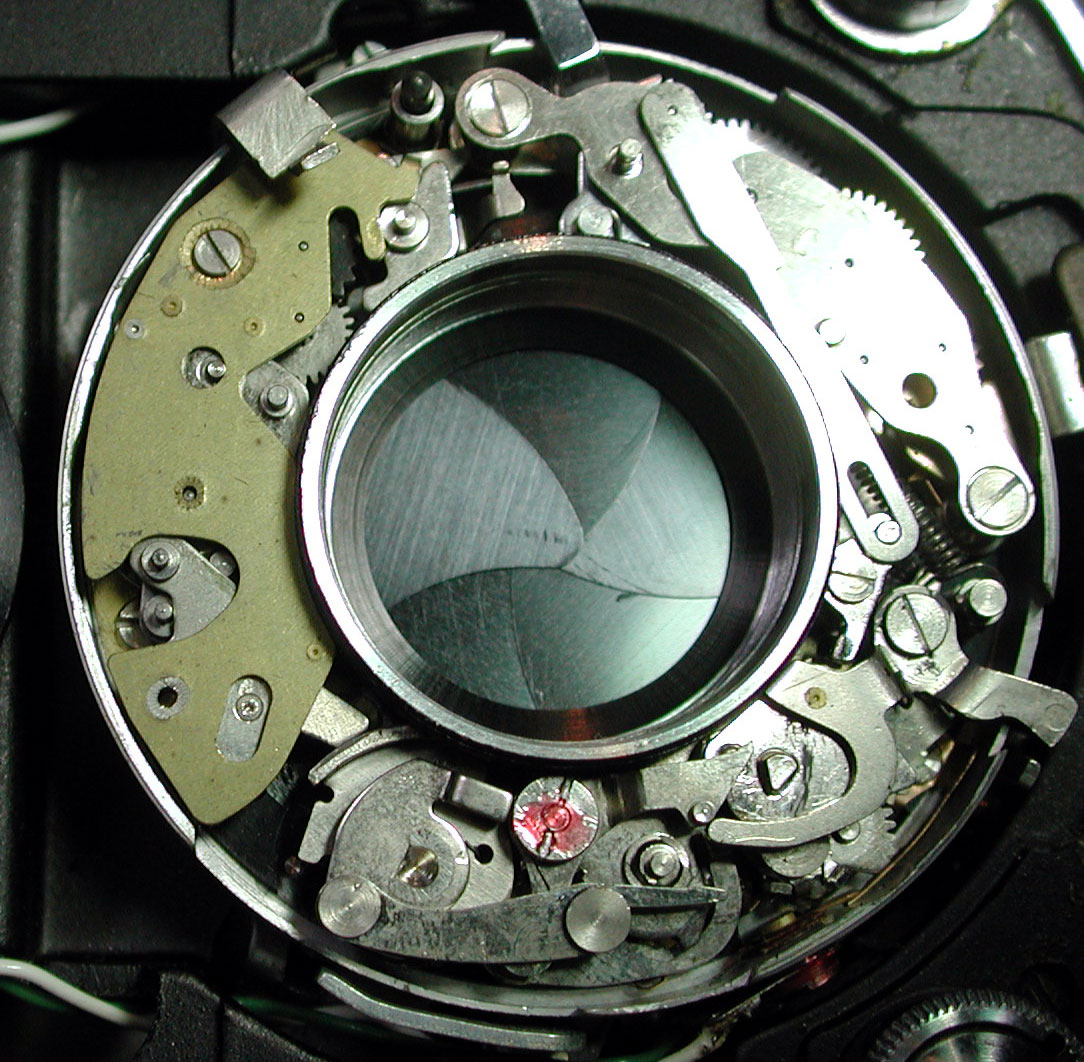
Citizen MVL shutter. Minolta A3 is the same as the shutter. Was a small amount of lubrication in particular there was no problem. Enlarged view of the shutter ishere . Aperture clung around oil. Close call in the state of the aperture pin would fly a little more. Back on safe ground and washed with benzene |
|

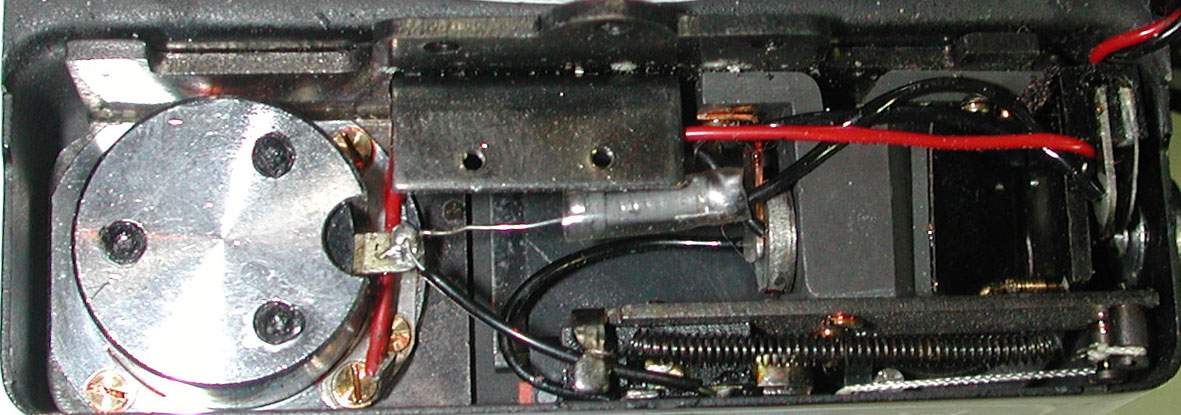
Remove the swing look funny because of the exposure meter. Aperture and shutter does not work at all in a very simple exposure meter. |
|

A simple exposure meter individual Cds, two pieces of resistance. Are waving at right angles to the optical axis on the mirror. Improved somewhat with the cleaning of the contacts. Cds is so deteriorated that much. At a later date, will be replaced with new. Enlargement is here |
