Big Set of Yashica 124G
Saw this big set of Yashica 124G on ebay… very complete system and truly speaking, I never saw such a complete set. The accessories are in very nice condition.
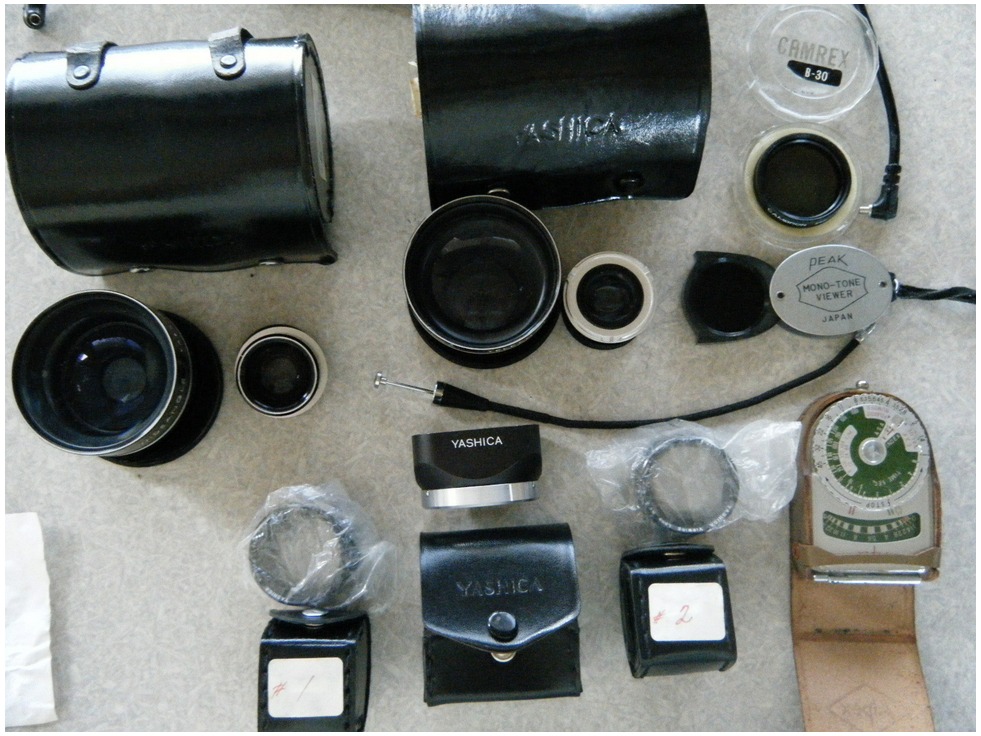

description by the ebay seller:
Where to start.This is the biggest complex set I’ve ever seen.If you want it all with one stop shopping, this is the set.
Camera is clean with all covers and buttons working,and there are many.
2 triggers for an option to use either to operate the unit.
Nistar Flash works and has 2 leads, 1 is coiled and flashed bright when triggered.Also has original direction book.Contacts are clean and non corroded.
There are viewing lenses 1 and 2 with their own leather cases and in plastic bags .
Yashinon Wide Angle set of 2 lenses in leather case.
Yashinon Telephoto set of 2 lenses in leather case.
Alpex light meter #44456 was registering light readings and has leather case.Flip up light meter door works great.
Camrex Cambron Polarizer Filter B-30 looks great.
Peak Mono Tone Viewer very nice medium dark brown lens.
Yashika Square attachment I think is for field reduction and light/glare reduction
Metal mount,not sure what it is called but attaches where tripod does and has a vertical fist type grip with safety strap,shown in mostly folded for storage.
There is the Yashica original complete instruction guide/manual.There are so many papers on what to set camera at for specific subjects,what films to use and where and why,what speeds to set for different shooting modes and actions,Helpful hints and tips,what lenses, filters to use where and when.All kinds of information and I didnt get all papers into the pics,there wasnt enough room.
There is a brand new battery that I removed from package to test unit and then put it back into package.
This huge set is 20 pieces counting the carrying case but NOT counting the lens covers and such.
DIY Replacing Mirror in Old twin lens reflex cameras
 |
This time, replace the mirror surface (mirror surface reflection) is the name of the domestic machine Ricoh flex VII.
Twin-lens reflex, so it is most similar to the structure, time does not change the Minolta auto code in Rolleiflex. Mirror surfaces are then extracted in this way is usually degraded. Focus position is not changed even by changing the mirror surface of the structure because it is pressed against the stopper plate spring on the left. |
 |
To which the mirror surface is available, those sold for repair camera is generally very expensive.
Cut glass is in the hardware store. It is sufficient for the cheapest ones. |
 |
It is a simple glass cutting than I had expected. I think the bend while pulling on both sides put the scratches in the glass cut it hang. Can not peel off the protective sheet until the end of the blue.
Repair of dozens of twin-lens reflex is possible with a single mirror of ¥ 1,890. No doubt because it is so you do not put a face sheet of blue glass cutting shed. |
 |
You have put a protective sheet surface of the front side blue. I’ll leave this up to the mounting surface of the sheet, so very weak. |
 |
This is a Ricoh flex, it is exactly the same procedure in the Rolleiflex. |
 |
The mirror is fixed by simply pressing plate spring. Then, peel off the protective sheet of blue. |
 |
Shiny. Brightness of the finder was felt more than doubled to experience.
I want to try so very simple. Finder of the old twin-lens reflex is to regain the glow of the time. |
|
|
This flex Aires automat (with Nikkor).
Hood focus of many twin-lens reflex depart with four screws. |
 |
Severe degradation of the mirror surface. Is how the mounting plate is pressed against the stopper in the spring as well. Even if there is no movement of the focus to be replaced. |
 |
We cut a new surface mirror. Since the tip of the cut glass is not stable at normal scale, I will use one that does not slip if there is a certain thickness.
Cutting units of 100-yen shops, this is also useful as a mouse pad actually. |
 |
Here but have to peel off the sheet, those who do not have good peel.
So I tried to put Fresnel incidentally here buying. |
|
WARNING *** *** Let’s not act to earn margins, such as auction based on information that has been opened to the public on amateur camera repair workshop. |

Contaflex TLR – A legendary

In 1935, Zeiss Ikon brought forth the most advanced – and one of the heaviest cameras – of the day: the Contaflex (860/24) twin-lens reflex that used 35mm film. Camera has been produced only to 1943. The camera boasted the first built-in selenium light meter. The Contaflex featured interchangeable lenses, a focal plane shutter and a van Albada sports viewfinder. The lenses were the same as those offered for the Contax II but in a Contaflex mount. This heavy camera was considered to be one of the greatest German engineer’s cameras ever built. Contaflex had the first built-in selenium light meter, the first chrome finish and the first interchangeable lenses on a TLR. The viewing screen accommodates views for a range of lenses with concentric frames for them plus a very useful pop-up magnifier. The focusing screen is 2x the size of a 35mm neg and gives parallax correction for the 50mm standard lenses. The viewing lens is an 80mm or 8cm f2.8, which showed the same angle of view as the 50mm or 5cm f1.5 lens, but on a larger viewing screen and with shallower depth of field. The camera had interchangeable lenses with framelines in the finder for them all (except the wide angles) which required an auxiliary finder. The shutter is similar to the that used in the prewar Contax cameras, a vertically traveling focal plane shutter made of metal slats. It is heavy, 1.5kg, about twice as much as the Contax I. The lenses are also larger and heavier than their Contax counterparts, and are difficult to mount. The view through the finder isn’t bright by today’s standards, although it’s not too bad when compared to some of the tiny viewfinders of the day. The magnifier is a necessity if you plan on focusing. Between the waist level viewing, with it’s reversed image, and the need for a magnifier, the only way you can photograph anything moving is with the Albanda finder. But in doing that, you’ve just turned your overly expensive and heavy camera into a viewfinder camera. And if you think photographing action is bad, try taking a picture in portrait format (as opposed to landscape). You must hold the camera on it’s side at eyelevel, parallel to the subject. Now, instead of everything being backwards, it is upside down! And the controls are in the most inconvenient places. This is a camera that sold in 1939 for $250 with the 50/2.8 Tessar, and $372 with the 1.5 Sonnar. With the 50/1.5, it was the tied for being the most expensive still camera in their catalog with the Contax III with it’s 50/1.5. A range of accessories were offered for it, which are rarely seen today. They included a special lens shade which clips to the body, a cut film adapter back, a microscope adapter and an special arm for the copy stand.
A Review from pacific rim camera

Contaflex TLR, shown with 50/1.5 Sonnar This is one of the most impressive cameras ever built. Introduced in 1935, it was the first camera to have a built in exposure meter, and the first available in chrome finish. This was the flagship camera of the Zeiss line at one of their proudest moments. The viewing lens is an 80/2.8, which showed the same angle of view as the 50mm normal, but on a larger viewing screen, and with shallower depth of field. The camera had interchangeable lenses, with framelines in the finder for them all, except the wide angles, which required an auxiliary finder. The shutter is similar to the shutter used in the prewar Contax cameras, a vertically traveling focal plane shutter made of metal slats.
This is a perfect example of how the German photo industry was often driven by engineers. They conceived the camera as a feat of engineering. Many of the solutions are ingenious, and the camera is truly a marvel to behold. But as a instrument for making photographs, it is miserable. It is heavy, weighing 3-1/4 lbs (1.5kg), about twice as much as the Contax I. The lenses are also larger and heavier than their Contax counterparts, and are difficult to mount.
The view through the finder isn’t bright by today’s standards, although it’s not too bad when compared to some of the tiny viewfinders of the day. The magnifier is a necessity if you plan on focusing. Between the waist level viewing, with it’s reversed image, and the need for a magnifier, the only way you can photograph anything moving is with the Albanda finder. But in doing that, you’ve just turned your overly expensive and heavy camera into a viewfinder camera. And if you think photographing action is bad, try taking a picture in portrait format (as opposed to landscape). You must hold the camera on it’s side at eyelevel, parallel to the subject. Now, instead of everything being backwards, it is upside down! And the controls are in the most inconvenient places.
This is a camera that sold in 1939 for $250 with the 50/2.8 Tessar, and $372 with the 1.5 Sonnar. With the 50/1.5, it was the tied for being the most expensive still camera in their catalog with the Contax III with it’s 50/1.5. A range of accessories were offered for it, which are rarely seen today. They included a special lens shade which clips to the body, a cut film adapter back, a microscope adapter and an special arm for the copy stand.
Contaflex TLR Lenses
35/4.5 Orthometer
35/2.8 Biogon
50/2.8 Tessar
50/2 Sonnar
50/1.5 Sonnar
85/4 Triotar
85/2 Sonnar
135/4 Sonnar

The frame lines in the finder.

A look at the lens mount. The notch connects the lens to the focus on the camera.

Four of the lenses, the 35/2.8 Biogon, the 85/2 Sonnar, the 50/1.5 Sonnar and the 50/2 Sonnar.

The 35/2.8 Biogon mounted on the camera.

The 85/2 Sonnar mounted.

The 135/4 Sonnar mounted.

The 135/4 Sonnar.

The eveready case for the Contaflex.

The front cap.

The cut film adapter back, with holder and ground glass focus screen.

The camera apart, in case you were thinking of taking one apart to see what is inside.

The camera apart, from the back showing the shutter. The curtain straps are broken on this camera
